|
|
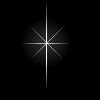
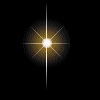
| This tutorial will teach you how to create the glowing stars as seen on the cover of this site. Here is an example of what the finished image will look like. |
 |
| It's
quite easy to do. In this tutorial, you will be using:
- the line tool, - the motion blur effect, - layers and - the airbrush tool |
| Step
1:
Create a new file by clicking the "file" menu and selecting the "new" option. Select "black" as your background with "16 million colours". Select "white" as your foreground colour. |
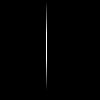
| Step
2:
Using the line tool with the "normal" line type and the width set to "1", draw a vertical line down the center of your image. |
 |
| Step
3:
Now go the "image" menu and select "blur". "Motion Blur" is the one you want so select it and put in these settings: - Pixels: 30 - Degree: 0° |
 |
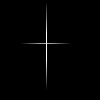
| Step
4:
Now create a new layer by clicking "layers - new". This time draw a horizontal line across your first line and use the same blur function on it with the degree set to 90°. |
 |
| Step
5:
Create another new layer. From the point of intersection, draw a short line at 45°. |
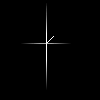 |
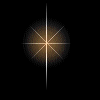
| Step
6:
Draw the other side of the line and use the "motion blur" again but this time with the degree set to 45°. Create a new layer and do the same thing for the other side. Use the "motion blur" at 315°. You should have an image like this. |
 |
| Step
7:
Select your airbrush tool and put in these settings into the control bar: - Paper Texture: None - Shape: Round - Opacity: 10 - Density: 100 - Size: 50 - Hardness: 0 - Step: 100 At the point of intersection, click the mouse button once to achieve the image below. |
 |
| Step
8:
Now change the following settings to: - Opacity: 30 - Size: 30 Click in exactly the same spot once or twice. |
 |
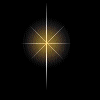
| Step
9:
Change the settings again to: - Opacity: 50 - Size: 10 Click on the centre about 5 times. This is the final image. |
|
|
|
|
| Alternatively, you could use colours with the airbrush tool to achieve different effects. Here is an example below. |
 |
| Step
1:
Complete steps 1 to 7 above. Use the airbrush tool with the following settings: - Opacity: 10 - Size: 40 Select orange and click on the centre twice. |
 |
| Step
2:
Now use these settings: - Opacity: 30 - Size: 30 Select yellow and click on the centre twice. |
 |
| Step
3:
Use the same settings as step 9 above and with white, click on the centre about 5 times to complete the image. |
|
|
| Experiment with colours to achieve all different kinds of glowing stars. |
|
|
| You could also repeat steps 1 to 3 above to achieve a star which refracts light, as seen on the cover page of this web site. |
| Step
1:
Start with a completed star and creat a new layer. On this layer, draw a line from the center in the direction you want the light to refract. Go back to the background by clicking "layers - background". |
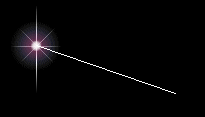 |
| Step
2:
Then use the technique above to create glowing circles along the line. Place the circles closer together if they are close to the star and use larger circles as you move away from the star. Finally, remove the line by selecting "layer 1" and clearing it. Make sure your background colour is black. |
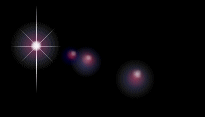 |
| Here is your finished image. Again, experiment with colours to achieve different results. |
