Percy's Scale Modeling Page |
 |
Percy's Scale Modeling Page |
|
Welcome to my scale modeling page. For the past 4 years I have rekindled a passion that I had long ago - building scale models.
I started back into the hobby four years ago collecting and building primarily aircraft, with an emphasis on helicopters. I have now expanded my collection dramatically to include a small Car collection and a growing Armour collection. I have become increasing fascinated with the struggle of Israel over the past 50 years and am collecting Aircraft and Armour models that reflect middle east conflicts.
I have a number of new walkarounds on ARC that you might be interested in. They are:
C-47 Dakota
CF-100 Canuk
CF-101 Voodoo
CF-104 Starfighter
BO-105 (Canadian Coast Guard Helicopter)
H-21 Piasecki "Flying Banana"
CH-124 Sea King
Special thanks to Don for the opportunity to photograph the Sea King is as much detail as I could. All other photos except the BO-105 are of aircraft at the Comox Air Force Musuem located in Comox British Columbia.
|
|
This was my first model in 15 years and was used to try techniques I had not done before. Techniques tried included sanding and filling seams, airbrushing, cleaning/polishing/futuring the canopy, scribing and decaling using setting solutions. Well, after much trial and error (more error I'm afraid), it turned out not too bad. :-) |
|
|
My all time favorite aircraft. This was a simple build compared to the Crusader I just finished building. I did this as a simple one color Marines scheme. On this model I tried dry brushing for the first time and was quite satisfied with the results. Hmm, still haven't tried applying a wash... Maybe the next model |
|
(a.k.a. Blackhawk) helicopter.
|
Nope, no wash yet...
On this model I attempted a 3 color camo scheme and it turned out much better than I expected. Here's the short of it: I enlarged the camo scheme from the instructions until they were the same scale as the model. I then airbrushed the base color of medium green and cut the masks from the camo enlargements. To achieve the slight "fuzzy" edge between colors, I used "blue tack" to raise the paper mask about a millimeter. The results are very satisfying. |
|
(Enola Gay)  (Click picture for more images. Warning! Lots of high resolution images) |
hehehe, it's done!
For this beast I applied washes and dry brushing throughout the interior and used SNJ for the aluminum finish. Click on the picture for more pictures and information. |
 |
I did this kit as a Canadian Military bird on skies. The metalic finish is household aluminum foil attached with Micro Foil Adhesive. The decals are out-of-the-box and are thick, but went on okay. I had to apply a semi-gloss coat over the decals to hid the carrier film. |
|
CH-113 Labrador   |
This little model is now finished in the scheme you see on the box
cover. It's built straight out of the box with the exception of a
scratch built search light and the undercarriage towel-rack antenna.
It make a nice addition to my desk at work... :-) I should add that this little gem won me a Bronze at the Rocky Mountain Modellers Show this last April. I was quite please to say the least. |
 |
Ahh, I finally finished the Harrier; oops, sorry, my wife's Harrier.
:-) I completed it in the two color wrap-around scheme and I'm fairly
happy with the results. I haven't included the fuel tanks or weaponry
yet since I'd like to purchase the Hasegawa weapons set.
I used the Eduard Photo Etch set and I'm really happy with the results. This was my first attempt at PE and I'm hooked. Great detail for a relativly minor effort. |

Testors/Italeri 1/48 AH-64D Apache Longbow  |
Whew, they're done. The 1/32 Revell kit is HUGE, with the total
length somewhere around 24". The 1/48 kit is of course smaller but
quite nice actually. I learned a great tip from a fellow modeller
in how to create a realistic "disco ball" (IR Suppressor). Email
me for details if you're interested.
I'm hoping to have some pictures avilable in the next while to show these off. :-) |
 |
Hasegawa 1/72 P-3C Orion/CP-140 Aurora | I had grand plans to have this model ready for our annual show the
end of September but we had guests come and ... yea, we had guests come.
So I started thinking that the Aurora looks best when it's in a steep bank 200' over the water so I'm planning on doing this gear up, flying over water. I'm trying my hand at a number of new things; motorizing the props, including pilot figures, mounting on an acrylic rod and making a base covered with "water". Should be fun! Let's hope I have it done in time for next year's show! :-) |

(if this is your photo, please let me know. I found this on the web and it's a great image) |
Italeri 1/48 UH-1N Twin Huey | I received one of these wonderful kits for Christmas along with the
Belcher
Bits Griffon conversion. When I opened the kit I noticed
that it has decals for the Canadian CH-135 Twin Huey in the Chrome Yellow
rescue scheme. I couldn't help myself; I had to buy another kit.
So now I'm building both versions side by side.
So far all I've done is airbrush the major interior components. Update (August 24): Well, the Eduard photo etch sets finally arrived but I have put this on hold while I finished the Apaches and now I'm considering building the CP-140 Aurora for our contest... |
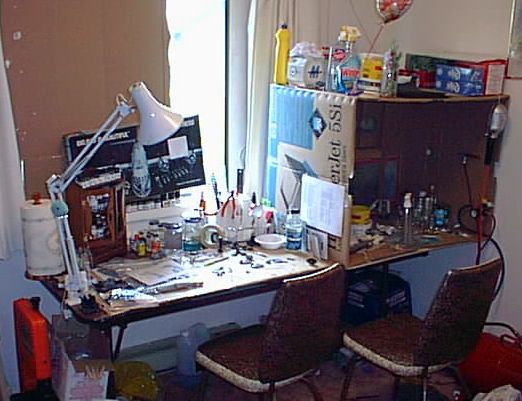
The whole messing affair |

Close-up of the major supplies |
| Paasche VL double action airbrush. Air source is a 9 gal Sears tank with a separate Cambell Hausfield compressor to fill the tank when needed. I also use a regulator/moisture trap combination to ensure a nice consistent airflow. The setup works quite well. |
| I've been using mostly Model Master Acryl paints with great
success. Typically I thin the paints 5% with windshield wiper fluid (cheap
by the 4 liter bottle) and spray at between 10 and 20 psi. I find
the paints are also pretty good for hand brushing. I have also used Tamiya
paints and the odd Model Master and Testors enamel for various
odd items.
A couple of points with the Model Master Acryls.
|
| Tenex 7R. Wow, this stuff is great. I use the Touch and Flow
needle applicator since using a paint brush seems to cause the glue to
dry before applying it. My local modeling shop (BC
Shaver and Hobbies) was finally able to Tenex 7R in so we're all happy
again. :-)
The secret to using Tenex 7R is to apply it sparingly to the joint. I used to hold the joint apart a 1/4 mm while applying the cement but recently I've been applying it with the joint closed. This seems to work a bit better, using less cement and creating a better bond. Here's another important point: once you have applied the cement, do not allow the joint to open. Any time that I have allowed the joint to open, I've had tiny air bubbles in the joint. These air bubbles are a major pain to fix since they are too small to be filled with putty. What I did the last time this happened was to gouge out a small line along the joint using my scribing tool and then filling the line with putty. |
| Future Floor Wax. What can I say about this stuff that
hasn't already been said. A modelers best friend. :-)
For those of you who don't about Future, it's simply a clear acrylic paint that can be brushed or airbrushed (directly out-of-the-bottle) to create a smooth, glossy surface. I also like using Future on my canopies to produce that beautiful glass shine that looks soo nice. For my canopies I usually sand them with 1000 grit or above sandpaper and then polish them with Novus Plastic Polish until the surface is reasonably smooth. I then wash the canopy with Sunlight to remove any of the oils left behind by the polish and once dry I drip in future. The results are simply amazing. For decaling I spray the painted and cleaned surface of the model with a couple of thin coats of future. Once dry I decal as usual (an entire different topic!) and then seal the decals with either future (for gloss) or a flat coat. For the flat coats I've been using the Model Master Acryl Clear Flat with excellent results. |
* I have no affiliation with any of the above companies,
I just use their stuff.
Well, that's it for now. Thanks for dropping by. Email me at percified@pacificcoast.net if you have any comments, questions, etc.

Cool 3D flag courtesy of ![]()
![]()


