Kings Quest III:
To Heir is Human
Walkthrough
Note: This walkthrough
gives a complete description of how to finish the game with the maximal
score possible. Still, there are more things do discover in the game than
you will get by following this walkthrough. The most interesting alternate
solutions to problems encountered in the game are therefore presented here
as well. Don't consult this walkthrough immediately when you get stuck
in the game. At least read my General Adventure
Gaming Tips first and try out some of the things suggested there. It's
never as rewarding to finish an adventure game if you've had to use a walkthrough
to do it!
Introduction
You begin in the
entrance hall of Manannan's house. Wait a few seconds and he will magically
appear and tell you to perform some chore. You'll better obey him, or there
will be trouble. There are five chores he may ask you of, and here's what
to do for each one of them:
-
Clean the kitchen:
Go one screen right and one screen up from the entrance hall. There's a
broom against the wall to the left of the fireplace. Walk up to it and
clean
kitchen.
-
Dust study:
Go one screen up from the entrance hall and at the bottom left of the screen
there is an oak cabinet with a duster on it. Walk up to the cabinet and
dust
study.
-
Empty chamber
pot: Walk up the stairs from the entrance hall and up into Manannan's
bedroom on the second floor. At the bottom left of his bed is his chamber
pot. Walk up to it and empty
chamber pot.
-
Feed chickens:
Walk down from the entrance hall to go outside. To the left of the chicken
coop is a bag of chicken feed. Walk up to it and feed
chickens.
-
Feed Manannan:
Go one screen right and one screen up from the entrance hall. In the kitchen
on the table to the right lies a loaf of bread, some fruit and a mutton
chop. get
any of them and bring them down to the dining room. Walk up to Mannanan
and give
any of the food items to him. If you already carry the food items with
you, just bring them to the dining room.
From time to time,
he will tell you to perform one of these tasks later on as well. When this
happens, perform them immediately to avoid getting punished.
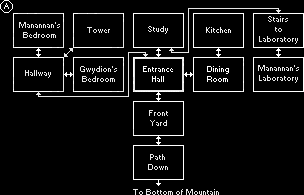
Map of Manannan's
House

Manannan's house
As long as Manannan
is home you cannot do much. He has forbidden you to enter his study or
bedroom except for when you're performing some chore there, so stay out
of them. Instead, walk to the right into his dining room. There is a tin
cup on the table there. Walk up to it and get
cup. Then walk
up to the wall, left of the fireplace. There's a knife and a serving spoon
hanging on a rack there. get
knife and get
spoon. Continue
left to the kitchen shelf. There's a clay bowl on it. get
bowl. You cannot
do much more than this while Manannan is still at home, so wait until five
minutes has passed. Manannan will magically appear and tell you that he's
decided to take a journey. As he disappears you are free to explore the
house.
First, walk
upstairs from the entrance hall and enter Manannan's bedroom. At the foot
of Manannan's bed is a mahogany vanity. Walk up to it and open
drawer. You will
get the hand mirror that was inside. Next, walk over to the closet to the
right. look
closet. Ah, there
is something on top of it! look
above closet.
You've found a small brass key. Next, open
closet look
behind clothes
to find an ancient parchment map. close
closet. Continue
to the dresser against the right wall and open
drawer. Inside
is a vial of rose petal essence that you eagerly take. If you now examine
your inventory you will find that the things you just got are all marked
with a star in the inventory list. This indicates that Manannan must not
find you carrying these items, for he will kill you instantly if he does.
You must find a good place to find them before he returns home. But there's
no hurry yet. Walk out of the bedroom and continue up the stairs to the
tower. There's not much to do up in the tower, but there's a dead fly on
the floor. Walk up to it and get
fly. Actually,
all you need is the fly wings, and that's what you'll get. Walk down the
stairs again and return to the entrance hall. Now, head for Manannan's
study. Walk up to the oak cabinet to the left and unlock
cabinet. It turns
out that the brass key you got from the bedroom fits perfectly, and inside
you'll find Manannan's magic wand. Now, walk over to the bookshelf to the
right. look
books. You will
discover a glint of metal behind them. push
book. A lever
is concealed behind it. pull
lever. As you
do, a secret trapdoor opens in the floor, revealing a staircase leading
down below the floor. Walk down the stairs. If Manannan's black cat is
sitting here, walk back up and down again until he's gone. If he's there
and you walk past him, you will slip on his tail and fall to your death.
Walk down the stairs and you arrive in Manannan's secret laboratory. This
is where he prepares all of his spells. It would be useful if you could
learn a few of these spells. Among the many strange items in the wizard's
shelves are many useful spell ingredients that will come in handy. get
powdered fish bone,
get
nightshade juice,
get
mandrake root powder,
get
saffron, get
toad spittle and
finally get
toadstool powder.
Now it's time for some magic! Walk up to the large book on the oak table
and turn
to page IV. Next,
do the following: First, put
a pinch of saffron in essence.
Next, recite the following verse:
Oh
winged spirits, set me free
Of
earthly bindings, just like thee.
In
this essence, behold the might
To
grant the precious gift of flight.
Next, wave
the magic wand.
Now you have a potion that can turn you into a fly or an eagle if you dip
some fly wings or an eagle feather into it.
(Note: The
page numbers and descriptions of how to prepare the magical spells in this
game are printed in the game manual and serves as a copy protection for
the game. However, as this game is so old and these instructions has been
reprinted in various King's Quest-related literature, they will be reprinted
here as well. This can hardly hurt sales of the game. In fact, as the game
isn't even sold anymore there should be no problem!)
More ingredients
are needed to make other spells, so it's time to leave the laboratory.
Return up the stairs, walk over to the bookshelf,
pull
lever and push
book. With everything
put back in its place, your visit downstairs should go unnoticed. But there
is still time for some exploration! Walk out of Manannan's house and head
for the path down. This path can be quite tricky, so save often and watch
your step! Once down you are free to walk around the Llewdor countryside
for a short while. Manannan will not return home before 30 minutes has
passed.
Map of Llewdor

Llewdor
First, walk one
screen to the right and one screen down. You will arrive in a quaint seaside
town with a store and a tavern. The store has many useful things for sale,
but without money you cannot get them. So head for the tavern and open
door. There should
be two men inside. They are bandits and quite dangerous. Still, they should
know where to find money more than anyone else. But they won't just tell
you even if you ask nicely. It's time for some magic! dip
fly wings into essence.
You will turn into a fly. Fly over to the bandits and wait for them to
speak. They will tell you something about a secret hideout in an oak tree
and a rope hidden inside it. Fly out of the tavern and continue two screens
to the left. This is the oak tree the bandits were talking about. If you
fly in front of the hole at the base of the tree you will enter it and
see the rope inside. Fly back out of the tree and recite the following
verse to turn back into your human form: Fly,
begone! Myself, return!
The ground below the tree is full of acorns. get
acorns. You're
looking for dried ones and they are hard to find. If you're not successful,
walk over to another spot and try again until you find some. Next walk
over to the hole and pull
rope. A rope ladder
will fall down. Walk up the ladder and up to the shack above. This is the
secret hiding place of the bandits. They won't like you to pay them a visit
though, so look
inside shack to
check if someone is at home. If you see somebody walking around inside,
return down the ladder and go up and look again. Repeat this until you
see somebody sleeping inside. Now walk into the shack. On the table lies
a coin purse. Walk over to the table and get
purse. This purse
contains 8 gold coins. Now quickly walk out of the shack and climb back
down the ladder to the ground.
(Note: As
the bandits hang out in these parts of the forest, you should watch out!
If they catch you they will rob you of all your possessions. If they do
this, you can retrieve the stuff by returning to their shack. Walk over
to the bin at the top right corner of the shack, open
bin, get
all and do
not forget to get the purse from the table again before you leave. But
you shouldn't have to do this if you stay near to a screen edge and run
away as soon as the bandits appear.)
Walk two screens
right, back to the town and up to the door of the store. open
door and walk
up to the counter. There are a number of useful items to buy here. buy
a pouch, buy
salt, buy
fish oil, buy
lard. Then walk
over to the dog on the floor and pet
dog to get a wad
of fur from him. Exit the store.
It should
be about time to return up the mountain. But you don't have to walk all
the way. look
map to discover
it's a magic map that has recorded all the places you've visited. There
is an arrow that you can move around to select a part of the map. Make
sure it points on the square with the mountain on it and press F6
to magically teleport there. You still have to walk up the mountain though.
When you're on the top, enter Manannan's house and walk into his study.
You must now put the magic wand back in the cabinet as it was before you
took it. Walk up to the cabinet and unlock
cabinet to put
the wand back inside. Now you have to get rid of all the other things you're
carrying. Walk upstairs and continue one screen to the right. This is your
bedroom, a place Manannan never visits and therefore the best possible
hiding place for everything you carry with you. Walk up to the bed and
hide
all under bed.
Return down to the entrance hall and wait for Manannan to arrive. He will
tell you that he's hungry, so you'll better feed him. Walk right into the
dining room where Manannan is waiting for his meal and continue into the
kitchen. Walk up to the table to the right. There's some food on it. get
food. Walk back
to the dining room beside Manannan and give
any of the food items to him. It doesn't matter if you select the bread,
fruit or mutton. Manannan will leave the table after finishing his meal,
and all you can do is hang around for five minutes. Eventually he will
tell you that he's going to take a nap in his bedroom. By now you may have
figured out that Manannan follows a very strict schedule. He's at home
for five minutes of game time, and then he will either take a journey or
go to sleep for 25 minutes. This is when you are free to explore his house
and the Llewdor countryside.
It's time
for your second journey! Walk up into your bedroom and get
all from under bed.
As you now have the magic map you don't have to walk all the way down the
mountain again. Just look
at map, move the
arrow over to the town and press F6
to go there directly! From the town, walk one screen down and up to the
left tree. It has some mistletoe growing on it. get
mistletoe. Walk
back up to the town and another screen up. There is a small stream here.
Walk up to the edge of it and get
mud. The spoon
you got from the kitchen is now filled with mud from the stream. Walk down
the stream into the ocean one screen to the right and get
ocean water. The
tin cup you were carrying is now filled with water from the ocean. Now
look
at map again and
use it to teleport to the oak tree where the bandits have their hideout.
From here, continue one screen to the left into the desert. When you enter
this screen, instantly turn so you're facing down. This must be done because
soon Medusa will appear, and if you look at her you will turn to stone.
As she approaches you, show
mirror to medusa.
This must be done when she's close to you but before she is able to touch
you. When she sees her own reflection in the mirror, she turns into stone
herself and is rendered harmless. There's a small cactus growing right
next to the stone to the left. Walk over to it and get
cactus. Now walk
two screen up. There's a dried snake skin lying on the ground here. Walk
up to it and get
snake skin. Next,
look
at magic map and
teleport to the screen below the mountain path screen. From there, walk
one screen down. This is the house of the Three Bears. Depending on chance,
the Three Bears are either at home or away. If you see Mama Bear in the
garden or no bear at all, return one screen up and re-enter. Do the same
if you see the Three Bears returning from a walk through the forest. But
if you see them leaving from a walk, you are safe to stay and enter their
house. Walk up to the door and open
door. Once inside,
walk over to the kitchen table where three bowls of porridge sits. Walk
over to the smallest one in the middle and get
porridge. Then
walk upstairs and up to the dresser to the right. open
drawer. Inside,
there's a silver thimble. get
thimble. close
drawer and walk
back out of the house. Standing in the garden get
dew. The thimble
is now filled with dew from the flowers in the garden. Now you have nearly
everything you need to prepare all the other spells in Manannan's book.
Walk two screens up to the place where the mountain path begins (and watch
out for the bandits on the way). Wait here for a few seconds until an eagle
appears. If it doesn't, walk one screen to the right and then return. The
eagle can appear in any of these two screens, and even on other places
in Llewdor. Expect a couple of attempts before it appears. When it does,
it sometimes drops a feather while flying by. If it doesn't, keep walking
back and forth between the screens until you're more successful. When the
feather has dropped to the ground, walk over to it and get
eagle feather.
Now continue one screen to the right and one screen up from the mountain
path screen. There is a cave entrance here, covered with a huge spider
web. Don't walk over to the web. Instead, dip
eagle feather in essence.
Now you have turned into an eagle. Fly over to the web, and you will automatically
grab the spider in your claws and fly it to the ocean where it is dropped.
When you have returned to the cave screen you will turn back into your
human form. Enter the cave. Inside is an oracle that tells you of a three-headed
dragon that invaded Daventry years ago and lets you know that you are the
brother of its next victim, Princess Rosella. Now you know your fate: To
travel to Daventry and save your sister! The oracle gives you an amber
stone. There is nothing more to do here, so exit the cave and walk back
one screen down and one screen left to the mountain path (or teleport using
the map if you prefer that). Walk up the path back to the top of the mountain.
At the gate to the chicken coop,
open
gate to enter.
Walk over to a chicken and get
chicken. get
chicken feather
and then open
gate again to
exit the chicken coop. Walk over to the door to the house and open
door. Now all
you need before going back to the laboratory is one final ingredient. Manannan's
black cat is roaming freely around the house. Find it by walking in and
out of the rooms until you see it. Walk over to the cat and get
cat. This may
take several attempts as it is quite hard to catch. Once you have it in
your grasp, get
cat hair. Now
enter Manannan's study. unlock
cabinet, push
book and pull
lever like before
and walk down into the laboratory. Remember to watch out for the cat on
the way! Once down, walk over to the book and turn
to page xxv. This
is the spell for transforming another into a cat. To prepare it, do the
following: put
the mandrake root powder in a bowl,
put
the cat hair in a bowl,
put
two spoons of fish oil in the bowl,
stir
the mixture with a spoon,
put
the dough on the table
and shape
the dough into a cookie.
Next, recite this verse:
Mandrake
root and hair of cat
Mix
oil of fish and give a pat
A
feline from the one who eats
This
appetizing magic treat.
Finally, wave
the magic wand.
Now you have a cookie that turns the one who eats it into a cat. This might
be your key to getting rid of Manannan! But he won't just let himself be
fooled by a cookie with cat hair sticking out of it, so put
cat cookie in porridge.
With the cookie crumbled up in the porridge, it is impossible to discover.
But time is short and Manannan will soon wake up. Therefore, walk back
upstairs, pull
lever and push
book like before,
walk over to the cabinet and unlock
cabinet to put
the magic wand back in place. Then walk upstairs into your room and hide
all under bed.
But as you need the porridge, get
porridge from under bed.
Walk back down to the entrance hall and wait for Mannanan to wake up. Once
again, he's hungry. Walk into the dining room, up to Manannan and give
porridge to manannan.
Without any suspicion he eats the whole bowl and suddenly turns into a
black cat. Congratulations! Manannan is no more and you are free to walk
wherever you want! Time to prepare the rest of the spells! Go up to your
room and get
all from under bed.
Then go down to the study, unlock
cabinet, push
book and pull
lever like before
and go down to the book in the laboratory. Once there, turn
to page II. This
is the spell for understanding the language if creatures. To prepare it,
do the following: put
the small feather in a bowl,
put
the dog fur in the bowl,
put
the reptile skin in the bowl,
add
a spoonful of powdered fish bone,
put
a thimbleful of dew in the bowl,
mix
with hands, separate
mixture into two pieces,
put
dough pieces into ears
and recite this verse:
Feather
of fowl and bone of fish,
Molded
together in this dish,
Give
me wisdom to understand
Creatures
of air, sea and land
Next, wave
the magic wand.
For the next spell, teleportation at random, turn
to page vii. For
this spell, grind
a spoon of salt in a mortar,
grind
the mistletoe in the mortar,
rub
the stone in the mixture,
kiss
the stone and
recite this verse:
With
this kiss, I thee impart,
Power
most dear to my heart.
Take
me now from this place hither,
To
another place far thither.
Next, wave
the magic wand.
The next spell is for causing a deep sleep. turn
to page xiv. Then
follow these directions: grind
the acorns in a mortar,
put
the acorn powder in a bowl,
put
the nightshade juice in the bowl,
stir
the mixture with a spoon,
light
a charcoal brazier,
heat
the mixture on the brazier,
spread
the mixture on a table
and recite this verse:
Acorn
powder ground so fine
Nightshade
juice, like bitter wine,
Silently
in darkness you creep
To
bring a soporific sleep
Next, wave
the magic wand.
Now a spell for brewing a storm. turn
to page lxxxiv.
Follow these directions: put
a cup of ocean water in a bowl,
light
a charcoal brazier,
heat
the bowl on the brazier,
put
a spoon of mud in the bowl,
add
a pinch of toadstool powder,
blow
into the hot brew
and recite this verse:
Elements
from the earth and sea,
Combine
to set the heavens free.
When
I stir this magic brew,
Great
god Thor, I call on you.
Next, wave
the magic wand
and pour
the storm brew into the jar.
Finally you should prepare a spell for becoming invisible. turn
to page clxix
and follow these directions: cut
the cactus with a knife,
squeeze
the cactus juice on spoon,
put
the cactus juice in a bowl,
put
the lard in the bowl,
add
two drops of toad spittle,
stir
the mixture with a spoon
and recite this verse:
Cactus
plant and horny toad
I
now start down a dangerous road
Combine
with fire and mist to make
Me
disappear without a trace.
Next, wave
the magic wand
and put
ointment in the empty lard jar.
Finally you
are done with the spells and can leave Manannan's house forever. look
at map. Teleport
to the town again. Walk over to the tavern and open
door. There are
some sailors here now. talk
to sailors. They
might offer you a ride if you have enough gold to pay for the trip. give
purse to sailors.
Fortunately they accept it and allow you to board their ship. Walk out
of the tavern and two screens right. Cross the gangplank onto the ship.
Oops! It turns out to be a pirate ship, and now you're their prisoner!
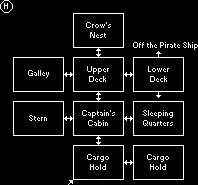
Map of Pirate
Ship

The Pirate Ship
Your first mission
on the pirate ship is to get out of the hold. Walk one screen to the right
and up to the small crate there. get
crate Now carry
the crate back to the left screen and walk with it to the left of the large
crate directly below the rope ladder. Standing directly beside the large
crate, drop
crate. Now jump
onto crate to
get onto the small crate. jump
onto crate again
to get onto the larger one. Walk directly under the ladder and jump
up to ladder.
When on the ladder, climb up and out of the cargo hold. At the next screen
you will see the captain's cabin to the left. If the captain is in it,
walk one screen to the right and return. Repeat this until the captain
is gone. Walk into his cabin and up to the chest at the foot of his bunk.
open
chest. look
inside chest.
Inside are all of your possessions that you eagerly take back. Now walk
back one screen to the right. At the base of the lifeboat here is a shovel.
Walk over to it and get
shovel. If either
some pirates or the captain himself appears as you do these things, quickly
walk away from them. If they catch you, they will throw you back into the
hold and you will have to get your possessions back again in the same way.
If you are captured multiple times you will have to walk the plank and
become shark food. Therefore, avoid getting caught! Once you have the shovel
and the rest of your possessions, climb back down into the hold, where
you are safe. Walk one screen to the right and check out if there are any
mice scurrying to and fro on the floor. If not, return back and re-enter
until there are. Eventually you will hear them talking about a buried treasure.
There is little more to do on the ship now. Just wait patiently until the
ship has sailed all the way over the ocean. You can see its progress on
the magic map. When you hear the lookout shouting "Land Ho!", walk back
to the part of the hold where you started and pour
sleep powder on floor.
Then recite: Slumber
henceforth! The
pirates has now fallen asleep and you are free to escape from the ship.
jump
onto crate, jump
onto crate and
jump
up to ladder like
before and climb all the way up to the upper deck, two screens above. Walk
off the ladder to the right and walk to the other ladder and climb down.
Continue off the screen to the right and walk up, off the deck of the ship.
You will fall into the water. Now swim off the screen to the right and
you'll see a beach. Swim towards the beach. A shark is hunting in this
area, so watch out! Swimming off a screen edge and then returning may save
you from it.
Map of Mountain
Path

Climbing the mountains
Once you're on
the beach, walk one screen to the right. There's a palm tree here. Walk
over to it and position yourself directly to the right of it. Walk exactly
five paces to the right of the palm tree, just like the mice described
it, and dig.
If you're at the right spot, you should find a treasure chest and take
it with you. If not, try digging again at a nearby spot until you find
it. Now walk one screen up and one screen to the right. A tricky mountain
path starts here. Follow it back to the screen to the left. A rock blocks
off the path here. Walk up to the rock and you'll automatically start climbing
it. Climb up, right and finally down off the rock and you should be standing
on the upper part of the path. Now walk back to the right screen and continue
up along the path. Follow the path over to the next screen. There is a
small waterfall here. Walk up to the waterfall and climb it. You will arrive
at the snowy summit of the mountain. The Abominable Snowman lives here.
dip
eagle feather in essence
and fly two screens to the right, passing his cave. On the screen to the
right of the cave screen you will return to your human form. Walk one screen
down. Congratulations, you've managed to pass the Abominable Snowman! But
there are more dangers ahead. At this cave maze, begin by climbing slightly
to the left and then down onto the path below. Walk into the upper left-hand
cave. After a few seconds you will come out of the upper right-hand cave.
Walk to the left edge of the narrow path here and up so you're climbing
the cliff again. Climb left and down, carefully passing the narrow cliff
part to the right of the center cave. Once you're down at the bottom middle
path, walk into the adjacent cave to arrive at the bottom left part of
the screen. Here, climb straight up and then to the right on to the path
at the center cave. Enter it and you'll arrive at the bottom right cave.
Phew! You've passed the cave maze and are free to continue off the screen
to the right. Follow the now descending mountain path for two screens.
You will slip down the final part of the path, arriving in a familiar-looking
place!
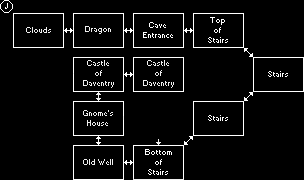
Map of Daventry

Return to Daventry
You've made it
to Daventry, but it's not the place it used to be. Walk one screen to the
left and you'll find the old well, filled with rocks. Walk one screen up
and you'll see a run-down shack with a withered gnome sitting on its porch.
talk
to gnome. He'll
tell you what's happened to Daventry and informs you that your real name
is Prince Alexander. Now you must go and save your sister from that three-headed
dragon! Return one screen down and one to the right, where you arrived
in Daventry. Enter the cave and walk up the ladders that King Graham once
climbed during his quest to find the Three Treasures of Daventry. At the
top of the ladders begins the Land of the Clouds. This is where the dragon
has its dwelling. You can't let him see you, so rub
invisibility ointment on body.
With the dragon unable to see you, walk one screen to the left. To kill
him, stir
storm brew with finger
and recite the following verse: Brew
of storms, Churn it up!
Lightning strikes the terrible dragon and he falls to the ground, dead!
Walk over to the girl tied to the pole and untie
girl. talk
to girl six times
for an interesting and sometimes amusing conversation. With Rosella free,
walk back to the cave entrance and down the stairs. Continue left to the
old well and then up to the gnome's house. Rosella will follow you automatically.
As the gnome runs ahead of you to announce your triumphant return, follow
him one screen up to the castle. Now sit back and enjoy the ending sequence!
Congratulations! You've finished King's Quest III: To Heir is Human!
Alternate solutions
You can use the
spells for other things besides the places where you must use them. For
instance, the sleeping spell can be used to put the bandit in the shack
to sleep if you want to. The teleportation spell can be used to escape
from many dangers, such as the bandits, the pirates or the Abominable Snowman.
Escaping the snowman through teleportation is an alternate method to transforming
into an eagle, and gives you just as many points if you succeeed.
The eagle
feather can be a bit tricky to obtain. If the eagle flies by and drops
one when you're just passing by, take your time to stop and fetch it. You
never know when your next chance will come!
It is possible
to do everything needed to Kill Manannan during the first time he's away,
but it requires speed and efficiency. You can also take your time and use
more than two journeys to collect everything. Just keep in mind that your
time as a slave boy for Manannan is running short. Soon, he will dispose
of you and find another young boy to raise as a slave.
You don't
have to leave the pirate ship by swimming ashore. You can also try to teleport
using the teleportation spell. You don't even have to put the pirates to
sleep if you don't want to, but expect a pirate to appear on the beach
if you don't. And of course, digging for the treasure is purely optional.
Back
to King's Quest III: To Heir is Human - Main Page
Back
to The King's Quest games - Main page
Back
to The King's Quest Chronicles - Main page
