WIRE YOUR OWN HOVER-COMS!!
(And under $100 does it all!)
Thanks to Martin Glynn, Mike McCullough and Ray Matthews for helping me get this information up and running!
The original idea came from Martin Glynn in Louisiana......
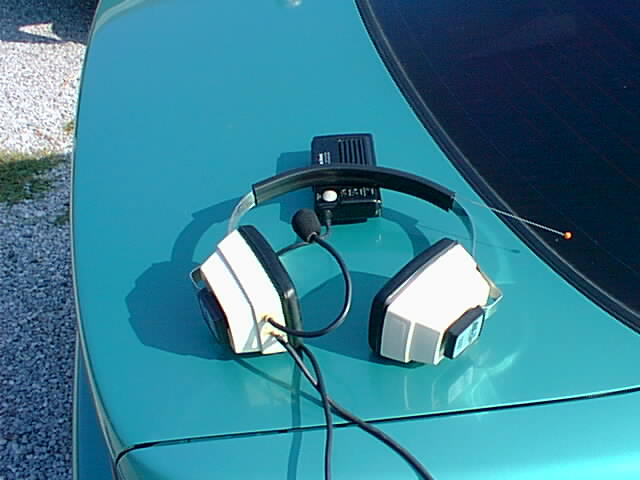
The headsets are "Smith & Wesson" and were less than $10.00 each. The radio is from Radio Shack. Interesting, when I went to get them, the salesman tried to sell me the newest model, however, because of the design of the earpiece, I knew I would have a problem getting them into the muffs. I asked if the older model had been discontinued, and he said no. He said he had several sets in the back.....and they were on sale. The earpiece can be installed in either the right or left ear in the headset. If you want the left or right ear, just turn the headset around. I prefer the speaker on the left and the beltclip on the left, with this, my right hand is free to operate the thrust lever. Total cost of materials was under $100.
The antennas were routed through the top of the assembly so you wouldn't look like an alien. If it were allowed to stand straight up, the range would probably be more. The original idea was to communicate with a passenger, which it does well. Just remember, try to keep the units out of water.....they're not waterproof. In the winter, you could put the beltclip unit in your coat pocket and reach in to hit the transmit button. The unit is so simple, it is easy to find the transmit button without looking. Actually, it was easier to configure in the Smith & Wesson than in my off brand. About 1 hour of labor, however, takes several days to seal the holes with silicone.
NOW HERE'S A STEP BY STEP FOR YOU...by Ray Matthews.
Cruising & Communicating!
Wouldn't it be great if you could easily talk to your passenger while you were out cruising? Or better yet, how would you like to be able to talk to people in other crafts, even if they may not be in sight? Well thanks to some creative thinking from Martin A. Glynn, you can! Unfortunately, Martin didn't give us all of the details of his new invention up front. But after a little coaxing (or maybe begging?) from a few present and future Starcruiser owners, he finally gave out just enough of his secrets to make me dangerous. But seriously, Martin devised a way to combine two readily available and inexpensive products into what may be the ultimate communications system for hover lovers. And making the modifications really aren't very difficult at all, and will only probably take you an hour or so per headset. To help make the job a little easier, I have included detailed photos and instructions for the units that I built below. (Martin, did I even get close to what you were describing?)
 |
1. First step it to go out and buy the two main ingredients. The walkie talkies are sold by Radio Shack, and are their model TRC-506 (stock #21-406). They list for $69.99 per pair. The hearing protectors are made by Smith & Wesson. They are called the 'Suppressor Ear Muffs', and are available in the sporting goods department of your local Big-K (K-mart) store for about $9.99 each. I'm sure that other ear muffs would work as well, as long as there was enough room for the headset speaker unit. |
 |
2. First step to preparing the headset is to remove the padded ear cushion from one side. Then you should also reach in and pull out the foam rubber insert. They both just pull off easily, leaving you with an empty plastic shell. |
 |
3. Now drill a hole in the top of the earpiece to allow the antenna to stick out. I used a 7/32 inch hole, and drilled it off center so that the antenna would not be blocked by the headband. Also, be sure you drill far enough from the 'head edge' to allow room for the ear cushion to be replaced. |
 |
4. At the other end of the earpiece, I drilled a 15/64 inch hole that will be the start of the outlet for the cable and the microphone boom. This hole is centered in the cup from front to back, and just below the S&W logo. |
 |
5. Now using a Dremel tool or a RotoZip or whatever else you may have available, create a notch that runs from this new hole all the way to the inside of the earpiece. This notch does not have to be perfectly straight and clean, since almost all of it will be covered by the cushion. (In fact, you will notice that I slipped with the Dremel and chewed up the front a bit. It won't matter.) Just make sure that this notch will be wide enough to allow the cable and mic boom to slide through, yet it should hold them fairly snugly. |
 |
6. Take the foam insert that was removed earlier. Using a scissors, make a notch on the top and another on the bottom that will roughly match the locations of the cable and antenna holes you just made. Also, cut out a small rectangle slightly above the center of the foam. This will allow access for the headset speaker unit to rest in the earpiece. The exact locations and dimensions of these cuts is not critical at all. Anything close will be fine. |
 |
7. Place the foam back into the earpiece. |
 |
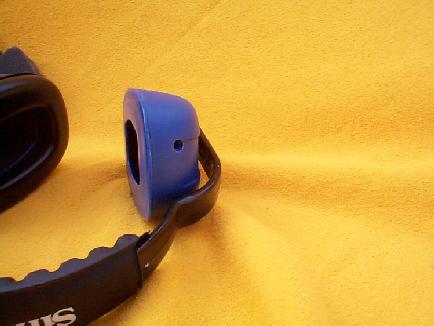
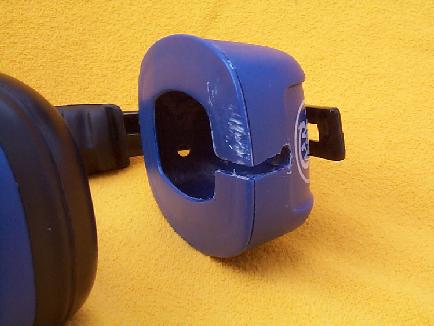
8. Now it's time to modify the walkie talkie unit. First, pull off the foam ear cushion from the speaker. Also, remove the antenna from the clips on the headband, so that it sticks straight out. |
 |
9. Hold the headband and the speaker, and turn the headband firmly about 90 degrees. When you give these two pieces a slight twist, they will easily come apart. (This is probably something that would really upset the typical owner of these radios, but it works really great for us!) |
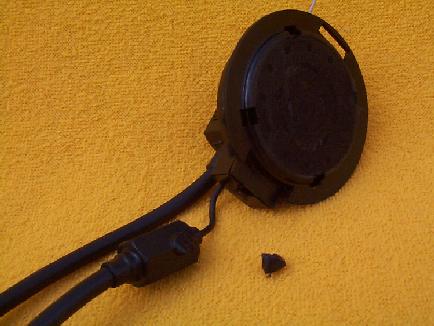 |
10. Now take a pair of diagonal wire cutters, and cut the plastic rod that is holding the microphone boom to the bottom of the speaker. I cut it at both the boom and the speaker, to remove as much of this rod as possible. |
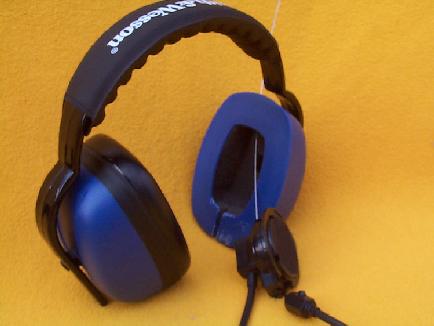 |
11. Time to start assembling things! First, stick the antenna through the hole you made in the top of the ear cup. It should slide easily through the cut you made in the foam |
 |
12. Stick the cable into the lower slot first, and slide it all the way down to the lower hole. Then stick the mic boom into the same slot on top of the first cable, and slide it in as far as you can. Now you can start to insert the speaker into the earpiece, one side at a time. |
 |
13. Once all is done, you should have all the cables resting nicely in the bottom of the slot, and the rear of the speaker should be resting inside the cut you made in the foam earlier. You should also position the mic boom so that it is fairly close to its final destination. (It can still be bent more later if needed, though.) Also, pull on the mic boom to remove any slack that may be left inside the earpiece. |
 |
14. Remember the foam ear cushion that you took off of the speaker earlier? Well, now just shove it onto the area below the speaker unit, to conceal and protect the wiring and to fill the void. |
 |
15. If you want to get the greatest possible range from the radios, you would probably want to just leave the antenna extended. |
 |
16. But if you would rather not look like an alien, then you can work the antenna through the padded headband until it sticks out the other side. |
 |
17. There was still too much antenna wire sticking out the other side of the headband. (You could poke an eye out with that thing!) So I just looped it around again and stuck the tip back into the headband the opposite direction, leaving just a small loop of wire exposed outside. |
 |
18. Now take some clear silicone sealant (yes, this stuff will dry clear), and seal up all of the holes and groves that you made. Be sure that the sealant is flat in the groove, so that it will not prevent the ear cushion from being reattached. Also, I placed a few dabs of the sealant in the areas where the speaker touch the earpiece, just to keep things in place. |
 |
19. After the silicone cures, just reattach the padded ear cushion! |
 |
20. Martin said that he places the unit on his left side so that he can operate the 'push to talk' button easily with his left hand, while still keeping his right hand on his Starcruiser throttle. But since you brought the mic boom out of the center of the ear cup, it could also be easily used on the right side of the head if preferred. |
Written by Ray Matthews, H-5626. Meet Ray, his wife Terri and The Prowler!