Coupla' tips on dealing with an old saw…
- When doing the initial jointing, check the shape of the blade; it may be concave, or you may want a "breasted" saw. Realising your saw is the wrong shape after you've done a lovely sharpening job is extremely irritating.
- The best ever time to clean, derust and polish the saw is just after you've done the first (probably major) jointing. The teeth will be stubby and blunt, and less likely to interfere.
- When tightening saw nuts to fix up a loose handle, use clamps or a vise to close the handle together, and just use the nuts to hold it together. Asking old and/or brass saw nuts to generate the closing force may be an "ask" too far.
Full Instructional Texts
- Pete Taran
- Bob Brode (wayback machine)
- Leif Hanson
- Bob Smalser
- Friedrich Kollenrott, in German, but wonderful
Old Instructional Books
Some Saw Sharpening files in the UK
One of the pre-requisites for sharpening saws is files. I recently purchased every file labelled as slim or extra slim from Axminster Power Tools. These are marketed as Swiss made, but the brand is actually Vallorbe.The file widths (i.e the side of the triangle) are as follows:
| 4" | 5" | 6" | |
|---|---|---|---|
| slim | 5.6mm | 6.4mm | 8.1mm |
| extra slim | 4.5mm | 5.6mm | 6.6mm |
| 4.5mm | 5.6mm | 6.4mm | 8.1mm |
|---|---|---|---|
| 13 TPI | 10 TPI | 9 TPI | 7 TPI |
I'm afraid those gullets look a little generous to my eye.

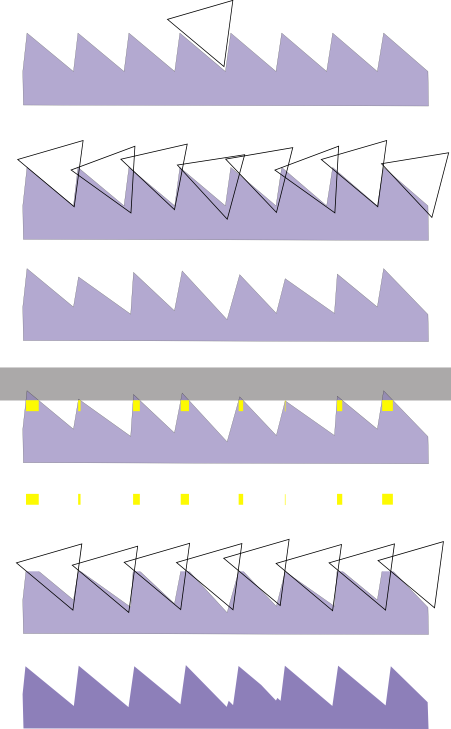
Illustration of some of the issues to be faced during teeth reshaping
The oft-quoted advice when saw sharpening is to joint the teeth, and then file away half of each shiner (flat top) on each pass; this is perfectly valid for sharpening, but more judgement is required when reshaping - unless you're going to remove the teeth more or less completely and retooth.- perfectly filed teeth
- a few rounds of bad sharpening
- the consequent shape
- jointing - with "shiners" indicated
- what you'll see looking down
- the best possible job (easy on a computer!)
- the (imperfect) result
Controlling Fleam
Whilst aligning a file against a single bevel gauge on the bench top is OK, I find referencing the file against multiple lines easier - if the file is not in alignment, it's quite glaring. I simple place a suitable piece of paper against on the bench top, flush against the vise jaw. For the common good I present a number of ready-to-print reference images, at various "likely" angles, as a tiny (5K) PDF file and the postscript file that generated it.
(See also controlling rake)
Filing new teeth
In the age of the high resolution printer, marking out teeth by hand is crazy. Simply print the tooth pattern you want, and glue it on the saw.
For the common good, I have generated uniform teeth templates 12" long, from 6 to 20 TPI, ready for use. Here's the PDF file. The chosen page is printed out, folded at the apex of the twin tooth sets, and glued to the saw plate, leaving teeth marked on both faces of the plate.
The postscript program can also make incremental tooth patterns; the instructions for doing this are in the Postscript file. It needs to be put through a PostScript interpreter, invoked as
ps2pdf "-sPAPERSIZE=a4" saw_teeth.ps
Cleaning near the teeth
When cleaning a saw blade, there is a clear difficulty near the teeth. If you have not had to do a major jointing (rendering the teeth pretty harmless) the cleaning medium (probably wire wool or wet 'n' dry paper) will tend to snag on the teeth, which is most inconvenient, to say the least. If using wet 'n' dry you may also damage the teeth; in short the teeth and the abrasive need to be kept from one another.This can be easily done by making a "tooth guard". This is one of the best devices I know in terms of functional return versus difficulty of manufacture. It is no more than a piece of scrap wood, say 1/2" x 1" cross section, and 6" long. The key part is a tiny rebate, of around 1/8". The guard is simple pressed again the teeth, which are thus unable to interfere with the cleaning - indeed, the guard also acts as a fence, making using the abrasive so very near the edge of the saw a trivial matter.