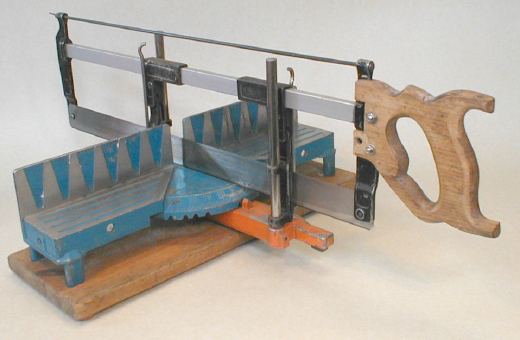
Marking Dovetails
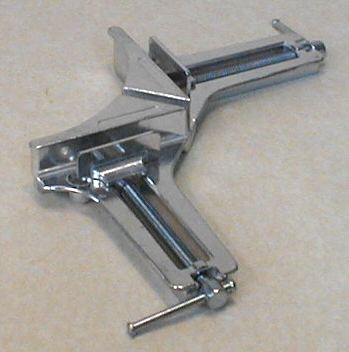
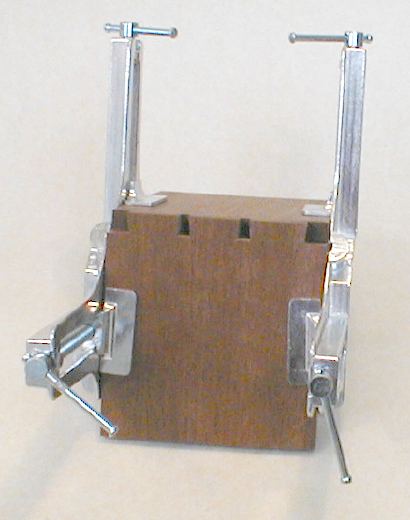
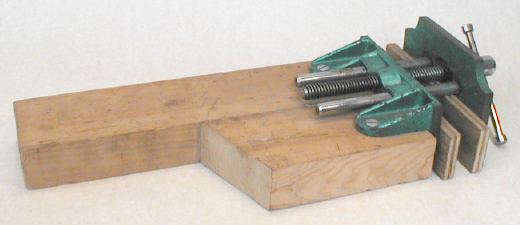
This tip is not nearly as well known as it ought to be. One of the less trivial (and very critical) stages of making a dovetail joint is marking the second piece from the first. The "textbook" method has you hold the unmarked piece upright in the face vise, putting a block (normally a jack plane) on the bench, and placing the already cut workpiece as a "bridge" over the vertical workpiece and the block. Having assembled this precarious pile of bits with sub-millimetric accuracy you have to hold it perfectly immobile with one hand and mark the joint with the other. This is horrible.Since the task is to hold one piece at right angles to the other, why not simply use a clamp designed explicitly for this purpose? Get yourself a pair of cheapo aluminium (not cast iron - too cumbersome) "corner clamps" and clamp your workpieces as shown. You can fiddle and adjust to your hearts content. When the workpieces are exactly aligned, tighten the clamps. You can mark the joints when ready. In fact you could mark 2 pins, have your lunch, come back, and then mark another pin - the work ain't going anywhere...
I can't claim responsibility for creating this wonderful method, but I do my best to publicise it. I first saw this tip on the OLDTOOLS list, in a post by Conan the Librarian He didn't invent it either; a little recent correspondance with him revealed a passing reference and photo with an article by Christian Becksvoort, in FWW #128, page 82
Alan Foust has collected a wonderful set of dovetail links.

Sanding Block
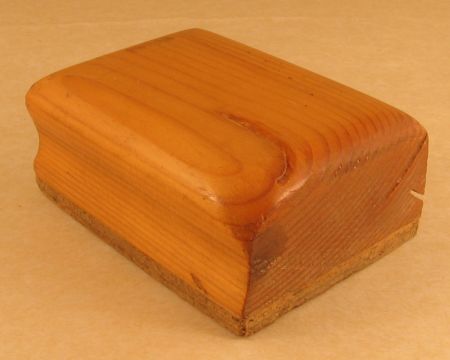
It's worth making a decent sanding block. I knocked this up early in my woodworking career as a prototype (hence the cheap wood, with visible split). But I did go to the effort of making it comfortable; the groove of the left suits my thumb nicely, the rear left corner is shaved off, allowing high pressure to be applied with comfort, and the 45°kerf of the right hand side almost holds the sandpaper on its own. However, my fingers reinforce this grip. The sole is cork from a floor tile. The block is made to use 1/6 of a full (9"x11") sheet with minimal waste.Like all prototypes that work extremely well, I've never got round to making "the real one"
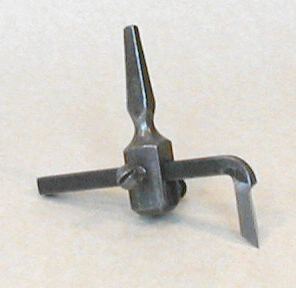
Improved Handle for Nobex Mitre Saw
Nobex mitre saws are considered the best of their type, and are used in many trades. They're also the most expensive saws of their type. Bizarrely, the handles supplied are dreadful; hollow injection moulded things that are both fragile and uncomfortable. When a #202 came my way at auction, with missing blade and handle, for the princely sum of 4 pounds, action was required. Real, (dreadful, remember?) Nobex, spare handles are available and they cost 8 pounds. The solution was a dead Spear & Jackson rip saw, from the 1950's. The handle in good condition, the blade was only slightly rusty, but the blade was badly kinked. I'd bought the saw for 50p, primarily as donor material for scrapers and scratch stock blades (I still haven't used it all, and I've even used one of the saw nuts to repair another S&J saw)The handle, after some modification, was fitted to the Nobex, where it continues to give good service. As handles go, it's not as nice as 19th century forms, but the Nobex only gets light use; the handle is good enough.

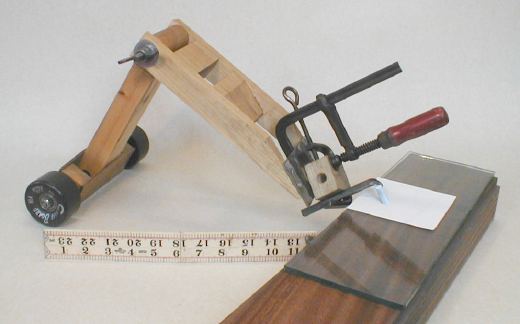
Over the Top Sharpening Jig
Being of modest skill, I started out sharpening using sharpening jigs. Actually, I still use 'em. I've got several, and they all have their pluses and minuses. Most of them are good for plane blades and chisels; once you get into "funny" blades, like mortise chisels (very deep), spokeshave blades (very short), and skewed blades, one by one, the jigs fall by the wayside, unable to cope.So I decided to make the ULTIMATE SHARPENING JIG®. OK, it's not the ultimate, it's just another compromise. In this case, I sacrificed convenience to rigidity, versatility and scope. It's essentally a hugely scaled up version of the General #809 .
The wheels, complete with axle, were scavenged from a car boot sale "snakeboard" and they run very nicely, having no less than 2 sealed ball bearings each. Last year's teen craze becomes this year's part source. The long axle gives tremendous stability.
It has no dedicated tool holding capability at the business end - just a metal plate. I normally use fret clamps to hold things in place, which is fiddly and inconvenient when sharpening a simple plane blade. The real pay-off comes when I need to sharpen something "exotic".
With a handful of clamps and blocks of wood, and a bit of inspiration from the work holding chapter of your favourite engineering textbook you can secure almost anything, at any angle.
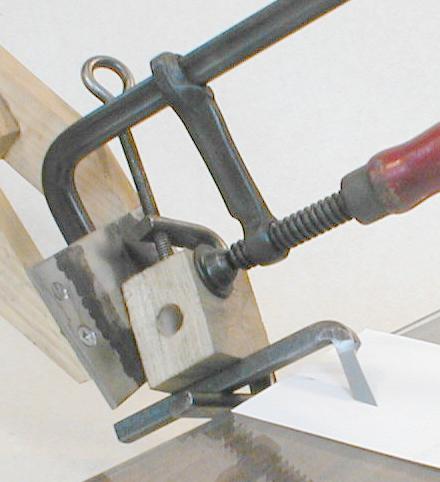
The illustrated example is the blade from a tank cutter. The honed face of this thing is tiny, at a compound angle, and obscured by the right angle bend in the arm (similar to, but even worse than, the notorious blade from a #271 router). The photographs show the jig set up to sharpen this nightmare. I've substituted a piece of notepad paper for the normal SiC (which is matt black, and hard to photograph). When sharpening blades that hang off the side like this, the jig ends up swivelling left and right, rather than moving back and forth.
I actually use "normal" jigs when sharpening "normal" blades; I save the monster jig for when it's needed, since the setup time can be considerable.

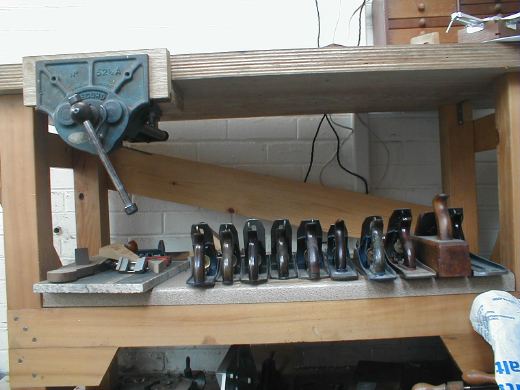
Using a hand vise when sharpening
Removing nicks and flattening bevels from blades can be hard work. Holding the blade in an engineer's hand vise can be very helpful, and these tools are common and cheap on the second hand market. This is especially true when working on plane blades, which often have sharp corners that dig into your palm. The softened edges and corners of the vise are a great improvement, allowing more work to be done with less pain.Accuracy of bevel is also improved. Since the hand-vise-plus-blade is 4-5 inches longer than the blade alone, the effect on the bevel of small changes in the height above the bench of your hands as you work (very difficult to avoid, despite the optimistic words of old texts) are much reduced. These two benefits make a hand vise a great aid to hand correcting faults in blades.

Rake Angle Control When Sharpening Saws
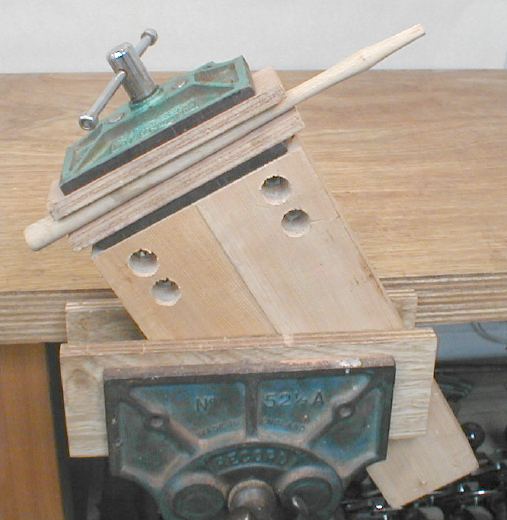
Moved to shop projects pageVise in a Vise gives you half an Emmert
Emmert's are wonderful vises, that can twist and turn and hold things at all sorts of angles. This idea won't give you an Emmert, but it is almost as versatile, and far cheaper. It's a "craft vise" fixed on about 2 feet of 2x4. By holding this in the main bench vise, you get a variable height, variable angle work holder. Chamfering the corners of the 2x4 makes it a little easier to insert into the main vise.As illustrated, I'm using it to hold a hammer handle I'm in the process of fitting to a nice vintage head. Since the jaws of the craft vise are in the horizontal plane, downward forces (from spokeshaves and rasps) are well resisted.

Vise in a Workmate
The built in clamping of a workmate is wonderful; it's powerful, large, and will hold tapered objects. Add the little plastic dogs, and it will hold an even wider range of objects. Nice one Mr Hickman!But the workmate won't hold small, metal objects. For that you need a metalwork vise. Since I spend a lot of time restoring tools, I very often work on small metal components. To do this, I have mounted a small metal working vise (about the size of a Record #1, but actually made by Ward & Payne) on a 1 ½" blockboard slab. This has a batten on its lower side so that the slab can be held (in turn) by the workmate. The slab is made so that it comes exactly to the back of the workmate top (i.e. the slab length is equal to the depth of the workmate top plus the width of the batten. This means that I can use a clamp at the rear of the slab to improve the stability if needed.

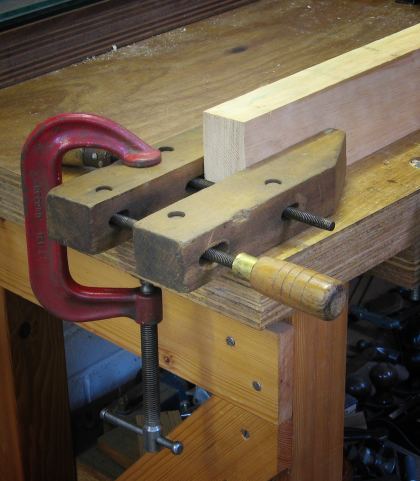
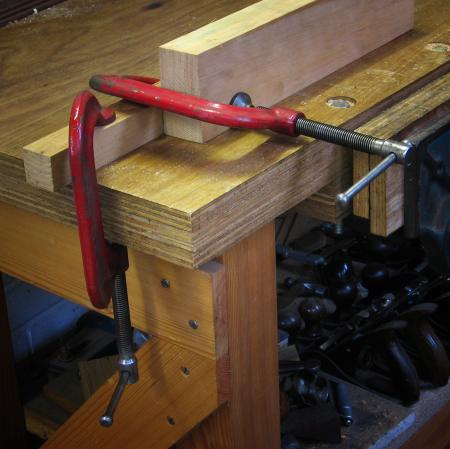
Workholding when Morticing
Morticing with the workpiece held in a vise is not goodIf the workpiece is sitting on the guide bars, you might get away with it. But you'd be (in effect) trying to knock the vise off your bench with a large mallet. If the workpiece is only held by the tightness of the jaws, you're in a world of trouble. The piece may slip and be damaged by the vise jaws. And you're still trying to knock the vise off your bench.
It's better to have the workpiece on the bench, ideally over a leg. The downward forces of the hammer are now resisted directly by the mass and rigidity of your bench.
The easiest way to achieve this is to clamp a handscrew onto your bench, and then hold your workpiece in the handscrew's jaws. The handscrew is only holding the workpiece in place (the main forces are resisted by the bench's very existence). The workpiece can be fixed and removed by a half turn on the handscrew's handle.
If you don't own a handscrew, you can fix a piece of scrap down to your bench, and clamp horizontally to the scrap. This is slightly less convenient for fixing and removing the workpiece.
In either case, the clamps should not be of the sliding head (or 'F') design; these can slip under vibration, and morticing is a rich source of vibration.
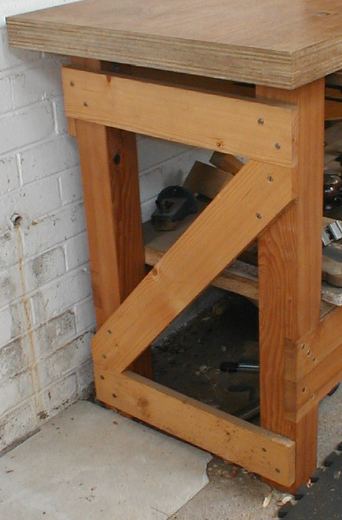
Bench Design
When I built my bench I was nervous about my woefully imperfect joints (half-lap, I wasn't even going to try M&T's). So I did something unusual to my bench (although rather common in engineering terms). I put diagonal braces in. There's one at each end, and a big one across the rear face.I also ripped off Ian Kirby's "double depth joint" idea for the stretcher at the front (where I can't have a brace)
Either the bench is strong, or I'm weak, because even heavy planing hasn't made it rack.
Other bench ideas are pointed to on my link farm
Plane Threads
Many of the bolts and fixings on a Bailey Pattern plane are non standard (as far as normal engineering threads are concerned). 2 occasions where you might encounter this issue are replacing the oft-missing bolt at the toe of the tote (on #5 and bigger planes) and modifying the front knob (and its fixing bolt) to be of the "low knob" pattern.If you measure the pitch of the thread, it looks like you're dealing with Whitworth/UNC ¼", since it's 20 TPI. But it's not ¼" OD; it's #12 size, or 0.216", a full 34 thou less (or 1/32" if you don't think in thous). Conversely, the standard UNC pitch for #12 rod is 24 TPI. This thread was never an engineering standard, just a Stanley plane standard.
In particular a Whitworth ¼" 2 part die can be closed down sufficiently to cut our #12 20 TPI thread. 0.216" is probably close to the lower limit of a 0.250" die, since the cutting geometry is being taken beyond its design, but it works well enough (given the alternatives ;-)
If you're reducing an existing ¼", 20 TPI component to #12 diameter, you should use a file to slightly reduce the OD of the part before deepening the threads. I am informed (by old engineering handbooks) that dies don't like cutting at the apex of the thread.
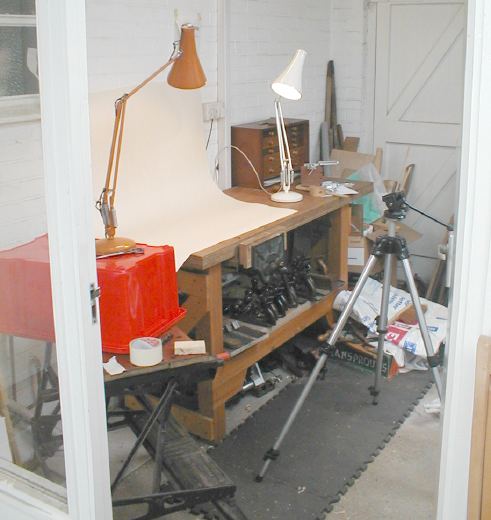
Photographic Technique
To take all the tool photos I used a quite old Olympus C830-L digital camera (called D-340R in the U.S.A.) and the setup shown (except there was a camera on the tripod ;-) The anglepoise lamps are normal shop fixtures - I find them very helpful when doing fine work like dovetails or saw sharpening. This "long shot" was taken through the door of my rather small and very full workshop
(29/6/2006)Good grief! my A510 had a run in with some Coke, and didn't survive. I now have a Canon A630