Prerequisites
The POV-Person library
consists of a set of files that can be used to add characters (e.g. people) to
POV-Ray scene files.
In order to use POV-Person you will need:
- a version of the POV-Ray raytracing software (Version 3.5 or above)
- the POV-Person library files
- at least a rudimentary understanding of the concepts of raytracing and the POV-Ray Scene Definition Language (SDL)
The POV-Ray manual
and sample files are likely to be sufficient to give you an understanding of
the terminology used in this manual. Various tutorials are also available
on the Internet that may better suit your needs.
A Google search on 'povray tutorial'
should lead you to a wealth of alternative tutorials.
Downloads
Installing POV-Ray
POV-Person 2.0 has been written using POV-Ray 3.5 and POV-Ray 3.6, but should also be compatible with more recent versions.
- Download
and run the POV-Ray installer for your operating system. Installation is normally straight forward.
Installation instructions and help files are included with POV-Ray. Prebuilt installation programs are
available for most Operating System e.g. Windows, Mac-OS and Unix (including Linux and Solaris).
Source code is also available for download.
- Render the default test image in POV-Ray to make sure that the installation was successful.
Installing POV-Person
POV-Person files are available as a zipped archive. Other formats may be available (check the web site).
- Download
the POV-Person library files (The files in the library consists largely of ASCII text files containing POV-Ray SDL).
- If you downloaded a compressed POV-Person archive, extract the files from the archive.
- Place the POV-Person library files into a directory accessible to POV-Ray. You can use the standard
include directory e.g. "C:\Program Files\POV-Ray for Windows v3.6\include"
or you can create a new directory and add a library path to POV-Ray
(Look for "library paths" in the POV-Ray help index).
- Open the POV-Person library file 'pp00example.pov' in POV-Ray.
- Click
 .
.
- If you see a sample image similar to the following image then congratulations on
having successfully downloaded and installed POV-Person. Otherwise review the installation steps above.
 With POV-Ray you create scene files that describe the scene you want to render.
To add a POV-Person figure to your scene you need to add at least two lines to your POV-Ray scene file. For example:
#include "povperson.inc"
With POV-Ray you create scene files that describe the scene you want to render.
To add a POV-Person figure to your scene you need to add at least two lines to your POV-Ray scene file. For example:
#include "povperson.inc"
ppFigure("ppalf.inc","ppstyle1.inc","smile","ppstanding.inc","ppoutfit1.inc")
Note. The POV-Person characters have been created with textures that work reasonably well with the
lighting levels used in the examples. Your scene file may well contain far more or
far less light, so some adjustments may be necessary. You have to decide whether to adjust the lighting and textures in your scene,
or whether to adjust the textures used by POV-Person.
- The povperson.inc file contains the top level POVPerson macros which pull in other files as they are needed.
- The ppFigure macro adds a single figure (the 'alf' character) to the scene at the origin.
By wrapping the figure in an 'object' definition you can treat it as a standard POV-Ray object. The following example
adds the 'ann' figure to the scene and translates it 5 units along the x-axis.
object {ppFigure("ann.inc","style1.inc","smile","standing.inc","ppoutfit1.inc") translate x*5}
The general form of the ppFigure macro is:
ppFigure(Character, Style, Expression, Pose, Outfit)
Where:
Character - Is the name of an include file describing the main attributes of a person.
You can use the character files 'ppann.inc', 'ppbabs.inc', 'ppalf.inc', 'pprod.inc' and 'ppdot.inc' or you can
set up your own character files.
Style - Is the name of an include file describing the style to be applied to the character.
This typically includes hair and makeup.
The style files provided include 'pppunk.inc', 'ppskinhead.inc', and 'ppstyle1.inc' through 'ppstyle6.inc' to
demonstrate the use of the standard hair styles. You can add your own style definitions.
Expression - None yet provided.
Pose - Is the name of an include file describing the pose to be applied to the character.
In its simplest form this contains a series of predefined positions for each of the components of the person.
The poses provided include "ppstanding.inc", "ppsitting.inc"
Alternatively it can also theoretically contain animation algorithms to vary the pose over time.
Outfit - Is the name of an include file describing the clothing to be added to the character. You can specify
"ppoutfit1.inc" or "none", or you can set up your own outfit file.
To use several copies of a figure that you have defined using POVPerson you can assign it a name using a POV-Ray declaration:
#include "povperson.inc"
#declare myFigure = ppFigure("alf.inc","style1.inc","smile","sitting.inc","outfit1.inc")
object {myFigure rotate 120*y translate <-1,0,1>}
object {myFigure rotate 200*y translate <0,0,2>}
To add different figures to your scene you can invoke the ppFigure macro multiple times
using different parameters:
#include "povperson.inc"
object {ppFigure("alf.inc","style1.inc","smile","standing.inc","outfit1.inc") rotate 120*y}
ppUndef(1,1,1,1,1)
object {ppFigure("ann.inc ","style5.inc ","smile","standing.inc","none") translate <1,0,10>}
The ppUndef call shown above resets the different categories of control variables to ensure that parameters intended
to define one person are not carried over onto the next person.
The general form of the ppUndef macro is:
ppUndef(CharacterReset,StyleReset,ExpressionReset,PoseReset,OutfitReset)
where the parameters are usually all 1's to indicate that you want all of the control variables reset.
It is possible to pass 0's into the ppUndef macro to carry over specific groups of parameters.
The consequences of doing this are not necessarily straight forward, so this is not recommended
for novice users of POV-Person.
|
A crowd is simply a group of figures positioned on a surface.
POV-Person provides two macros that are used together to generate a crowd.
The ppCrowdPositions macro generates a more or less random set of
positions on a surface of your choice and stores those positions in an array.
The ppCrowd macro draws a figure at each of those positions.
You can of course call the
ppCrowdPositions macro on it's own to locate a series of points on a surface where you can then position other objects of your choice.
You can also define an array of points yourself then call ppCrowd to position figures at those points.
|

|
The following example illustrates a simplified use of the crowd macros:
#include "povperson.inc"
#local ppNumberOfActualPositions = ppCrowdPositions(16);
#declare ppCrowdFigureList = array[1];
#declare ppCrowdFigureList[0] = ppFigure("ppann.inc","random","smile","ppstanding.inc","random");
#declare myCrowd = ppCrowd(0, ppNumberOfActualPositions);
- The ppCrowdPositions macro is called with a single parameter to request 16 positions on the default surface, which is a square
starting at the origin and stretching out 10 units into the positive x and 10 units into the positive z dimensions.
- In this case the number returned into the variable
ppNumberOfActualPositions should be 16, as there shouldn't be any problem with fitting this number of positions comfortably onto the surface.
- An array called ppCrowdFigureList needs to be created to hold the range of figure definitions that will be used to form the members of the crowd.
- In this case only one object is defined and added to the first element of the array, which means that all of the figures in the crowd will be the same.
- The first parameter passed to the ppCrowd macro indicates which element of the position array to start from and the second indicates the number of positions
to use.
|
The above example should give a result similar to the scene shown below.
|

|
The ppCrowdPositions macro is quite careful about the positions it adds to the array, avoiding that a position
is too close to one that's already been defined and avoiding that the positions are too close to a dramatic change of height on the surface.
To do this it generates a random position, checks its proximity to previously defined positions, then samples a few points
on the surface nearby to see if there is a large change of height. These checks are parameter controlled to enable you to avoid
creating 'overlapping' figures or figures standing too close to an edge.
The following example illustrates this:
#include "povperson.inc"
#declare ppCrowdPlatform = sphere {<0,-2.4,0>,2.4 pigment {color rgb <1,1,0>}}
#local ppNumberOfActualPositions = ppCrowdPositions(6);
#declare ppCrowdFigureList = array[6];
#local ppI = 0;
#while (ppI
#declare ppCrowdFigureList[ppI] = ppFigure("random","random","smile","random","random");
#local ppI = ppI + 1;
#end
#declare ppCrowdFigureMinRotation = 150;
#declare ppCrowdFigureMaxRotation = 210;
#declare myCrowd = ppCrowd(0,ppNumberOfActualPositions);
- By declaring ppCrowdPlatform before calling ppCrowdPositions the macro scans this object, looking for 6 suitable positions.
- As the object is a sphere, any positions towards the outside edge will be too steep to stand on and will be ignored.
- The macro therefore selects 6 positions close to the centre of the sphere.
- Note. If the radius of the sphere is reduced below about 2 units, then ppCrowdPositions will start to have difficulty in finding enough
positions and is likely to return less than 6 positions.
- This time, ppCrowdFigureList is populated with 6 potentially different figures by using the random parameter in a number of
positions on the ppFigure call.
- This example also introduces a couple of control variables that can be used to constrain the randomness used for orienting crowd members.
- By default, ppFigure generates a figure facing out over the positive z axis.
- The ppCrowd macro turns them randomly through anything up to 360 degrees about the y axis.
- The ppCrowdFigureMinRotation control variable tells the ppCrowd macro to rotate each figure by at least 150 degrees.
- The ppCrowdFigureMaxRotation control variable tells the ppCrowd macro not to rotate any figure by more than 210 degrees.
- This means that all figures will face roughly towards the -z axis.
|

|
Tip 1. To prevent ppCrowdPositions from choosing positions that are too close to any figures that you want to position manually, you can
add those positions to the array before calling ppCrowdPositions, then call ppCrowd starting from the array index
following those positions.
Tip 2. The surface object that you pass to ppCrowdPositions does not have to be rendered. In various circumstances
it is convenient to pass a 'tailored' version of the surface that you are planning to render. For example, you can slice a section
out of the surface you pass to ppCrowdPositions to prevent positions from being located in that region.
Because of the edge detection algorithm:
-
Parts of a surface with more edges (e.g. Steps) will attract less positions than parts of the surface that are
clear of edges.
- If there isn't enough space available to position the number of figures you specify then there is the
potential for a macro of this type to loop indefinitely. To avoid this there is a parameter on the ppCrowdPositions
macro to limit the number of attempts to find a position. The ppCrowdPositions macro therefore returns the number of
positions actually defined, which, unless it runs into this problem should be the same as you requested.
The ppCrowdPositions macro can be called any number of times to add positions to the array. This can be used to compensate
for a reduced number of hits on areas with a larger number of edges.
To keep render times to a minimum it is usual to render distant figures in less detail than figures close to the camera.
The following example illustrates a slightly more adventurous sequence of calls.
It would obviously be possible to animate a figure by defining a large number of pose files to record each of the positions that you wish to render frame by frame.
However, this becomes extremely tedious for all but the very shortest of animations.
POV-Person therefore provides a set of tools to reduce the number of poses that need to be coded by hand.
The ppInterpolatePose macro enables you to code key poses and interpolate between them. A very simple example of this is illustrated in the ppanimation001.inc pose file which interpolates between the ppsitting.inc pose file and the ppstanding.inc pose file.
The ppMirror macro enables you to mirror a set of joint position left to right. This enables some repetitive sequences to be generated with a very small number of manually defined pose files.
Several animation sequences have been defined as standard. To see an example load the pp00animationexample01.pov scene file and run the renderer with a command line option of +KFF30. This will generate 30 frames that will produce a complete walking sequence from the 4 manually defined key poses. The animated sequence is illustrate in the following image.
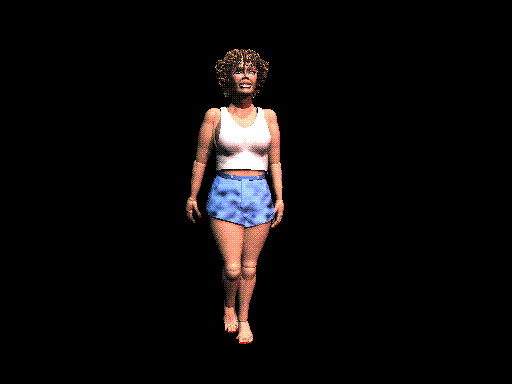
Note. POV-Ray produces a sequence of images. To animate the sequence you will need a seperate tool that chains the sequence of images together into an animated file format. The image above is an Animated GIF. Other common animation formats include MPEG and AVI.
As you will see from the pp00animationexample01.pov it doesn't take much to add an animated character to your scene file. The following lines of SDL are used to control and define the 'walking' animated figure:
#declare ppFrameCount = 30;
#declare ppClock = clock*ppFrameCount/(ppFrameCount+1);
#declare ppWalkDistance = 1.06*ppClock;
#declare person = ppFigure("ppann.inc","ppstyle6.inc","smile","ppwalking.inc","ppoutfit2.inc");
For an explanation of the control variables and to learn how to define your own animations, see the animations section of this users guide.