|
Brainstorming the Polish Winged Hussar project A meandering interview of how two guys, halfway around the world, collaborated on a 1/6th scale project |
|||||||||||||||||||||||||||
 |
|||||||||||||||||||||||||||
| Hey Ran, did you notice how large I made our 1/6th scale figures in the background? | Oh, it's just compensating for our miserable little egos! LOL | ||||||||||||||||||||||||||
 |
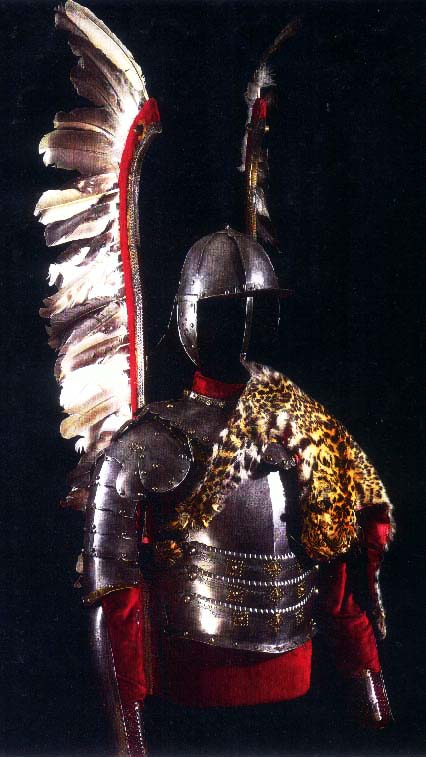
April 2005 - A conversation about worldly things and 17th century Polish wiinged hussars... Ran: So, what's your favourite colour, Ron? Ron: USMC green. LOL Ran: I thought so. I was thinking, you would have to love history to get into this hobby too huh? It's more than just the figurines, that's my opinion anyway. Ron: Undoubtedly a most worthy opinion. And too, as Artists, there are so many artfully clad historical figures. It's like we use 1/6 Man as blank canvases. Now that's genuine creativity, don't you think? It's a thing of beauty to the trained eye of the 1/6 beholder. Like a pearl or a gem. Like we're in awed of the Mystery of Armor, headgear and weapons or uniforms. (or some bullshit like that) .Or are we just in denial of a childhood fantasy? Only our psychiatrists know for sure. My friend: Call them anything but dolls! But really, I'd like to do one of those Winged Hussars. Man, that would be awsome to do. But I do like the Samurai too. Ran:You know, I think we are beginning to be sado-masochists of sorts. The more devilish to customise/scratchbuild a figure, it would appear the more we'll want to do it! Maybe it's a reaction from all the masses of mass-produced goose-stomping WW2 German figures available on the market today! Not that I am complaining. Those are really well made. Almost state-of-the-art compared to what we had six years ago. Ron: It would be a gigantic undertaking. Insane to even think about! LOL Ran:You know, you're the second person to say that this project's an insane understaking. Ron: Well, I’ve been searching on the internet on the Hussars and have a whole bunch of pictures. Amazing! Ran:Okay, let me try to briefly put things in context for our viewers, some of whom may have no idea about what we're talking about. The Polish 'winged' hussars, were the legendary and fascinating warriors of Poland and were a dominant military force from 1500-1775. Most dramatic of all hussar characteristics were the 'wings' worn on the back or on the saddle, although not all hussars wore them: The hussars terrified the Turks, Tatars, Muscovite boyars, Ukrainian Cossacks, and Swedes, who did everything to avoid facing them directly in battle. Below are some reference photos of 15th - 17th century Polish winged hussars taken off the internet, the three photographs of armour on display are actual armour. An account by Mark Allen Cantwell describes how one would feel being on the receiving end of a winged hussar assault: "As your army stands deployed for battle, you scan the enemy's lines across the field. Cavalrymen in crimson riding coats begin their advance toward you, slowly at first, saving their horses' strength for the last moments of the charge. As the oncoming army gathers speed your own horses become skittish and a strange roaring whistle grows in the air above the pounding of hooves. Your stomach tightens and a cold sweat breaks across you. Mounted on horses sixteen to seventeen hands high the approaching horsemen appear even more gigantic as you see sweeping wings of eagle feathers arch high over their steel-clad heads. Above the disciplined ranks of thundering iron figures flutter enormous standards bearing images of a white eagle on a blood red field and others showing the winged Archangel, Michael. Fantastic cloaks and saddle cloths of wolf, tiger, and leopard skins flap around every soldier as they continue their ominous attack. As you begin your counter-charge, the galloping knights lower gold-leaf covered lances with streaming pennons for the final impact. You vow to yourself that if you survive this day you will never forget your encounter with the winged Hussars of Poland. "
|
||||||||||||||||||||||||||
|
Many thanks to Polish Winged Hussar reenactor Rik Fox for the use of these pictures. "Charge of the Winged Hussars",was painted by celebrated American Civil War painter Keith Rocco, as a private commission for a collector in Chicago. Courtesy of Rik Fox's website: The Polish Nobility Commonwealth Guild. http://www.oocities.org/rik_fox/husaria/
Far left: A non-winged hussar picture was taken from the coffee table book (now out-of-print), "Ogniem i Mieczem-portret filmu" (With Fire and Sword, film portraits) by the set still-photographer Zenon Zyburtowicz. Courtesy of Rik Fox's website: The Polish Nobility Commonwealth Guild. http://www.oocities.org/rik_fox/husaria/
Left: Picture is taken from the book of the U.S. museum tour "Land of the Winged Horsemen, Art in Poland". Courtesy of Rik Fox's website: The Polish Nobility Commonwealth Guild. http://www.oocities.org/rik_fox/husaria/
Far left and left: These are from the book "Polska Husaria" by Anna Wasilkowska. Courtesy of Rik Fox's website: The Polish Nobility Commonwealth Guild. http://www.oocities.org/rik_fox/husaria/
|
|||||||||||||||||||||||||||
 |
|||||||||||||||||||||||||||
 |
 |
||||||||||||||||||||||||||
 |
|||||||||||||||||||||||||||
 |
|||||||||||||||||||||||||||
|
Ron: Read about the Battle of Venice against the Turks who had
110,000 man army defeated by the 75,000 man allied Polish German
and Austrian Army. All because of the tenacity of the Hussars
Cavalry. Ron: Hehehe!These guys were really loaded with all kinds of weapons.
Not to mention that their lances were 18 - 20 feet long: and that
translates to more than 30 inches in 1/6 scale. Whoa! That's long! Did you know there was a Polish movie made that had winged hussars re-enacted? It's called "With Fire and Sword "and was made in 1999, it was so popular when released in Poland that it even topped Titanic. Here are some photographs taken from that movie. Don't they look resplendant? I got thesse photographs from Rik Fox's The Polish Nobility Commonwealth Guildwebsite: http://www.oocities.org/rik_fox/husaria/
|
|||||||||||||||||||||||||||
 |
|||||||||||||||||||||||||||
|
This facinating assemblage of Polish Winged hussars is from the book "Sto dni Hoffmana" (100 Days of Jerzy Hoffman), [production notes from the director on the making of Ogniem i Mieczem-With Fire & Sword], photo credit Zenon Zyburtowicz.
Hussars on the march, also from the coffee table book, "Ogniem i Mieczem-portret filmu" (With Fire and Sword, film portraits). Both photographs courtesy of Rik Fox's website: The Polish Nobility Commonwealth Guild. http://www.oocities.org/rik_fox/husaria/
|
|||||||||||||||||||||||||||
 |
|||||||||||||||||||||||||||
|
Ran: Sheet metal has a better memory, thus its easier to bend the panels or girdles to shape and they stay so immediately. There's less fuss compared to working with card - which might have to be presoaked in hot water, or dampened and then dried out using a hair dryer while fitted over some kind of form. You can glue strips of leather with 2-part epoxy glue to the back of the sheet metal as a form of restraining straps, this is quite effective. Styrene or thin plastic card can also be considered and might be a better alternative to card, the plastic card could be formed to shape by heating near a lighten candle. In fact I'm wondering if the breastplate could be cut out using a template and then fitted over the chest of a 1/6th figure, this is then closely placed over the slots of a heated up toaster. Of course ensure that there are no slices of bread within being toasted! LOL So far this is my favorite design.
|
|||||||||||||||||||||||||||
 |
|||||||||||||||||||||||||||
 |
|||||||||||||||||||||||||||
 |
|||||||||||||||||||||||||||
|
April 2005: Ron does more intensive research... Ron: Got the DVD yesterday afternoon. Actually it's two DVDs cause
it's a three hour movie. I wasn't disappointed. Except with some
the battle scenes where the Winged Hussars were cut down by the
Cossack small arms fire. (LOL) Just hated to see them fall. But
later on they kick some ass. But I won't spoil it for you. LOL
All in all it's pretty damn good. Each DVD has 2 parts. So when
the first part is over, they run the credits again and I thought
it was over so I went to the second disk. Well there seemed to
be a big jump in time but I figured maybe something was wrong
with the DVD but then I checked the scene menu and found that
each DVD has two parts so I stopped the 2nd one and put the first
one back in and found part two. Kind of confusing? LOL Well that's
how it went. Ran: Thanks for the review. Can't wait to see it.
April 2005: Helmets - Aluminium foil bright idea ... session 1 Ron: Here's a little idea I thought of. I was cooking breakfast when I noticed in the pots and pans cupboard one of those thick aluminum turkey roasting pans. The kind you throw away. Anyway that got me to thinking how shiny they looked. Well before you know it I was cutting and taping a big piece to an old broken 21C figure I had and started to form it to the figure then used a spoon to burnish it to a high shine. After that I removed it and turned it face down on a piece of papered plasterboard (drywall). Then I used a ball point pen to make indentations, and that looked like beadwork when viewed from the other side. I also used a Pounce wheel for the tiny decorations. Now this was only an experiment to see the effect. But it worked pretty good. Then I tried a piece of it on a 21C helmet. I sanded down the WWII helmet to get rid of the rim then started to form the metal to it. After several tries (3) well it took a long time to figure out how to make it work but I kinda figured it out. Anyway these roasting pans are real cheap but pretty heavy aluminum and I think they might work. |
|||||||||||||||||||||||||||
 |
|||||||||||||||||||||||||||
 |
|||||||||||||||||||||||||||
| Referenced cuirass on right | |||||||||||||||||||||||||||
|
April 2005: Helmets - Lots of burnishing and cursing... session 2 Ron: So you tried the helmet eh? Ran: Thanks for the load of metal-tooling tips, but I'll be taking a different course. I'm going to sculpt the dang thing with modelling clay. I've already sculpted the initial part and it looks fine, I'll be bulking the sides and back more, then adding the frontal brim and the two cheekpieces. Ron: OK, now I did find at a grocery store in the baking section, some real cheap aluminum bread baking pans... ( 3 for 99cents ) made in USA. They're the same kind of aluminum as the old one I had. You can tell that, if you can easily score it with your fingernail. If you want some, but can't find any, let me know. Maybe I can squash some down and send it with the movie. Course it'll set off all the metal detectors everywhere it goes and it might take two months for your package. Who would want squashed pans? LOL They might think it could contain some kind of new fan dangled coded message. LOL
April 2005: Helmets - Going for a multi-medium approach session 3 Ron: Your right about the foil. I went to get some more foil pans just to have extra and found out your right there are different types and the one I got was too stiff and I couldn't anything with it. Man I'm sorry, I bet you were real frustrated trying to make it work like it was some kind of Spanish secret or something. LOL. Ran: Oh, you should have heard me cursing that Ron Escudero! LOL Ron: LOL. I could sense that after I tried the new stuff I got. LOL. Well live and learn. The one I was using was in the cupboard for years! I have been checking at different stores to try and match it but no success. I did find some cupcake pans that work. LOL Anyway they were in the cupboard too. They must be using some kind of Chinese aluminum in the new ones. Ran: LOL. I think the softer foil is the Chinese one! LOLOL! Well, some progress has been made on my sculpt of the helmet. I've used Jovi (an Italian brand) air-dried modelling clay (what to do, i'm an amateur! LOL) for the crown and spent some time sandpapering it smooth. I then bulked the areas I thought that needed it, then spent more time sandpapering it again. I've finally decided on a combination of clay and card - with card pieces used for the brim, cheekguards and neckguards. Dropped the idea of using the aluminium foil for the brim, cheekguards and neckguards. Here's what I came up with. When everything was dusted off for dust, I Krylon chrome-sprayed the helmet. |
|||||||||||||||||||||||||||
 |
|||||||||||||||||||||||||||
 |
|||||||||||||||||||||||||||
 |
|||||||||||||||||||||||||||
|
Ran: I sculpted me a headculpt without ears so that the cheekguards fit nicely on both sides. Rigid ears on commercial headsculpts just make the cheekguards pop outwards. Very unmilitary-like. LOL. I gave the sculpt a very manly moustache, then realised in the photograph that it looks very much like Saddam Hussein! The helmet was embellished with some earring accessory bits and the faceguard was simply cut out of aluminium sheet. What I'll need to do later is ascertain the correct position of the faceguard on the helmet, drill a tiny hole and secure it to the front of the helmet with a tiny screw, just like the real thing. Ron: Nice job on that helmet.Very clean! Here's my works in progress; Everything is hinged with gold pins. The head is not on yet cause I still have to paint it and add the steel wool mustache hair. This just shows my work in progress of many many many hours of trial and error. Anyway hope you likey lot. LOL . I'm working on the collar, shoulder and arm pieces. Ran: Splutter!!! Is that for real? Omigosh... Well done! |
|||||||||||||||||||||||||||
 |
|||||||||||||||||||||||||||
|
April 2005: Cuirass / Breastplate - session 1 Ron: I have already sculpted the breast work from sculpy in two
parts (Front and back). I did this right on the figure that I
covered with tin foil so it keeps it's shape in the oven. Then
I'm going to use the foil for the top part and the stiff foil
for the bottom sections. And here's another Idea: You know at
scrapbook stores and some fabric shops they have scissors they
use to cut fancy borders on paper kinda like they used to do on
old black and white photos with scalloped edges. Anyway my daughter
had some and they cut through the aluminum pretty good. In the
"Movie" the armor was the same kind of design exactly like the
pic I sent. With the fancy chest disks and the sectioned stomach
areas with the scalloped edges. So I decided to sculpt the armor
and over lay it with the cut pieces. I also found some beads that
are close to the flower looking designs on the bottom sections.
Anyway since the sculpy is sculped to the figure that way I won't
have any problems with lining up the front and back. And that
also means it will be strong and won't dent if I drop it. (which
would have probably happened some time or another.) LOL And I
can attach all the shoulder armor dangles and use pins for rivets
secured to the Sculpy. And also add any raised decorations without
denting anything. It's working out pretty good so far cause I
have the exact shape I need to make it kinda like the Pic below...
So progress is being made.
|
|||||||||||||||||||||||||||