 |
|||
|
The Australian Light Horseman Light Horsemen of the Australian Lighthorse Brigades fought as mounted infantry in World War One. Contrary to the name, a fully equipped Lighthorseman on the saddle is not a light weight. It has been said that when fully loaded, a rider would have no chance of falling off his Waler, being securely hemmed in by the gear in front and back of him. The Waler The Australian Stock Horse or Waler evolved through selective
breeding in response to the demands of the environment. The history
of the breed began in 1788 with the arrival of the First Fleet
which brought the first horses to the colony of New South Wales,
as the whole of eastern Australia was then known. These horses
were of English Thoroughbred and Spanish stock; later importations
included more Thoroughbreds, Arabs and Timor and Welsh Mountain
ponies. Later, in the Middle East during the First World War, the British generals called again for Australian Light Horse regiments and their Light Horse regiments and their stock horse remounts. About 160,000 Australian horses served in World War I with generals and cavalrymen from 20 nations, from both sides, accepting that these horses were more reliable and had greater endurance than other breeds. The Walers, used by the AIF were amazingly sturdy creatures, for they had to carry an approximate weight of 18.5 stone or 110 kgs into battle in a variety of conditions ranging from mud to sand. The English cavalryman, Lt. Col. R.M.P. Preston, D.S.O., in his book "The Desert Mounted Corps" described the stamina and spirit of the Australian Light Horse "... Calvary Division had covered nearly 170 miles... and their horses had been watered on an average of once in every 36 hours... The heat, too, had been intense and the short rations, 9 1/2 lbs. of grain per day without bulk food, had weakened them considerably. Indeed, the hardship endured by some horses was almost incredible. One of the batteries of the Australian Mounted Division had only been able to water its horses three times in the last nine days - the actual intervals being 68, 72 and 76 hours respectively, yet this battery on its arrival had lost only eight horses from exhaustion... the majority of the horses in the Corps were Walers, and there is no doubt that these hardy Australian horses make the finest cavalry mount in the world...." Sadly, only one Waler returned after the war; the remainder were either killed in action or shot to ensure that they would not fall into the hands of the Arabs or Egyptians. This was indeed a great tragedy for the Australian Lighthorsemen who were so proud of their horses.
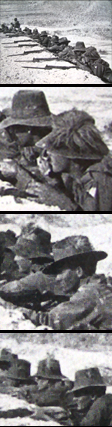
Emu Plumes In the photograph and close-ups below, men of the 5th Light Horse Regiment waiting on the alert on the eastern side of the Jordan River best illustrate the size and state of the emu plumes worn on the slouch hats. Of great interest is the second picture below. Sun helmets or pith helmets with plumes were also seen worn by men of the 10th Australian Light Horse Regiment.
|
|||
 |
|||
This project took a good three months to realise, Half of it went to research and cross-referencing, while the other half was spent tearing my hair out figuring how to create the English Universal Pattern saddle tack by reverse-engineering! The British Universal Pattern saddle or UP 1912 was used by the mounted forces from Britain, Canada, Australia, New Zealand and South Africa. This saddle was a web strapped steel bracket suspension design linked to the saddle tree by iron hinges, and believe you me, it is an extremely difficult saddle to customise.
The best way is to keep everything simple on account of the fact that most of the brackets/straps is wrapped by leather covering. I resolved this by sculpting the saddle seat with JOVI, a Spanish air-dry modelling paste, which once hardened, can be carved, sawed and sanded.
Although there are photographs and diagrams of the saddle tack, what is woefully missing are the exact specifications and dimensions of the saddle seat (But this is not proffered as an excuse, the specifications will surface with more extensive research). But for the moment, short of getting your hands on the Military Artificers handbook, eye-balling is the only way out. The saddle seat appears to be more compact than Dragon's Blitz's German saddle seat. Being a novice at this and using Dragon's as a reference guide, I eventually found myself reworking the saddle four times; cutting, sawing the pommel and cantle and remodelling the saddle to the form it now is. If there are any inaccuracies, the fault is mine entirely.
The saddle tree is made up of balsa wood sideboards affixed onto felt. The side flaps and stirrup straps are leather, with the stirrups being sculpted out of Sculpy. All buckles for the saddle tree were handmade out of wire with operable "tongues". Wire "D" rings and buckles were then painted with a coat of brass coloured enamel paint.
The bridle is a relatively simple affair, the difficult bit (pardon the pun) being the 1902 "portmouth" bit. Once I found the pattern, I resolved this issue by transferring the outlines of the bit to an expired telephone card. Holes were then drilled into the hard plastic after which the entire shape was cut out with a pair of sharp scissors. The snaffle bit is actually a pair of sewing pins with rounded plastic heads, skewered into the bit and then pinned into the mouth of the horse. The bit ensemble was then painted silver.
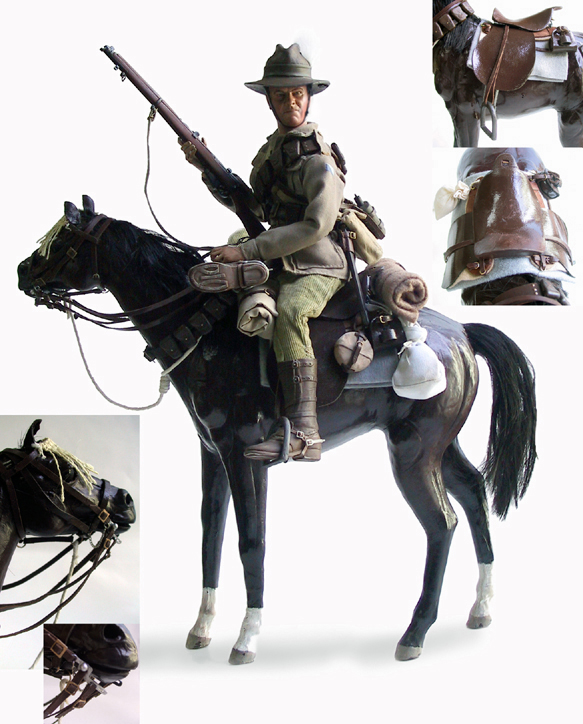
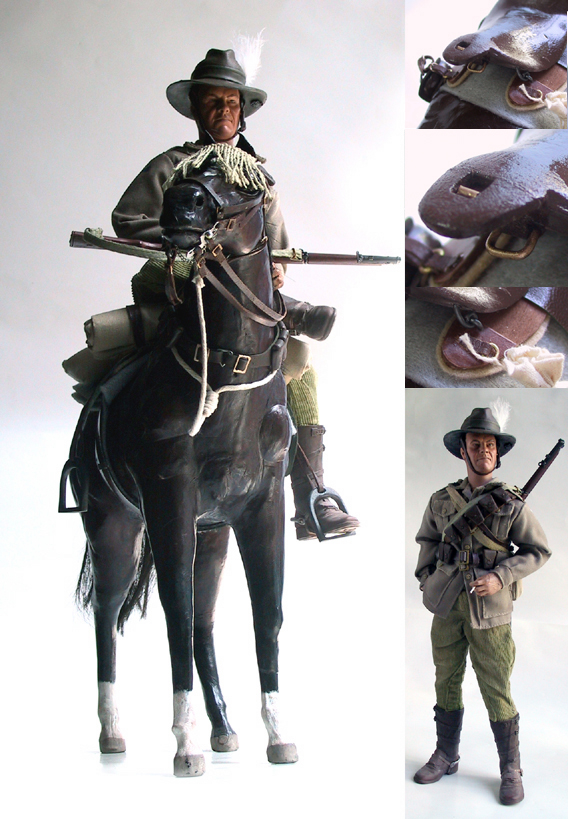
Accoutrements like the horse feed bag were scratch-built - white cotton twill was sewn into an oblong shape with a strap affixed to one side, the other end knotted to a loop on the other side. Ventilation holes grommets were created with thick dabs of acrylic paint, applied in a circular shape then flattened when semi-dried. Holes were then pierced after while the grommets were painted a brass colour.
The 90-round bandolier was also scratch-built with ammo pouches sculpted and casted to resemble the excellent Sideshow bandolier ammo pouches. Buckles were made out of plastic elephone card scraps. The straps are of real leather and the ends are connected by a triangle-shaped wire.
The circular cavalry messtin cover was sculpted out of air-dried modelling paste, then painted a dusky light dan colour before adding on the leather straps and buckle.
The horse's fly veil was created out of a rectangular piece of gunny sack cloth. The edge of the fabric was retained and a thin layer of glue applied behind. The other end of the fabric was carefully frayed, picking away the horizontal cords while leaving the verical cords intact. The problem with working with hemp is that there is a lot of superfluous fiber hair. These can be made more manageable with a coating of hairspray.


Sideshow's Light Horseman is an excellent piece, however it could benefit from a few modifications. The slouch hat was repainted a drab colour with the hatband a dull drab with a tinge of green. Sweat stains in a mix of burnt umber/black were painted above and beneath the hatband. Along the way I replaced the leather straps (seen on the photograph of the solitary figure) with a thinner one made out of thick card. The buckle was similarly scratch-built out of thick card. This closely resembles the actual hat straps.
The canteen straps supplied were too long, I replaced these with a shorter length of leather strap. The bandolier was given a thin leather strap - this looped around the waist belt before being "studded" or glued down.
The breeches were forced bleached (100% bleach solution) to give a light khaki hue. I then quick rinsed it in light grey dye. When dried, a trip to the sewing machine was made to take in the superfluous fabric on the sides of the breeches. Lacing was applied by hand-sewing elasticated tan coloured thread through the bottom legs of the breeches.The excellently fabricated tunic was simply weathered with pastels.
The stirrups were repositioned higher up the heel while the "butterflies" had the strapping repositioned. Everything was then dusted with pastel.
The rifle was treated with notches and sanded to created a woodgrain before being painted with washes of burnt umber and other shades of brown.
The horse is a leather covered model made in India and seems to be 1/7 or 1/8 in scale. I sawed off the tail and glued lengths of hair taken from a lady's hair accessory piece. Lengths of hair were similiarly glued into bored holes along the nape of the horse.
Feb 2005
|
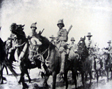
For Australia, as for many nations, the First World War remains the most costly conflict ever in terms of deaths and casualties. From a population of less than five million, 300,000 men enlisted, of which over 60,000 were killed and 156,000 were wounded, gassed or taken prisoner. The outbreak of war was greeted in Australia, as in many other places, with great public enthusiasm. In response to the overwhelming number of volunteers, the authorities set exacting physical standards for recruits. Yet the majority of men accepted into the army in August 1914 were sent to Egypt first, not Europe, to meet the threat which a new belligerent, Turkey, posed to British interests in the Middle East and the Suez Canal. After four and a half months of training near Cairo, the Australians departed by ship for the Gallipoli peninsula, together with troops from New Zealand, Britain and France. The Australians landed at what was to become known as Anzac Cove on 25 April 1915, where they established a tenuous foothold on the steep slopes above the beach. During the early days of the campaign, the Turks tried to repel Australian attempts to break through the Turkish lines. All attempts ended in failure for both sides and the ensuing stalemate continued for the remainder of 1915. The most successful operation of the campaign was in fact the evacuation of the troops on 19-20 December, under cover of a comprehensive deception operation. As a result, the Turks were unable to inflict more than a very few casualties on the retreating Australians. After Gallipoli the Australian Imperial Force (AIF) was reorganised and expanded from two to five infantry divisions, all of which were progressively transferred to France beginning in March 1916. The AIF mounted division that had served as additional infantry during the campaign remained in the Middle East. By the time the other AIF divisions arrived in France, the war on the Western Front had also settled into a stalemate, with the opposing armies facing each other from trench systems that extended across north-western Europe from the English Channel to the Swiss border. Unlike their counterparts in France and Belgium the Australians
in the Middle East fought a mobile war against Turkey in conditions
completely different from the mud and stagnation of the Western
Front. The lighthorsemen and their mounts had to survive extreme
heat, harsh terrain and water shortages. Nevertheless casualties
were comparatively light, with 1,394 Australians killed or wounded
in three years of war in the Middle East. This campaign began
in 1916 with Australian troops participating in the defence of
the Suez Canal and the allied reconquest of the Sinai. In the
following year Australian and other allied troops advanced into
Palestine and captured Gaza and Jerusalem; by 1918 they had gone
on to occupy Lebanon and Syria. On 30 October 1918, Turkey sued
for peace.
References/Links http://www.equusplazanz.com/abouthorses/upsaddles/saddles/1912/page_01.htm http://www.lighthorse.org.au/manual/1.html http://www.militaryhorse.org/upsaddle/index.htm http://www.diggerhistory.info/pages-equip/lt_horse.htm http://www.grantsmilitaria.com/asp/search1/gallsingle.asp?idGallery=14 http://www.firebirdarts.com/guydolls/indexhorse.shtml
|