KNM Math Program Instructions
Disclaimer: This program (actually a set of programs)
has many, many options and optional paths of execution. As such it has been impossible to test them
all and, therefore, it is possible that errors exist. So, use the program carefully and with thought. The author takes absolutely no
responsibility for anything.
The Screen.
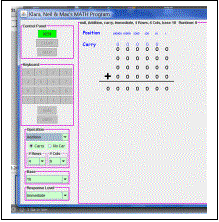
The display window for KNM Math program has two sections, on the left is the control button area and on the right is the operating area. Math programs are set up by selecting options from the control buttons in the control area. Math programs are worked by clicking buttons in this control button area and watching the progress of the operation as shown on the right side of the screen.
Operations.
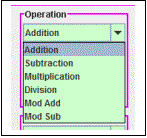 The program handles math
problems of six different types: Addition, Subtraction, Multiplication,
Division, Modulo Addition and Modulo Subtraction (at least what the author
understands to be Modulo Addition and Subtraction, never having seen examples.) When the program begins, the Addition option
is selected. Other options can be
selected from the “Operation” control box of the left side of the display. Clicking the arrow on the right side of the
dropdown box displays the list of six operations and allows the operator to
select an operation by clicking on the desired item.
The program handles math
problems of six different types: Addition, Subtraction, Multiplication,
Division, Modulo Addition and Modulo Subtraction (at least what the author
understands to be Modulo Addition and Subtraction, never having seen examples.) When the program begins, the Addition option
is selected. Other options can be
selected from the “Operation” control box of the left side of the display. Clicking the arrow on the right side of the
dropdown box displays the list of six operations and allows the operator to
select an operation by clicking on the desired item.
Problem Options.
There are a number of
options that can set for each type of problem.
Addition problems, for example, can be set up to have from two to six
rows of numbers with each number being from one to six digits long. They can also be set up to require the
student to enter carry digits or not enter the digits (Carry digits are always
used, as is normal. With the “no carry”
option the student must remember to add the carry digit but does not need to
type it in.) The following table gives
all options for the six operations.
|
Addition |
|
|
Number of Rows |
2 – 6 |
|
Number of digits per number |
1 – 6 |
|
Student enter “carry digits” |
Yes/No |
|
Number base |
2 – 16 |
|
|
|
|
Subtraction |
|
|
Number of Rows |
2 |
|
Number of digits per number |
1 – 6 |
|
Student enter “borrow digits” |
Yes/No |
|
Number base |
10 (for now) |
|
|
|
|
Multiplication |
|
|
Size of Multiplier (digits) |
1 – 4 |
|
Size of Multiplicand (digits) |
1 – 6 |
|
Student enter “carry digits” |
Yes/No |
|
Number base |
10 (for now) |
|
|
|
|
Division |
|
|
Size of Divisor (digits) |
1 – 4 |
|
Size of Dividend |
1 – 6 |
|
Number base |
10 (for now) |
|
|
|
|
Modulo Addition |
|
|
Number of Rows |
2 |
|
Number of digits per number |
1 |
|
Student enter “carry digits” |
No (N.A.) |
|
Number base |
2 – 16 |
|
|
|
|
Modulo Subtraction |
|
|
Number of Rows |
2 |
|
Number of digits per number |
1 |
|
Student enter “borrow digits” |
No (N.A.) |
|
Number base |
2 – 16 |
Base / Modulo Selection.
The Addition, Modulo Addition, and Modulo Subtraction operations allow the use of numeric bases other than 10 (will be extended to the other operations soon.) When these three operations are selected a dropdown box titled “Base” for Addition and “Modulo” for Modulo Addition and Subtraction is displayed and allows the user to select the numeric base (2 – 16) for operations (the current software has an error, “Base” is displayed instead of “Modulo” for Mod Subtract.) With bases greater than 10 for Addition, the computer uses the characters A (for 10), B (for 11), C (for 12), etc.
Response Level.
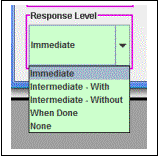 In addition to the options
that can be selected for each mathematical operation, there are four “Response
Level” settings that can be selected.
These indicate the level of feedback given the student as he or she
works the problem. The levels are given
in the table given below.
In addition to the options
that can be selected for each mathematical operation, there are four “Response
Level” settings that can be selected.
These indicate the level of feedback given the student as he or she
works the problem. The levels are given
in the table given below.
|
Response Level |
Meaning |
|
Immediate |
An audio response indicating a correct or incorrect entry is given immediately after the entry is entered. Furthermore, the program will not proceed until the correct entry is typed |
|
Intermediate - With |
An audio response indicating a correct or incorrect answer (not just a single entry) is given when the student completes a problem. The “With” part of this option indicates that with any audio response indicating an incorrect answer, red circles will be drawn, by the program, around every incorrect entry. With incorrect answers the student is given the option to start working the problem again. |
|
Intermediate - Without |
An audio response indicating a correct or incorrect answer (not just a single entry) is given when the student completes a problem. With incorrect answers the student is given the option to start working the problem again. There is no indication which entries were incorrect. |
|
When Done |
A visual response (displayed number) is given the student indicating how many, of an assigned number, of problems were answered correctly. The idea for this option is that the teacher can assign the student a number of problems for “homework”. The student must work the problems but will be given no indication of correctness of work until the assignment is complete. |
|
None |
No response is given the student. This option is intended as being a method for helping the teacher give the student an exam. Indication of correctness is only given, by the teacher, after the teacher examines the student’s work. |
To fully implement the ideas behind the “Response Level” options, a program has to be written to allow the teacher to set up practice or homework sessions and exams before the student begins work.
Control Panel.
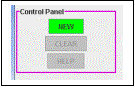 The Control Panel, at the
top of the left side of the screen, provides the means of activating a problem
once the operation and its options are selected. Clicking on “NEW” generates a new problem and allows the student
to begin working on it. “CLEAR” allows
the student to “erase” a problem without finishing it. “HELP” isn’t implemented.
The Control Panel, at the
top of the left side of the screen, provides the means of activating a problem
once the operation and its options are selected. Clicking on “NEW” generates a new problem and allows the student
to begin working on it. “CLEAR” allows
the student to “erase” a problem without finishing it. “HELP” isn’t implemented.
Modulo Addition and Subtraction
Clock.
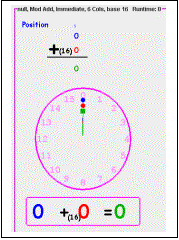 Like normal, or
traditional, Addition and Subtraction, the Modulo Addition and Subtraction
programs display two rows of numbers.
Because they are beginning forms of arithmetic, problems are limited to
the two numbers of one-digit each (top of figure to the left.) Working these programs can be done in the
same manner as the traditional operations.
That is, by entering the correct answer digit on the graphic
keyboard.
Like normal, or
traditional, Addition and Subtraction, the Modulo Addition and Subtraction
programs display two rows of numbers.
Because they are beginning forms of arithmetic, problems are limited to
the two numbers of one-digit each (top of figure to the left.) Working these programs can be done in the
same manner as the traditional operations.
That is, by entering the correct answer digit on the graphic
keyboard.
However, to make the problems more interesting, and more instructional, a “clock” graphic is provided (see figure.) Around the outer perimeter of the clock is displayed the numbers in the currently selected numeric modulo. Inside the clock are three clock “hands”. And, below the clock, an in-line equation showing the numbers pointed at by the clock hands. Additionally, as the solution proceeds, a broad, colored arc is displayed showing, like the equation, the solution suggested by the placing of the hands on the clock (see figure below.)
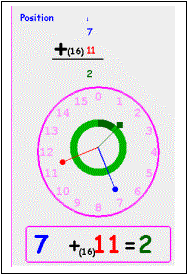 The clock hands and the
equation are colored coded to match the numbers in the problem shown above the
clock: blue hand for the blue (first) number, red hand for the red (second)
number and green hand for the green (answer) number.
The clock hands and the
equation are colored coded to match the numbers in the problem shown above the
clock: blue hand for the blue (first) number, red hand for the red (second)
number and green hand for the green (answer) number.
The student can move the blue and red hands to help solve the arithmetic problem simply by moving the mouse near the dot of interest and holding down the left mouse button while moving the mouse (the computer picks the dot nearest the mouse when the button is depressed.) The student should rotate the hands to point at clock number corresponding to the number in the problem. As the hands are rotated, the green hand automatically rotates to indicate the sum (for mod addition) or difference (for mod subtraction) of the two numbers. When the hand is rotated to the proper spot, releasing the mouse button keeps it in position. When both blue and red hands have been rotated to their proper position, corresponding to the numbers in the problem, the small green square points to the answer.
Note: Unfortunately, the hands on the clock do not
always aligned perfectly with the numbers (as they should.) The student should watch the numbers in the
equation below the clock to make sure of which number the hand is aligned with.
Once the student has rotated the blue and red hand he/she should notice the position (number being point at) of the green “answer” hand and use the screen keyboard to enter his/her answer to the problem.