![]()
 Have you ever
wondered how to re-wire your factory fog lamps to enable them to
illuminate without needing the headlights on? This is more of an
aesthetics mod, but well worth the 30 or so minutes required to
complete this process, in my opinion. I personally like to drive
with the fog lamps on as "daytime running lights" or
for use in the "rare" daytime rainstorms of South
Florida! However, I certainly do not want the headlights up as
that would ruin the nice smooth lines of the Probe's body.
Have you ever
wondered how to re-wire your factory fog lamps to enable them to
illuminate without needing the headlights on? This is more of an
aesthetics mod, but well worth the 30 or so minutes required to
complete this process, in my opinion. I personally like to drive
with the fog lamps on as "daytime running lights" or
for use in the "rare" daytime rainstorms of South
Florida! However, I certainly do not want the headlights up as
that would ruin the nice smooth lines of the Probe's body.
 |
This is probably one of the very first changes that Probe GT owners "in the know" will make to their cars. It is an easy way to personalize your Probe somewhat and begin to move away from the "stock" feeling of the car. I have had other Probe owners stop me in the street and ask how I accomplished this feat. Well, thanks to the Ford Probe FAQ, it was very easy. |
Since it was so well written, the rest of the page contains the essence of the "How-to" that is on the Ford Probe FAQ page. I have deleted some of the extraneous information, covered the minor differences in Probes with automatic transmissions, and I have also added some simple diagrams to help you visualize what we are talking about.
![]()
What this operation entails is the modification of the fog lamp switch (the button in the center console). Instead of having the fog lights operational only when the low-beams are on, we will modify the switch so that the fog lights will be able to become operational when only the parking / running lights are engaged.
This switch works more closely to a relay rather than a simple On / Off button. Current from the low-beam headlamp circuit is sent to the switch which closes the circuit and says that it is "OK", for the fog lamps to come on. When the there are only parking / running lights OR high-beam headlamps, there is no current to the switch and therefore the switch's circuit is not closed (or opened if they are already on) and the fog lamps will not come on or will shut off.
NOTE: The lamps are are turned off when the high-beams are engaged because Federal law limits the number of lights that are to be functional at the same time. I believe this magic number is four. Remember, high beams are the culmination of the (2) low-beam filaments plus the (2) high beam filaments which equals four. In the same respect the (2) low-beam filaments plus the (2) fog lamp filaments is equal to four. Obey the law (and out of common courtesy to other drivers) do not have the fog lamps engaged while using the high beams.
Caution: Do this procedure with the key removed from the car's ignition. It may be a good idea to disconnect the cable from the battery's negative terminal as an extra precaution.
Please note that this is a general guideline to help you accomplish this task. Some model years may require slightly different steps.
![]()
Before starting to do any work, have all of the necessary supplies and tools ready to go. What you will need:
-#2 Phillips screw driver (this is the "normal" sized driver)
-#1 or #2 Flathead screw driver (it maybe helpful, but not necessary)
-Wire cutters
-Pliers (or channel locks, vice grips, etc.)
-Electrical tape
-Scotch-Lok 3M(tm) connector: a.k.a. quick-splice or "u"-tap connectors. Your local Radio Shack or Discount AutoPartsstores(or similar) will more than likely recognize the Scotch-Lok name and can point you to them. Be sure to purchase the 18-10 awg size which are normally BLUE in color. The connector says that it is made for 18-10 awg, but I doubt anything larger than 14-12 is going through it. Either way, it is a good size for this application.
Since many people seem to have difficult time picturing what they look like from a description, here is my rendition of what they look like! Now when you go to buy them, you will have some idea of what to look for.
![]()
| 1.) | The first step in this process, is to remove the
center console to allow access to the fog light switches
wiring. The very first thing to do is unscrew the shifter
handle (1-2-3-4-5-R) on the manual transmissions. Automatic transmission-if you have an automatic, you will not have to do this. Read Step 2 below and you will see that it is possible to remove the center console without dismantling the shift handle. However, removing the retaining screw (located in the front of the handle) will allow you to manipulate it somewhat and may make things easier when it is time to pull the console over it. |
||
| 2.) | Automatic transmission
only--the trim ring around the shifter must be
removed before the following procedure. This is the
plastic piece the extends around the P-R-N-D-2-1 and the
shifter itself. Note that there is a "slit" in
top and bottom of the trim. That will allow you to
separate it into two pieces which is necessary to get it
over the shift handle after its removal. To remove this
piece, pull up on it CAREFULLY! A small
flathead screwdriver may help here, but be careful not to
scratch the plastic. There should be (4) snaps holding it
down (one in each corner). Lift the front end of plastic center console--lift gently but firmly. You will need to use your finger tips (or small flathead screwdriver) to get between the gaps in order to get a good grip. This piece IS the center console; it surrounds the shifter and parking brake and includes the ashtray. The back of this piece ends under the armrest/cupholder housing. Remember that the wiring for the cigarette lighter is attached to the plastic cover, so DO NOT FORCE this cover up too far before unplugging the wires. The cover is attached to the tunnel via metal clips so be careful not to lose these as the cover is lifted. Also, you may need to maneuver the cover around the parking brake handle. Setting the brake (lifting the handle) will give you some extra room to work. Remove the console and place it in a out-of-the-way location to avoid any damage. |
||
| 3.) | After the removal of the center console, two (2)
Phillips-head screws should be visible at the bottom of
the plastic frame that surrounds the vertical part of the
center console. This is the area under the equalizer if
you have the premium stereo or the storage pocket if you
don't. Remove these screws and place them in a location
where they will not get lost! |
||
| 4.) | After removing the (2) screws in Step 3, gently pull
the plastic frame from the vertical center console. Begin
at the bottom where you just removed the screws and work
your way up toward the air vents. This is removable with
the radio and A/C controls intact---there is NO
NEED to remove either one. As before, this frame is attached to the dashboard using metal clips. DO NOT lose these as you pull the frame away. As with the center console, don't pull the plastic frame too far out at first as the wiring for the auxiliary switches is attached. |
||
| 5.) | Locate the fog light button. There are five wires on
the back of this switch. 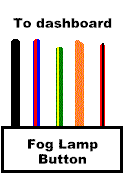 The colors are: The colors are:-orange The red / black stripe wire is connected to the headlamps circuit. This is the wire that becomes "hot" (+12V) when the headlights are turned on (this is normally referred to as a trigger or remote turn-on). The orange wire powers the light which illuminates the button when the dash lights are operational. Since this will give the same +12V necessary to close the circuit, but only with the parking lights on, this will become our new source for the trigger wire. |
||
| 6.) |
|
||
| 7.) | Open the Scotch-Lok connector (Figure 1) and position
it about two inches from the back of the button. Next,
fit the wires into the channels as shown in Figure 2.
Note that the orange wire runs through the passage that
is open at both ends and red / black stripe wire is
in the closed-end passage. When you have completed this,
close the cover of the connector and push down slightly
on the tab in order to hold the wire in place (Figure 3). wire is
in the closed-end passage. When you have completed this,
close the cover of the connector and push down slightly
on the tab in order to hold the wire in place (Figure 3). |
||
| 8.) | Use the pliers, channel locks, or vice grips to
gently squeeze the metal tap down (Figure 4). This will cut
through the insulation on both wires and thus make a
connection between them. Secure the connection by closing
the the locking flap that is on the connector. This
should cover the exposed end of the metal tab. (Figure
5). For an extra level of security, I personally wrapped
the entire connector, and first few inches of wire on
either side of it, with electrical tape. down (Figure 4). This will cut
through the insulation on both wires and thus make a
connection between them. Secure the connection by closing
the the locking flap that is on the connector. This
should cover the exposed end of the metal tab. (Figure
5). For an extra level of security, I personally wrapped
the entire connector, and first few inches of wire on
either side of it, with electrical tape. |
||
| 9.) | Make sure that there are no bare wires exposed metal.
Double-check the red / black wire that leads into the
dash. I tie-strapped mine down to the wire harness so it
would not come loose later from the vibrations and bumps
associated with driving. |
||
| 10.) | Reconnect the battery if you have disconnected it. Turn the fog light button off ("OUT" position). Then turn the headlight switch to the parking light position. Go outside the car and ensure that all parking lights are on, and that the fog lights and head lamps are off. |
||
| 11.) | Push the fog light button on ("IN"
position). Go outside the car and ensure that in addition
to all parking lights, the fog lights are now on. |
||
| 12.) | Turn the headlight switch to low-beam. Ensure that
parking lights, head lamps and fog lights are now all on. |
||
| 13.) | Turn all lights off by turning the headlight switch
to the off position. |
||
| 14.) | Ensure that all wires are safely out of the way.
Replace any metal clips that may have come loose to the
plastic frame that holds the auxiliary buttons. Line up
the clips with their respective hole locations on the
dashboard. Then, starting at the top near the air vents,
replace the center plastic frame by pushing the frame
into the dashboard. Make sure that all of the clips have
"snapped" into place. |
||
| 15.) | Replace the two screws at the bottom of the center
frame. |
||
| 16.) | Replace any metal clips necessary to the the plastic
center console cover. After fitting it back over the
emergency brake handle and shifter, push the cover down
into place on top of the center tunnel. Start at the back
near the armrest and work your way forward. Make sure the
leather shift boot goes over the shift lever (manual). |
||
| 17.) | Manual--Replace the shift knob by screwing it
clockwise onto the shift lever. Hold the top of the
leather shift boot so it does not twist as the shift knob
is tightened. Make sure the knob ends up tight with the
1-2-3-4-5-R facing the correct way. Automatic--push the handle down if it has been lifted up at all and then line up the hole on the handle with the screw hole on the shaft. Secure the handle with the proper screw. Next you will need to replace the trim around the shifter in the reverse of how it was removed (two separate pieces). |
||
| 18.) | That's it!! If you followed the directions closely,
the fog lights should now be operable whenever the
parking/running lights are on. Enjoy! |
![]()
![]()
This page is made possible by Geocities.
