![]()
 If you are
thinking about purchasing headers for your Probe and doing the
install yourself, you are in the right place! This is an overview
of the installation of Hotshot 3rd generation headers on my '97
Probe GTS.
If you are
thinking about purchasing headers for your Probe and doing the
install yourself, you are in the right place! This is an overview
of the installation of Hotshot 3rd generation headers on my '97
Probe GTS.
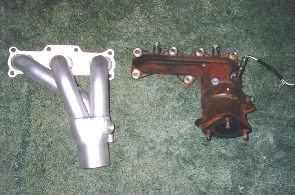
Here you can see the y-pipe and headers fitted together. If only it was that easy to put them on...
![]()
The first thing that you should know is that unless you have access to a lift, this will probably be a 2 day project. In other words, if you need the car for work tomorrow, don't start the install today!
Depending what year your Probe is, there are different manifolds on them. I am fairly certain, that the '93-'95s are identical in that they have one O2 sensor in each manifold (although the sensor fittings may have moved over a few inches over the years). For 1996, OBD-II was added and there were two O2 sensors in each manifold (along with pre-heaters). For 1997, the OBD-II remained, of course, but the two additional O2 sensors that were added to the manifolds in '96 were moved to the cat's inlet and outlet. In other words, the manifolds on the '97s should be close to identical to the '93-'95s, however, the now the end of the y-pipe needs a sensor fitting.
You should know that the rear manifold can only reached from under the car, so be prepared to spend many hours under there!
Again, this is an overview, not a How-to. Some years may require different steps.
![]()
- Jack stands
- Drop light
- Assorted metric sockets (10mm, 12mm, 14mm, 17mm)
- Assorted open-end and box wrenches
- Large adjustable wrench
- Vice grips
- Peroxide
- Bandages
- Tylenol
- Swear jar
- A friend to help, although not required
![]()
OK, the first and obvious thing to do is put the car up on jack stands and make certain that it is secure. You will be spending a lot of time underneath it, so double-check everything. If you have an older Probe, you may wish to spray penetrating oil on the the nuts that will need to be removed before starting.
Please, let the car cool before working on exhaust manifolds!
![]()
Once the car was secure on the jackstands, I took my trusty drop light and crawled under the car to size up this project. It didn't scare me off, but I wasn't looking forward to it either!
I began on the front manifold. First, I disconnected the O2 sensor (there's a plug-in type connector located about 8" away....just follow the wires). Then I began removing the aluminum heat shields. First, remove the shielding around the downpipe part of the header. There are (2) 10mm bolts holding it on. It comes off in two pieces that wrap around half the circumference of the pipe each. After that, the top portion of heat shielding can be removed. There (4) 10mm bolts holding this on. After they are removed, you can carefully pull the heat shield over the sensor (as I did) or take the sensor out first.
![]()
| Once the heat shield is
gone, you will be able to immediately see (4)12mm bolts
across the top of the manifold. Additionally, there are
(3) more on the bottom of the flange that you will need
to look for. The two middle bolts on the top side are
actually studs, so don't be surprised if the stud
unscrews. Before removing those however, crawl under the car and remove the (3) 12mm nuts in the flange holding it to the y-pipe. |
|
 |
Back topside, remove the (7) bolts and
have a firm grip on the manifold when removing the last
one. As you will find out, the manifolds are fairly
heavy. Take the metal gasket and put it aside to be
re-installed with the headers. Here is my stock front manifold next to the its Hotshot counterpart. |
![]()
OK, the easy part it over!  Crawl under the
car and begin by removing the cross member. There are (3) 17mm
bolts on either side of it.
Crawl under the
car and begin by removing the cross member. There are (3) 17mm
bolts on either side of it.
Once that is off and placed aside, remove bolts from the y-pipe flange at the front of the cat. Leave the y-pipe in the rubber hangers for the time being.
Now remove the (3) 12mm bolts in the flange holding the rear manifold to the y-pipe. Have a grip on the y-pipe so it doesn't fall on you when you remove the last bolt.
Disconnect the O2 sensor in the rear of the y-pipe if you have a '97 and then slide the y-pipe out of the hangers and place it aside.
![]()
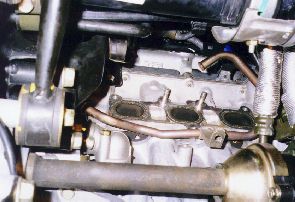
This is what you should now be looking at. The light colored thing inside the manifold is the O2
sensor. This needs to be unplugged also. Follow the wires up and
disconnect the plug-type connector.
light colored thing inside the manifold is the O2
sensor. This needs to be unplugged also. Follow the wires up and
disconnect the plug-type connector.
The next thing to do is to remove the heat shield around the flange area. This is done the same way as on the front manifold. There are (2) 10mm bolts holding two semi-circle pieces around the manifold.
After that is gone, you should have a slightly better view of the manifold. Now would be a good time to remove the O2 sensor since this one has to be out before the heat shield will come off.
When that's done, remove the top portion of the heat shield as on the front. It's a little tighter back here so a 12mm wrench will probably be a little more effective than a socket. Since you can't see the bolts on top of the heat shield, you will need to feel around for them.
With all of the bolts out, you are almost ready to remove the shield, BUT the EGR tube has to be removed from the manifold first. I believe that it was a 3/4" nut holding it on. Remove that and try to pull the tube away from the manifold. This is not an easy task by any means.
I ended up clamping vice grips on the end and pulling the shield while trying to push the EGR tube in the opposite direction. This will take some time and the heat shield will probably be bent to heck by the time it's out.
![]()
After the heat shield is off, it's time to take the rear manifold down. Just as in the front, there are (4) 12mm bolts on top (2 studs in the middle) and (3) 12mm bolts on the bottom of the flange.
If haven't noticed the trend yet, everything that was done in the front takes twice as long on the back.
Have a good grip on the manifold when you're at the last bolt (I suggest leaving an easier-to-reach bolt for last so you can have one hand on the manifold and still unscrew the bolt).
Once the manifold is off, put the metal gasket aside for re-installation with the headers.
This should have you about 3 hours into the install now. Take a break now. It's still up hill from here.....
![]()
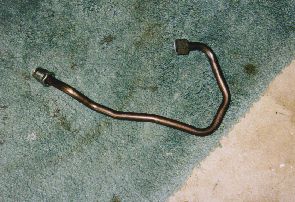
You will need to remove the threaded EGR nipple from the stock rear manifold. Put some penetrating oil on it and then grab some vice grips. Unscrew the nipple and then thread it into the rear header (there is a place for it).

![]()
 Now the real fun begins....
The single biggest pain of this entire install was making the EGR fit! In the photo to the right, you see the rear bank with the manifold removed and the EGR tube not looking like a real big deal.
At first I tried to put the rear header on with the tube as it is, but after 45 minutes of trying everything, I knew it had to come off completely before the header would fit. The problem there being that where it is connected to the block and the angle it's on, it is nearly impossible to get a wrench on it!
The EGR tube is ridiculously resistant to being bent....don't bother trying unless it's completely off the car and you can put your entire body into it!
This is where the "Swear Jar" starts to fill up! I tried for a good hour to loosen it from the block. It is a 23mm nut, BTW. If you don't have a 23mm open end wrench, you'd better have a big adjustable wrench! After 15 min. or so, I sprayed penetrating oil on it....worked on it for a while longer and then, completely pissed off, I called it quits for the night.
![]()
 The next morning, I started
with a new enthusiasm. To this day I have no idea what really
happened... I was working on fitting the O2 sensor into the
y-pipe and Dave was messing with the EGR. After about 20 minutes,
he had the tube out. Says that he just used the adjustable wrench
and it came out. Maybe the penetrating oil had time to soak in or
something.
The next morning, I started
with a new enthusiasm. To this day I have no idea what really
happened... I was working on fitting the O2 sensor into the
y-pipe and Dave was messing with the EGR. After about 20 minutes,
he had the tube out. Says that he just used the adjustable wrench
and it came out. Maybe the penetrating oil had time to soak in or
something.
Whatever it was, I was happy that it was out!
![]()
Once that was out, we put the rear header in and bolted it down (don't forget to put the O2 sensor out of the stock manifold into the header!) After that was done, it was time to fit the EGR tube back on. Since the header slightly moves where the fitting is, you will have to bend the tube.
This was not easy at all. It came down to bending it a little, test fitting it, bending it again, test fitting it, etc, etc, etc. Ultimately, this took a good 2 hours. I had a double box-end wrench....I slipped one end over the tube and put a breaker bar through the other end...just to bend it! The thing was unbelievable!
![]()
 |
This is a picture of the EGR tube
connected to the block and the header (marked by yellow
circles). This vantage point is from directly under the
rear bank looking upwards. This was clearly the most difficult thing to do and I was happy to take this photo once it was done! If you have reached this point, the rest is gravy! |
![]()
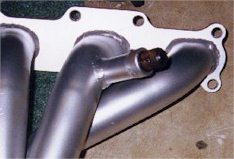
 As I mentioned before, I was working on
installing the O2 sensor in the y-pipe. Looking at the photo, it
is easy to see that the stock '97 y-pipe (top) is shorter than
the aftermarket replacement. This is why the GReddy needed to be extended in order to fit! As
you may guess, after this y-pipe is installed, the GReddy needed
to have that extension removed.
As I mentioned before, I was working on
installing the O2 sensor in the y-pipe. Looking at the photo, it
is easy to see that the stock '97 y-pipe (top) is shorter than
the aftermarket replacement. This is why the GReddy needed to be extended in order to fit! As
you may guess, after this y-pipe is installed, the GReddy needed
to have that extension removed.
The yellow circle shows the location of the O2 sensor.
![]()
 |
As you can see in this photo, instead if
having a fitting welded on, I drilled a hole, threaded
the sensor in, and then used Permatex Ultra Copper RTV to
seal around it to avoid leaks. This worked excellently!
No check engine lights to date! If you notice, I had to angle the sensor down instead of upwards. I test fitted the y-pipe and saw that in it's new farther back location, the sensor would have hit the undercarriage if it remained in it's original orientation. |
![]()
Getting close to the end! While the RTV was drying, I
installed the front header, but left the bolts  loose. This made it easier to
install the y-pipe by giving it some play.
loose. This made it easier to
install the y-pipe by giving it some play.
Installing the y-pipe is easy. Hang the pins on the hangers, line up the collectors with the bottom of the headers, push them on and bolt them down (not tight yet).
Connect the y-pipe to the cat.
Tighten down the front header.
Tighten the bolts holding the collectors to the headers.
Re-install the cross member.
Get the car off the stands.
Start the car and listen for any exhaust leaks!
![]()
You're done! Enjoy!
![]()
![]()
This page is made possible by Geocities.