Bougainville Water Project
Report on Mortar jar Trials, May 1999
By Brian Worboys
31/5/99
Day one :
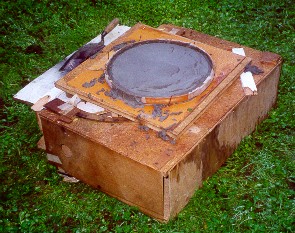
A mortar disk has been placed to
form the base of the jar. This is the same mortar mixture that will be used for the rest of the jar: approximately one part of cement to two parts of sand, with water carefully added to give the right consistency to get the mortar to stick to the mould.
A sack cloth bag has been sewn to form the shape of the jar. It is important that this bag has a base diameter that is approximately 30mm smaller than the prepared mortar base. The bag has then been placed on the prepared base and is being filled with damp sand. As the bag fills it must be progressively "patted" into the desired shape.

Care has to be taken if the desired symmetrical shape is to be achieved. However, this is not critical to the functionality of the jar. A smooth shape will improve the strength of the jar, and enable less mortar to be used.
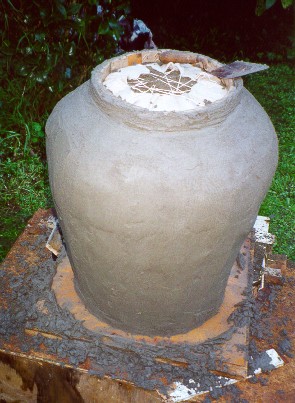
The top of the bag has been laced shut and a ring placed on the top to form the neck. An improvement would be to cut and sew darts into the top section of the bag to give a smoother surface.
The first layer of mortar is being plastered onto the sand bag mould.

The first mortar layer has been completed. A rough surface finish is left to improve the bond with the next layer.
The second layer can be plastered on as soon as the first layer has an initial set. This may be within a few hours or it may be the next day. This depends on the nature of the cement used and the climate.
Plastering on a second layer of plaster is child's play.
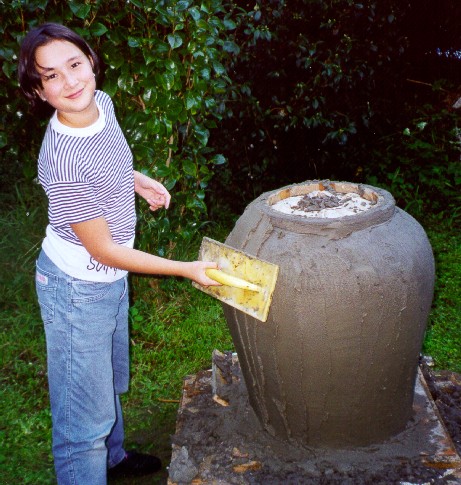
Mortaring is now complete, after two or three days curing the former ring at the neck can be removed and the sand dug out. The bag is then removed from inside the jar and can be reused.

After cleaning, the inside of the jar can be "painted" with a cement and water mixture to seal any minor cracks.
Day six.
After curing for a few days the jar can be safely moved. It weighs 46kg and holds about 120 litres of water. This jar had three coats of mortar and a wall thickness of approximately 15mm. Less than half a bag of cement was used. Two coats of mortar are generally considered adequate.
Larger jars of up to 4m3 can be made using the same technique. However, larger jars may not be able to be moved so safely, and may better be built on the location where they are to be used.
Many alternatives to the sand bag exist for forming an internal mould. These include woven bamboo segments and shaped concrete blocks. Moulds can be coated with wet clay to ensure that they can be removed easily.
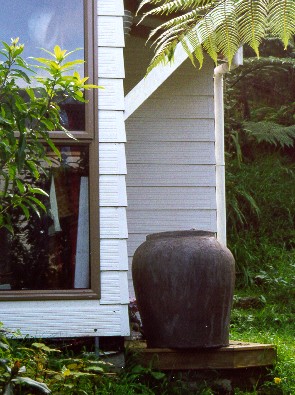
Placed by the house the jar can be filled from roof run-off water and is convenient as a domestic water supply.
A lid of some sort should be used to keep the water clean, and to stop mosquitoes breeding in the stored water.
Water can be drawn from the jar using a dipper. For health reasons it is necessary that the dipper is dedicated to this purpose and is never used for drinking or any other use. An alternative is to fit a tap to the bottom of the jar. This adds convenience and reduces health risk, especially for a larger jar, but it also adds a maintenance liability, and a risk of water loss through leaking and failure to turn the tap off fully after use. A good quality tap may also more than double the cost of materials needed to build the jar.

An alternative to the cement mortar jar is this type of earthenware jar. This one is from Thailand. These have the advantage of requiring no imported materials (cement). However, the necessary kiln firing requires fuel and a high level of skill is needed to obtain a reliable product. In the shorter term, and for small production runs, the mortar jar seems a more attractive alternative.
Earthenware jar production may have potential for other projects more focussed on the development of traditional handicrafts. The burning of wood for kiln firing may not have the associated environmental problems in Bougainville that it does in other countries.
Tools used in the construction of mortar jars :
• Sack material for the sand bag
• Knife or scissors
• Sack sewing needle, thread and string
• Small shovel or trowel for mixing mortar and digging sand
• Rectangular plastering float (300mm)
• Small plaster's pointing trowel (100mm)
• Vessels for mixing mortar and carrying water
• Flat solid board or other surface to build the jar on (1m x 1m)
• Thin wood or metal to make the former rings for the base and the neck
• Sheltered construction site
For further information, contact: Brian Worboys
Opus International Consultants Limited
PO Box 12003, Wellington, New Zealand
Phone +64 4 471 7000
Fax +64 4 499 3699
email: brian.worboys@opus.co.nz
web page: http://www.opus.co.nz