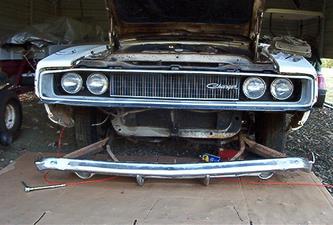
Front Bumper and Air Shield Removed
As stated in an earlier blog entry I plan to the extent possible to follow the sequence set out by Larry Lyles in his book titled Project Charger while restoring our Charger. I tell you this again so I can tell you that I'm already deviating from his proven sequence.
I've completed the tasks he recommends in Chapter 2 but I'm going to skip over Chapter 3 and start on Chapter 4 activities which have to do with exterior teardown.
My working conditions are such that I have elected not to remove the glass from the vehicle as he recommends in Chapter 3. I know there are certain tasks in Chapter 4 I will not be able to complete until I complete glass removal. I plan to remove the glass once outside conditions in this area improve. We don't have 10 inches of snow like people North of us but it is currently cold and windy here.
I removed the bumper and lower air shield (has with parking lights in it) at the same time. The primary reason for doing so is that the two small vertical chrome bumper parts wrap around under the air shield and fasten at the rear through holes in the shield. It was easier to remove the two bolts at the rear that go through the air shield rather than trying to get the front bolts holding the two small vertical chrome bumper parts loose from the bumper.
The air shield is held in place by ten 7/16 inch bolts. On either side at the fender there is a cover that connects between the air shield and the fender. These shields which are held in place by five 5/16 inch head screws must be removed to allow the bumper mounting brackets to slide out. The bumper will slide out once the four large bolts connecting its mounts to the unibody and the two 7/16 inch bolts that connect the bumper on either end to the front fenders are removed.
The four large bolts proved to be difficult to remove. If I owned a socket wrench set with a longer handle or a pneumatic impact wrench the job would have been much easier. Once I got the bolts out and the electrical connection to the parking lights disconnected the bumper and the air shield were easy to remove. I slid the the bumper, bumper mounting braces and air shield out until the braces cleared the grill. I did this by myself but an extra pair of hands would have been very useful.
Once the bumper and air shield are off the car the two small vertical chrome bumper parts can be disconnect from the main bumper and the air shield removed. I reattached the bumper parts after removing the air shield. At a later date I will dismantle the bumper from its mounts and send it to be chromed. I’ll also prep and repaint the mounts later.
The air shield has sustained some minor damage. I believe it can be straighten and re-used. I’ll strip the parking / turn signal lamps from it before sending it for refurbishing. I’ll refurbish the lamps later.
The incident that bent up the air shield also bent the bottom of the radiator support. I’ll need to straighten it before prepping and painting it.
I’m sure those people who take restoring Chargers more seriously than me know this but I found it interesting that the radiator support had white over spray on it at the bottom. Finding this body paint causes me to believe that the grill and bumper must NOT have been on the vehicle when the exterior was painted at the factory.