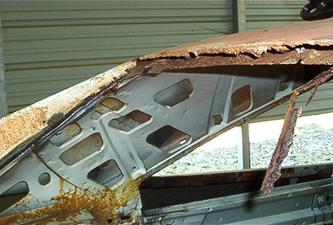
Not a Pretty Sight
The rear window area is show above after the glass was removed. It is not a pretty sight! It will be necessary to rebuild the entire rear window area to include the roof line. In addition to new sheet metal new trim molding clips are required. Most of the clips have rusted away.
After studying how the rear window was installed it was decided to use a flat limber bladed knife (same knife roofer’s use to cut tar paper and score shingles) to remove the window glass. The knife’s blade is about 4 inches long and curved approximately 270 degrees at the end to form a point. The leading and rear edges of the blades tip were sharpened to allow the blade to cut going in and coming out.
The back window doesn’t have a rubber gasket around it like the windshield. It is mounted by laying it in a bed of wet putty placed in the window channel. When the putty cures it bonds to the glass and the window channel thus holding the glass in place.
The glass removal process started on the exterior by cutting and removing all the putty between the glass and the edge of the window channel using a box opener knife, the roofer’s knife, needle nose pillars and a brush for cleaning up the mess. Once this putty was removed the removal process continued from inside the vehicle’s cabin.
The putty seal holding the rear window was sprayed with WD-40 oil. In the center at the bottom of the glass the tip of the roofer’s knife was used to beach the putty seal between the glass and the window mounting channel. Once the seal was broken the roofer’s knife was used as if it were a manual can opener. The curved part of the blade fit well in the channel and when the handle of the knife was push down and back the blade would rotate on the curved part causing the point to come up and cut through the seal. After each cut the blade was forward and the process repeated. It took less than half the time to get the glass loose from the inside as it did to remove the seal putty from the outside.
When reassembling the car it will be necessary to ensure the vinyl top and the trim molding clips are installed before the back and front windows and the channels that hold the side windows weather stripping are installed. It will be almost impossible to install the clips with the rear window installed. The clips also serve to hold the edges of the vinyl top in place as they are mounted on top of the vinyl. On the sides of the car the roof rail trim holds the edge of vinyl top in place. Also on the sides at the edge of the sail panels two screws are used on each side under the sail panel side trim to hold the vinyl top edges down.
Efforts to remove the vent window assembly from the driver door failed when the hex head drive screw that holds the vent wing assembly to the door frame could not be removed. After repeated tries and a pint of penetrating it was decide to put off the task, at least temporarily.
It’s not absolutely necessary to remove the vent window assemblies but they do have pit marks in the chrome. The project plan calls for them to be replaced or to have new chrome applied. This issue will be addressed later since there is no shortage of other tasks that can be performed while we weigh our options.