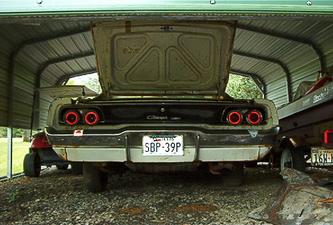
Photo: The Charger in Bob Mitchell's storage area with the decklid open to dry. Taken Oct. 25th.
It rained hard here all night. The lake is over its banks again for the 4th time this month. The people down around Beaumont who still hadn’t recovered from the rains that occurred just before you arrived are again up to their collective asses in water. Many areas can only be reached by boat.
I did a visual survey of the car today and as part of it removed the fender tag. I know you like to decrypt these things so I will send you pictures of it.
In case you have trouble reading the tag from the pictures the following is what I see when holding the tag:
The first row consists of the letters a – y in lower case.
The third row consists of capital letters A - Z
On the second row are the numbers 64, 7, 6, and a slanted 9. The number 6 in 64 is below the small letter a in the first row and above the upper case letter C in the third. The number 4 is located next to the 6 which puts it below the small letter b on the first row and above the upper case letter D on the third. The next number on the second row is a 7. It is located below the small letter h and above the upper case letter K. The next number is a 6. It is located under the small letter m and above the upper case letter N. At the end of the second row is the number 9. It is slanted and is located next to the tag mounting hole and above the upper case letter X and Y on the third row.
There are three numbers on the forth row. Those numbers are 1, 2 and 4 with the 2 and 4 being next to each other. The number 1 is located under the upper case letter R in the third row while the 2 and 4 are located under the upper case letters X and Y respectively.
The fifth line (from left to right) consists of the numbers 1 -9, a space, the letters AX, a space, the letters TRM, a space, the letters PNT, a space and finally the letters UBS. All letters are in upper case!
The sixth row: The numbers 5 and 0 are located under the numbers 2 and 3 in the fifth line while the number 8 is under 7 in the fifth row. The next number is a 1. It is located under the A in AX on the fifth row. C6F is located under TRM on the 5th row while WW1 is located under PNT. The last letter of the 6th row is an upper case G. It is located under the U in UBS on the 5th row.
The 7th and last row reads XP29, space, 41, space, 5, space, 31, space, 909, space, 078467 from left to right.
While looking at how the car was configured see if you can find out anything about what differential (rear end) is in the car. I’m sure its not a sure grip but if it’s a set of good road gears maybe we can just add the sure grip gears and have a good touring car that still has lots of get up and go.
On a similar note I’ve started putting out feelers to the effect that we are looking for a 440 cid engine and matching transmission. I want to get a cost quote so we can figure out how to proceed.
Either last year or the year before your Uncle David gave me a book titled “Project Charger”. It is a step by step process used by Larry Lyles for restoring a 1970 Charger R/T. Larry writes for Auto Restorer magazine. The book is dated 2004 and full of useful information. I used it extensively while working on the windows of the Coronet. I’m going to follow his step by step process as close as possible. I’ll deviate when it comes to the drive train work because my boat shed is not conducive to crawling around under the car. I’ll farm a lot of that work out to Advanced Automotive.
The first step Larry recommends is to document the current condition of the vehicle. I’m going to start that tomorrow. While doing that I will compile notes and take pictures. I’ll also put together lists of the parts we will need to purchase, refurbish or have refurbished. When done documenting the current condition my first task will be to fix the stuck driver side brake. I’ll need to move the car several times between now and when it is done.
I hear so much about frame off restorations that when I read the following in Larry’s book it stopped me in my tracks. “While the Charger is a total uniboby vehicle, meaning the body can’t be removed from the frame, it restores pretty much the same as a framed vehicle. It still has front suspension components, as well as rear suspension components to be dealt with. The basic difference is that the body cannot simply be lifted off the frame to gain access to these parts. The parts are bolted directly to the unibody structure, and therefore require a little more close-quarters work when dealing with them.” I believe this means I can strip the car then take it out and have the drive train work done separately.