Battle for Elsdorf
The After Action Report of a Combat Mission:Beyond Overlord battle between Rob Hounsell (AXIS, defending) and Chris Knapp (Allied, attacking) as told from the AXIS viewpoint. Battle took place in February 2002, over a period of several weeks, using the Play-By-Email feature.
Note: scale setting for combat units in images is set to 3x normal size for clarity.
![]()
Location: Western Europe (Germany)
Time: March, 1945
Conditions: Winter, light snow
10:00 AM
After setting up my initial hasty defences, I set up my fire zones and ambushes, place some grenadiers into the forward tree line to reinforce the snipers there, and order them to hide.
10:01 AM
I am not sure from which avenue the expected attack will come (I suspect my right flank, as the forward listening posts have identified armoured vehicles advancing there).
10:02 AM
Contact on the right! The snipers which I placed forward in the central woods (of which I seem to have too many - rather have more infantry) are causing the armour commanders to duck their heads and button up.
10:03 AM
Some Priests and infantry are moving slowly up the right flank. A scout car stops just before my ambush, and then reverses direction! The assault gun (a Priest) kills my 20mm towed gun in town before it can do any damage.
The main attack now comes up the middle, with a scout car, and at least four tanks. My central 50mm AT gun ricochets two AP rounds off the turret of what appears to be a Stuart tank and finally blows off a track before my crew is sent flying by a tank round which destroys the AT gun. My central 75mm infantry gun is also knocked out before doing much damage. The recoilless rifle is firing away at the scout car peeking around the corner of a building, but is not very accurate, and is also taking incoming rounds. Finally, my central howitzer (Wespe) has fired a couple of rounds at the tanks, but has missed and impacted on the houses well behind them.

click image to enlarge
On the right, a second Wespe fires at suspected infantry positions, while the panzerschreck squad I sent out has finally made it to the tree line guarding my forward right flank. I now have only the recoilless rifle, two Wespes, and one remaining 75mm Infantry gun (which is waiting in ambush on the right and has not yet fired) to deal with the incoming armour at any decent range. Having lost 3 guns in a short space of time, I fear being overrun, and am preparing for a bitter house to house fight. Perhaps the 20mm half-track I've sent out to the left to try to outflank the enemy will be useful in the coming battle. I see now that the main axis of advance is right down the middle. I need to hold on until the promised Panzer reinforcements arrive! There's no place to retreat to.

click image to enlarge
10:04 AM
The ambush the 75mm infantry gun set up on the right has claimed its first victim; a Yankee "Priest" SP gun. Revenge for the loss of my second Wespe, which fell victim to the Priest! I note that a couple of half-tracks are following the gun. The AT gunners have to be careful of the troops that appear to be advancing in the trees on the extreme right. I decide to send out my flammpanzer to support the gun - with a 50m range, it would probably be killed immediately in the town, as I suspect the enemy tanks will precede their troops. A second ambush by a brave squad of Volksgrenadier hiding in the middle have claimed a Sherman, but are immediately taken under fire by the enemy infantry. The remaining Wespe comes under fire, and backs down a rise to set up an ambush that I hope will claim one more tank.
10:05 AM
I will be recommending the crew of the infantry gun on my right for a commendation; the crew has killed an additional 2 half-tracks (one a mortar carrier) that were advancing behind the SP gun killed by the same crew just one minute previously. However, they pay the price and are now pinned, coming under fire from troops in the woods. I urge the flammpanzer commander to hurry to help the crew. I think there may be another SP gun in the same area, which is bad news.
More bad news: I am informed that two of the MG pillboxes have been knocked out by tanks (one a 105mm Sherman). An M8 howitzer advances over a small rise and damages the building my mortar spotter and machine gunner are in, panicking the spotter and immobilizing the gunner. The 'schreck team I sent towards the middle to take on the tanks has been eliminated by rapidly-advancing troops; they are moving much faster than I anticipated, and I am now unable to start the mortar bombardment I had ordered! The grenadier team in the centre which scored a tank kill last turn is now being wiped out by troops and other tanks. The enemy armour is still taking its toll - both on infantry, and killing the recoilless rifle that was unsuccessfully engaging the scout car hiding behind a building.
One small bright note: to my advantage, a chance encounter on my left between the 20mm half-track and what I thought was another Priest or perhaps a Stuart (but which turned out to be a scout car) was won by the quick shooting of the half-track. I order the 'track to take a defensive position and block the infantry advancing on the left!

click image to enlarge
10:06 AM
The half-track I sent out on the left has fallen victim to a gottdamerrung bazooka round. On the opposite side,
the flammpanzer arrived too late to prevent the capture of the AT gun crew, and now has come under fire by yet
another bazooka team. I decide to order it back into town and hope that it can slow the Yankees down while hiding
behind some buildings. The town continues to come under fire from the M8, artillery rounds, and now some Shermans.
One in particular advances, but stops just short of the Wespe's ambush target! My mortar spotter has suffered too
much at the hands of the pounding, and has broken and run, hiding in some smaller buildings.
I have ordered surviving crews of disabled guns into buildings in the town. They have only pistols, but I will
need every bullet.
On the left, I have two platoons of SMGs and SS rifles with some panzerfausts hiding in foxholes near the top of
the hill. I decide to keep them there instead of withdrawing them into town. Perhaps they will survive and be useful
elsewhere, as the main Allied thrust seems to be aimed at the town itself.
Again, my main worry is surviving until the promised reinforcements arrive. My troops are so few, and the Allies
seem to have swarms of them.
10:07 AM
Yet another SP gun has appeared on my right, and knocks out the retreating flammpanzer. A panzerschreck team in the center is cowering behind a pillbox after being attacked by infantry and a Sherman. I order them to crawl around the pillbox and engage the tank. The remaining two platoons I have are still hiding in foxholes in the hills to the left of the town. I think about committing them to assist the town, but I now feel their only chance is surprise.
10:08 AM
Artillery and/or the M8 have flattened the building my mortar spotter hid in. He's now dead. The central Wespe sets up another ambush after having backed down behind some woods. I am hoping they will get a flank shot at one of the tanks threatening the town. I disperse my two remaining squads to various buildings in the town after the central building comes under fire. Things are now desperate; there seem to be hordes of enemy infantry!

click image to enlarge
10:10 AM
The Yankees continue their advance, this time combining infantry and tanks. In the town I am reduced to 2 half
squads, a platoon HQ, and a Company HQ, and all are under intensive fire even though they are within heavy buildings!
I withdraw them slowly, hoping to fight a delaying retreat. One of the town's two wooden bunkers has been reduced
to kindling. The ambush the Wespe set up was ineffective - the idiots missed a flank shot on one of the tanks twice!
They were then blown to bits by the Sherman 105. Another Tommycooker and an incredible number of troops are advancing
on the central hills outside of town, and are coming under fire from several hidden platoons there, but my troops
are vastly outnumbered.
Just when things are looking like there is no hope, I'm informed that reinforcements in the form of a fresh platoon,
two Panzer IVs, a Tiger, and a King Tiger have rumbled up behind the town!

click image to enlarge
10:11 AM
Jubilant, I direct the King Tiger to roll into the outskirts of Elsdorf and use the buildings there as enfilade; he should have good shots (although frontal) at several armour targets from there. One of the PzIVs moves to the northern outskirts with a squad on board to interecpt some troops there and dispose of a scout car and SP gun moving in on my right. The remaining PzIV and Tiger I send (with squads embarked) up the road in the centre in order to hit the attacking forces from the left. I warn them to stay on the roads in order to avoid getting bogged down. Could this be the turning of the tide?
10:12 AM
My tanks immediately run into trouble. The right PzIV has a track blown off by an unseen foe and is immobilized. The King Tiger takes some shots at the Yankee infantry within the town, but Shermans there fire smoke and retreat.
Unbelievable bad luck! What looks like a tank destroyer (an M10, perhaps?) appears on far right outside of town and immediately damages the King Tiger's main gun! The best fighting unit I have is now useless except as a MG-loaded diversion. I can't believe it.
An attempt to get a panzerschreck team close to one of the Shermans meets with stiff resistance. Despite their attempts to crawl around a pillbox, using it for cover, they are soon routed by the weight of fire being showered on them.
10:13 AM
More ominous developments: 2 Pershings show up - one on my left and one on the right outside town. However, 4 more Tigers have rolled into the area from division reserves. Aha!
However, my worst fear is soon realized; one becomes bogged in some soft earth - I hope it can clear itself. I set up an ambush for the Pershing on the left with 1 Tiger, send a second to help (assuming it unbogs). The remaining Tigers I send behind the town to support the King Tiger. In the center, a PzIV and a Tiger slowly move forward on the road, knocking out a Chaffee tank as they go. I hope they can take care of the remaining Sherman and Pershing outside the town. In the central hills, another Chaffee is knocked out by a Panzerfaust. I order the squad to retreat as they are coming under heavy infantry fire. A second squad targets the remaining Sherman Jumbo.
10:14 AM
The bogged Tiger becomes immobilized. It may be useful as a kind of static pillbox. But the ambush of a Pershing on the left is successful! The Pershing is knocked out. This is more like it. My hopes rise, despite losing the PzIV advancing with the Tiger in the centre to enemy fire.
10:15 AM
Gott in Himmel! What I thought was a tank destroyer is actually another Pershing tank, and there are more of them than I thought.
Disaster ensues! First, the centre Tiger is killed by a Pershing. Then, after 8 shots, the King Tiger is finally
knocked out by another Pershing.
The platoons hidden on the central hills are taking their toll on the enemy infantry, but some Shermans are supporting
and are making life miserable for them.
10:16 AM
After ordering the remaining two Tigers to engage one of the Pershings in town (I hope to gain an advantage by both attacking the same target), the end arrives. Both Tigers are knocked out by several Pershings on the outskirts of town after only delivering glancing shots.
click images to enlarge


10:17 AM
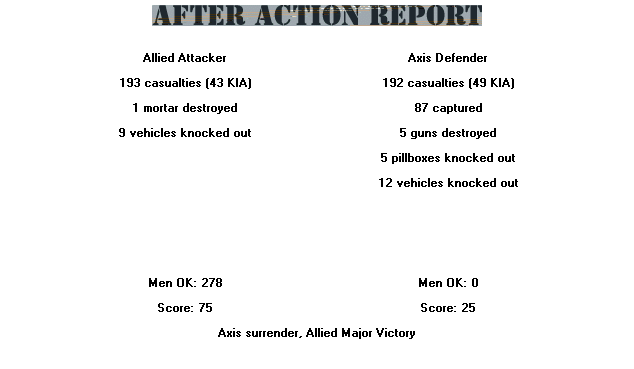
I have no choice - with all my reinforcements out of the fight, I am left with what amounts to a single under-strength platoon. There is no valour in allowing this massacre to continue. Gritting my teeth, I ride forward in my command car, white flag waving from the roof.