Building A Robotic Arm
Page 3
We need to attach the cord to the arm roller assembly so that it can be pulled up by the motor. Cut off 3" from a stock 1" by 4". Nail and glue it in place 6-1/2" from the top of the roller assembly. Drill a .099 hole 1-1/16" from the front of the wood. Pull the cord thru the hole and tie a knot at the end of the cord so that it can not be pulled out of the hole.

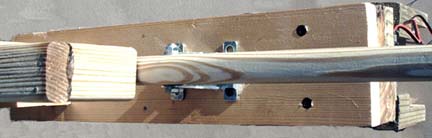
Cut a 10" piece of wood from the stock furring strip. Place the wood to the back of the roller assembly and drill two pilot holes thru the wood and into the roller assembly. Using the two pilot holes as a guide, drill two .140" holes in the furring wood you just cut. Now using a 1/2" drill bit, drill just enough so that the heads of the drywall screws will be flat with the wood. You will need a "cut off disk" (used to cut metal); to cut a little off the two #6 1-5/8" drywall screws, so that they don't touch the rollers when you screw the furring wood to the roller assembly.

For this cut you will NOT be using a saw blade. You will need to use a "cut off disk". The reason for this is that the wood end will be very glossy when cut with the "cut off disk". The glossy end needs to be facing the rail.
Measure the distance between the furring wood and the rail. Cut this amount minus 1/32" from the stock furring strip. The 1/32" is the space between the wood end and the rail.
(my piece was 2-5/16" long). Nail and glue the furring wood
in place.

Now you want to join the wrist to the arm. The side with the wrist motor is the bottom side. That goes to the bottom part of the arm assembly. Drill two pilot holes thru the wood of the arm assembly into the wrist base. Using the two pilot holes as a guide, drill two .140" holes in just the arm assembly. Now using a 1/2" drill bit, drill just enough so that the heads of the drywall screws will be flat with the wood. Screw the two assemblies together using two #6 2" drywall screws.


Home Page