Building A Wrist For The Hand
Page 1
So you say, what is the big deal about building a wrist. Just attach the hand to a gearhead motor. Well the problem with that is; the object the hand will pick up may be 10" from the wrist joint. A 2 lb. object would apply about 20 lbs. of force to the motor's shaft. Most small size gearhead motor's shaft would bend. The 2nd problem is; even thou the speed of a gearhead motor is slow, it is still too fast for a wrist join. The speed of our gearhead motor is 75 RPM. If we were to use the hand to pour out half a glass of water. We would have to be able to stop the wrist in less than 1/8 of a second! (at 90 degrees a glass would be empty; at 45 degrees, I figure the glass would be half empty. 45 degrees is a 1/8 of a turn. A turn takes less than a second.) It would be too hard for a human to control the wrist.
To solve these problems, I mounted the hand to a large gear that is attached to a ball bearing turntable. The gear ratio between the motor's gear and the turntable gear is 1 to 7. Now it will take about 7/8 of a sec. to pour out half a glass of water. Since we are going to use P.W.M. to control the motor's speed, we can slow the turn of the wrist even more.
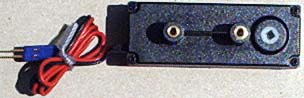
We are going to start by cutting off one of the motor's post. Cut down the side of the plastic close to the post that is closest to the shaft. Now cut off the post about 1/4" above the cover.

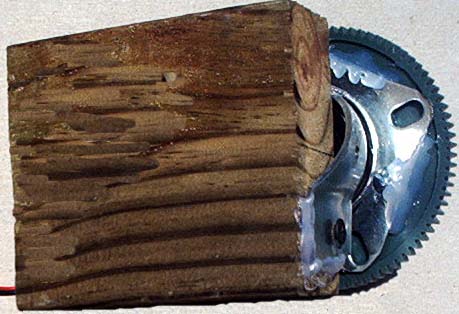
Cut off 4" from a 2" by 4". You should now have a block of wood 4" by 3-1/2". This will be the base for the wrist.
We need to drill two holes in the top of the wrist's turntable so that we can mount the large gear to the turntable. Drill a 1/4" hole 1-4/16" from the edge of the side. Do the same on the opposite side.

If you place the large gear on top of the turntable, you will see that the corner of the turn table stick out pass the gear a little. We need to grind off some on the corners.
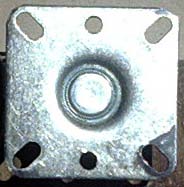
We need to drill two .144 or 9/16 holes in the side leg of the wrist turn table so that the two drywall screws can hold the turntable to the wooden base. Drill one hole 13/16" from the top of the leg and the other hole 1-6/16" from the top.

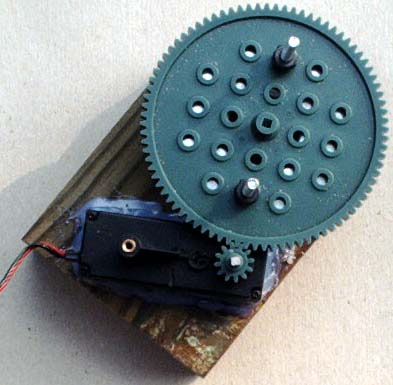
Put the two # 8-32 x 1-1/2 screws thru the holes of the table so that we can mount the large gear.

The hub on the large gear needs to be facing up. Now put the nuts on the screws and lightly tighten the nuts. Now take the table assembly and using one drywall screw attach it to the short side of the wooden base. You must now level the large gear and turntable with the base. You will not be able to adjust the large gear right if it is not level. When it looks level put hot glue along the side of the legs so that it stays in place. Now screw in the 2nd drywall screw. Put the small gear on the shaft and put the shaft into the motor.
We now need to do some adjustments so that the two gears mash together. To do these adjustments we need to apply 5 to 7 volts to the motor. The motor will have to be on an angle so that it will fit on the wooden base. Using some slow drying glue; put some glue on the bottom of the motor. The teeth near the screw on the large gear need to be mash with the gear on the motor. Hold down the motor and apply power so that the large gear turns to the opposite screw. If the gears get too tight then you know the motor needs to be moved a little away from the large gear and that the large gear needs to be adjusted a little on the turntable. So you need to loosen the nuts and move the large gear a little and lightly tighten the nuts so that the large gear can move on the turntable if given pressure from the motor. Repeat as needed. Now that you have the right place where the motor should be, let the glue dry. When the glue has dried, hot glue the motor to the wooden base.
Now you want to adjust the other sides of the large gear by running the motor and moving the large gear on the turntable as needed.
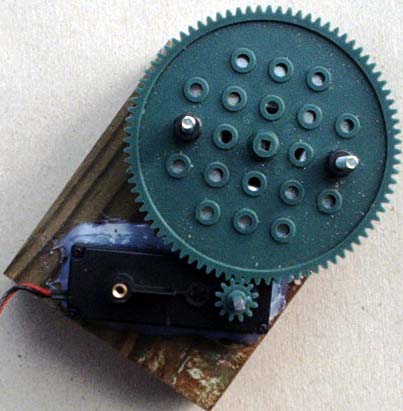
When the adjustments are done; tighten the nuts down and hot glue the large gear to the turntable.
Take the small gear off the shaft and add a little glue to the shaft so that the small gear is glued in place on the shaft.
Next Page
Home Page