 |
|
|
|
|
|
|
|
|
|
|
|
|
|
|
|
|
|
|
|
|
|
|
Re-painting Katryn |
|
|
|
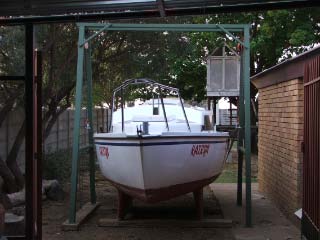
Firstly, I?m sorry but my computer where I kept my original log and photos has crashed and thus this is a write-up based on memory, but I know lots of boats in other countries are coming out the water for the winter now and maybe this will be use to someone.
I read somewhere that osmosis doesn?t always show immediately because the positive pressure of the water basically keeps the blisters in tact. I found this to be true. I took Katryn out the water with no real sign of any osmosis, but after about three days there they were, three or four fairly large blisters of approximately 5 centimeters (2 inches) in diameter all on the keels. I know things could have been much worse. Firstly I needed to drain any water inside them and I thought inside the keels as well. Katryn had been on the water for at least two years. Be warned, everybody always talks about the pressurized foul smelling acid type liquid that is contained inside the blisters, it is very true. I slowly drilled tiny holes at the bottom of each blister. I also drilled about four holes just above the foot of the keel, but only one of them wept a tiny amount of liquid over a period of time. Then came the waiting period. It is suggested that the boat be left to dry out for a period of three to four months. |
|
|
|
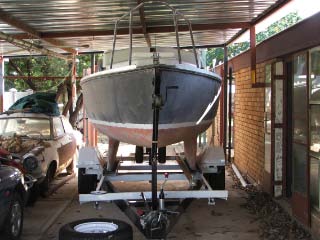
I read articles, searched the web and started phoning and shopping around. I needed ideas and products to use for fixing the blisters, painting below and above the waterline. Katryn had anti-fouling below the waterline and she was spray-painted above the waterline. Now here is the funny part, if I made twenty phone calls I received twenty different answers. This was really frustrating, because the answers weren?t really wrong but merely a matter of opinion or simply because that was all that was stocked in the specific store.ĀĀOne of the common suggestions was to simply abrade the anti-fouling and then apply a new coat of anti-fouling. The problem I had with this was that in SA all anti-fouling is basically that red-oxide color or if you wanted a specific color, also limited, you need to have a thick wallet. All the colored anti-fouling I found were imports and very costly. |
|
 |
|
|
|
|
|
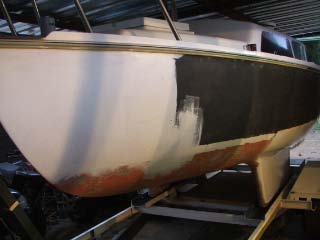
I started sanding the anti-fouling with the idea to abrade it, but being me, I became curious about what was going on under the anti-fouling. At first I sanded through a piece close to the nose. I was taken back at what I saw. The gel coat had lots of chips, less than fingernail size. This prompted me to open another area, so I went straight for her belly just behind the keels and then an area on the keel next to one the blisters. The anti-fouling, being an epoxy based product, had filled these nicks and cracks and kept them intact. Now I had a choice to either sand some more or to simply cover them again. I decided to sand one of the already exposed areas to see if I could simply flat it to smooth out the chipped areas. The gel coat came undone and by the time I had it flat and smoothed a large area was down to bear fiberglass. I had to decide if I were going to live with those chips under the anti-fouling or do I sand most down to bare fiberglass. The second decision was what to do above the waterline. As I stated before, I got a different answer from each phone call, but decided to follow up on some. I then decided to go with epoxy tar below the waterline, but needed more info. I eventually made contact with the chemist at the factory where they produce the epoxy tar. He answered all my questions and in the end convinced me that I?ll be making the wrong choice in the long run. He then referred me to a company called NCS Resins. I made contact with their sales rep for the area where I stayed and this was the first call where I got more than I asked for. Huxley thank you, you convinced me and put my mind at ease. Huxley also suggested not to fool around, but rather do the complete hull with their product. He informed me exactly what and how much I would need.
I stripped all fittings, engine mount, handrails etc. from the hull and stored them. |
|
|
|
ĀFor the next couple of weeks, that felt like years, all I did was sand the hull. I did not try any chemicals to strip the boat because I had a bad experience when I previously stripped a car for spray-painting. I read somewhere of a couple who stripped their boat using a heat-gun and decided to give that a try. Maybe I did something wrong, but the heat- gun didn?t work for me, so it was back to sanding, sanding and yeah more sanding.
The blisters were opened totally some time before and now had to be filled. This can be done using fiberglass or by using a fairing compound. The fairing compound is basically epoxy putty and with this there are various ideas as well. Personally I feel that if you are going to sail the big oceans, use the best product that you can find. Katryn will be on the dry most of the time so I opted to use the body putty that the panel beaters use. This is a much cheaper option, but still a safe option for my application. Whatever option you decide to take, make sure to follow the manufacturer?s instructions. I filled the blisters and sanded them down as well.
Eventually I was ready to start painting. The NCS Resin?s product, that I bought, was a brush on application. This was an experience of note for me, because the mixture had to be just right to allow for sufficient gel time. The first mixture was too strong and definitely too much to handle in one go, so it started to gel in my mixing bowl. With the second mixture I got it right and from there on things went much better. The only problem I experienced was that the ?paint? can be applied using a brush or a mohair roller. I decided to start of with the roller but was very disappointed so I switched |
|
|
|
 |
|
|
|
|
|
 |
|
|
|
|
|
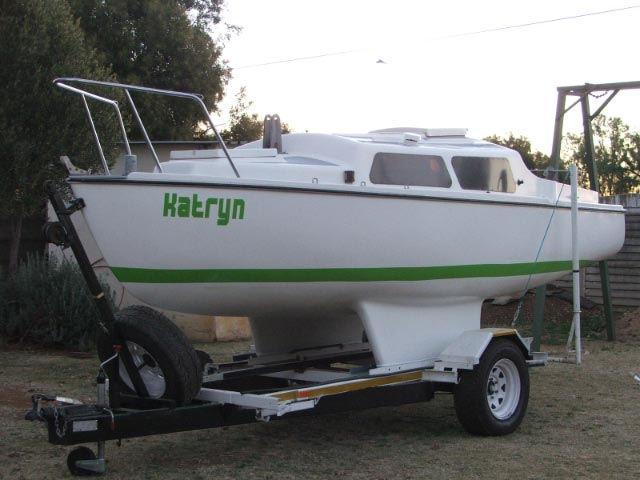
back to the brush. Even though the brush covers a much smaller area per stroke than a roller, I found it to work much easier and faster. Now here came the trick. Once you applied the first layer, you must wait at least 24 hours and then, you guessed it, sand it down. Then comes the second layer and yes you must sand it down. Repeat for the third layer and then finally apply the final layer. Even if I were only abrading between layers it felt like I was stripping it all of again. My arms were tired. The only sanding that was required after the final layer was to get rid of the insects. What is it that attracts insects to wet paint? I didn?t get the smooth finish I was hoping for so after the second coat I contacted Huxley again to enquire as to the possibilities of spray-painting their product. I should have enquired about the spray-painting from the start, as they do have a spray application available, but nonetheless he advised me on how to apply my product by means of spraying. This worked wonderful, but be prepared to become very sticky and dirty as well as discarding the clothing you are wearing during the spray application. Also make sure you mask everything properly and that nothing of value is left nearby. Your wife won?t a spotty effect on her luxurious German automobile. The final two layers were applied by spray application. Once again the correct mixtures were very critical.
In between all the sanding and painting I started working on some of the woodwork. My outboard motor mount was a stainless steel bracket with a plywood mount plate. The plywood had over time swollen so much that I had to force the motor onto it. I found some teak lying in my wood store and made a new mount plate. I changed some other small items as well and then sanded and finished all the exterior wood fittings. I know there are different ideas on what to use for the finishing touch, but that argument is as old as mankind, so will not go there and what it actually boils down to is each man?s choice.
Masking for the name and waterline sounds very simple, but the waterline is fairly tricky. Make sure you have plenty of measurements and also space to take a glance from a distance. I didn?t have the latter and so the waterline that I sprayed on could have been better. This I noticed afterwards when I could take a glance from a distance. I spray-painted the name and waterline using ordinary automotive paint.
The products I used were:
For painting the hull ? NCS Resin?s Poolcoat. The following info was supplied by them:Ā This is an ISOPHALIC resin/gelcoat, this class resin is specifically suited to corrosion and chemical barrier resistance within the medium to low category, vis not industrial acids (the relevant class for this is Vinyl Esters and up). More specifically, most water craft utilize this product; it is specifically suited to products that are exposed to high sunlight, prolonged water immersion and high use. Properties covered are;
Physical ? Scratch resistance, Hardness, Flexibility
Weather ? UV / Chalking and yellowing
Chemical ? Abrasives, Stains and Fluids
Applied correctly, you will have many years of good quality longevity. Take note that most boat hulls need a clean below the water line every so often and hence you should bear in mind to remove the craft and rub down with a mild cleaning solution to avoid excessive stain build up over time.
The catalyst added should be between 1 and 2%. To thin this down for the spray application, add 10 to 20% Monomer.
For the woodwork I used Woodoc 50. This is a polyurethane exterior sealer especially designed for harsh exterior conditions and recommended for use on boats and yachts.
All that remains now is to fit a couple of small items, the handrails etc. and then get her to water. The deck, cockpit and cabin will be tackled at a later stage, but I?ll definitely use the same products again. |
|
|
|
 |
|
|
|
Back to Articles Page |
|
|
|
|
|
Back to Katryn's Page |
|
|
|
|
|
Back to Main Page |
|
|
|


