GIF Animating: Animation Shop 3 |
If you have any questions concerning this tutorial, visit the forum. The link is
at the top of this page in yellow. It has an Animated GIF Help section, especially
for questions concerning GIFs, and the tutorials. |
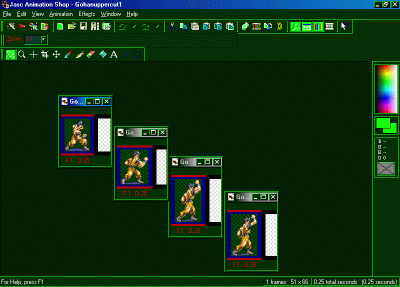
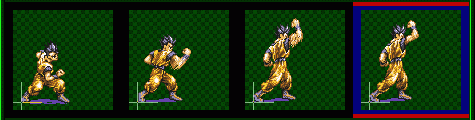
Introduction- Animation Shop 3, in my opinion, if the BEST GIF animator ever. I have tried just about every GIF animator out there, and I prefer AS3 by far. (NOTE: My browser colors will be different from yours, most likely. But everything else is the same.) Alright, see these four Gohan sprites? Right-click on each one, and select “Save Picture As...” And save all 4 of them. I am going to show you how to animate these sprites. You may use your own sprites, if you want. But for beginners, I reccomend using these Gohan sprites, to start off: |


Make sure it says “.GIF” in the drop-box beneath the filename of the sprites (Gohanuppercut1,
2, 3, 4) Most likely, they'll be saved in “My Pictures” or “My Documents”
(It doesn't matter what folder they're saved in.) Now that you've got all 4 sprites saved, open up Animation Shop 3, then select File on the top-left, then select Open. Open “Gohanuppercut1.gif ” After you do this, open up Gohanuppercut2.gif, Gohanuppercut3.gif, and Gohanuppercut4.gif in the same way. When you're finished, you should have all 4 sprites open, in their own little window, so you'll have 4 little windows. |
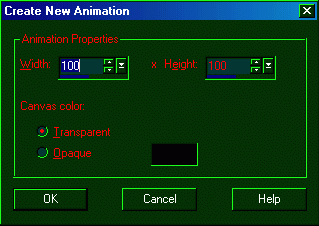
Alright! Now... Go to File > New. Make the new image 100 x 100 pixels, with a transparent background. |
Alright, now. You should have 5 windows. 4 windows with the Gohan sprites in them,
and the blank window, the one you just created. Now, to duplicate the frames
in the new window. Click edge of the new window (The one you just created) and
pull it to the right. Pull it until you have 4 windows, like this: |

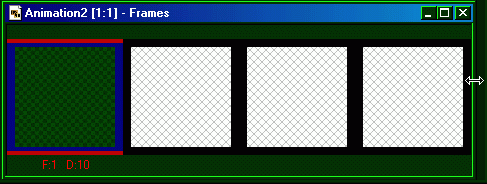
Alright, now click the duplicate icon 3 times (circled in red.) |
Alright, now here's an important step. Using the Registeration Mark. The Registeration
Mark is a VERY helpful tool, (circled in red) for keeping the frames of your
GIFs properly aligned. |
Alright, click the Registeration Mark icon, then click on the bottom-left of the
first frame in your new animation (The one you just duplicated the frames for)
You'll notice it will put a crosshair on all 4 frames, like so: |

Alright! Now... To put those Gohan sprites to use. Right-click on “Gohanuppercut1.gif ” and select “Copy” from the right-click menu. Ok, now that you've done that, click on the first frame of your blank animation (The one you just put the crosshairs on) After you click on it, click on the “Paste into Selected Frame” icon. (Circled in red) |

After you click that icon, you'll notice the Gohan sprite will appear in that first
frame, as your cursor (You can move him around). Alright, here is where the
Registeration Mark tool comes in handy. See the cross on the bottom-left? This
helps you to pick a location to place your sprites, in each GIF frame. The cross
won't appear in your animation, don't worry. Anyway, place the heel of Gohan's
foot against the center of the cross, then simply left-click, to paste the Gohan
sprite into the frame. If you end up pasting him in the wrong place, just click
on “Edit” at the top-left, and select “Undo paste” and you'll be able to move
the Gohan sprite around again. |

Alright! Moving on... Now, click on “Gohanuppercut2.gif ”, then right-click on it, and select “Copy” After this, click on the second frame if your blank animation, then click on the “Paste into Selected Frame” icon again. Same as before, position Gohan's heel on the center of the cross: |
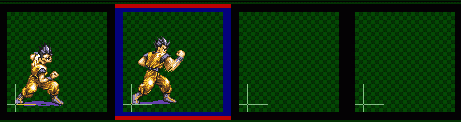
Ok, now click on “Gohanuppercut3.gif ”, then right-click on it, and select “Copy”.
Alright, now click on the third frame in your blank animation, and click the
“Paste into Selected Frame” icon again. And yes, same as before, place Gohan's
foot against the center of the cross: |

Heh, are you seeing the pattern yet? As you can probably guess: Click on “Gohanuppercut4.gif
”, then right-click on it, and click on “Copy”, then click on the 4th
blank frame in your developing Gohan animation. Now, click on the “Paste into
Selected Frame” and position Gohan's foot against the center of the cross. This
is what it should look like, now: |
Alright, you will most likely have a 5th remaining blank frame, after the 4 Gohan
ones. Just click on the side of the blank animation window, and pull it to the
right, and you'll see the frame. Just right-click on this frame, and select “Delete”
You have no use for this extra frame: |

Alright, after removing this extra frame, you're ready to preview your animation!
Click on the “View Animation” icon (circled in red) and a new window will pop
up, showing your animation. Just close this window when you're done looking at
it. |
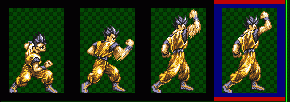
Well, that about does it! That's how you animate, using Animation Shop 3. Here's
what your animation should look like: |

Want to get rid of that purple shadow under his feet? Here's how! Click on “Animation” at the top, then select “Replace Color” When the pop-up box appears, make these as your settings (be SURE to click on Gohan's shadow, after you select the Replace Color option.) Then just click “OK” and his shadow will be gone! |

Ok, shadow's gone. Now, to crop all of that excess space out of the animation. Ok,
select the “Crop” tool (circled in red) |
Result: |

Alright! Now... Using the crop tool, click on the center of the cross, by Gohan's foot. Hold the click, and drag your cursor up. Be sure to put a box around Gohan, but MAKE SURE every frame of the animation fits inside of the box you created: |

Now... Making sure all 4 Gohan sprites are within the box (Like the example above)
set your cursor on one of the Gohan frames. Your curser will turn into
. Now, simply double-click on that Gohan frame. You'll
notice this cuts all of the excess room in the frames, resulting in this: |
Now that you've taken away the shadow, and cropped it, time to save! Click on “File”
then “Save as...” then save it as anything you want. But BE SURE to save it
in .GIF format. Congratulations, you've made a GIF using Animation Shop 3!!! |
