GIF Animating: Using add-ons |
If you have any questions concerning this tutorial, visit the forum. The link is
at the top of this page in yellow. It has an Animated GIF Help section, especially
for questions concerning GIFs, and the tutorials. |
Introduction- It is HIGHLY RECCOMENDED that you read the Animation Shop 3 tutorial before attempting the use of add-ons. I am assuming you know the basics of Animation Shop 3, to avoid me having to teach use of it every time I make a tutorial relating to the program. Alright, as with the first Animation Shop 3 tutorial, I am going to give you an example GIF to make, so you can see how it is done. Save these sprites, and the animated add-on: |
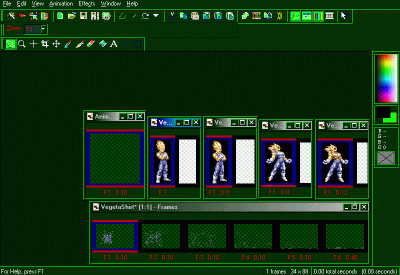
Alright. Now, open up the sprites, and the add-on in Animation Shop 3, along with
a new, 100 x 100 pixel blank animation. (Shown below): |
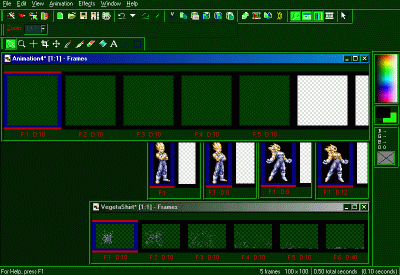
Alright, now drag the blank animation to the top-left click the edge, and drag it
to the right, to lengthen the visibility length, letting you see more frames.,
and click the Duplicate icon (Circled in red) 3 times. |

Your blank animation will have 5 visible frames. This makes it easier to work with
(As shown below) |
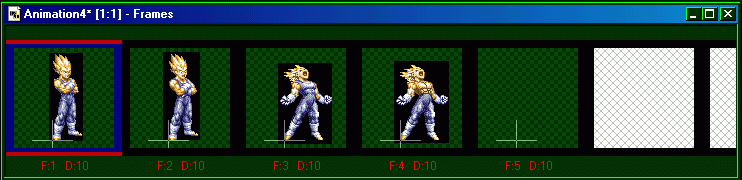
Alright! Now... Use the registeration mark tool (circled in red) and mark somewhere near the middle of the blank frame. (The cross appears in all frames.) Now, right-click on the first Vegeta frame (The one with him just standing there) and select “Copy” from the right-click menu. Now, click the “Paste into selected frame” button (circled in red) Now, position the Vegeta sprite so thst his foot is at the edge of the center of the + in the first selected frame of the blank animation. Now, right-click on the second Vegeta sprite (The one where his eyes are widened) and copy it. Click on the second frame of the blank animation, click on the “Paste into selected frame” icon, and same as before, position his foot at the edge of the center of the + in the second frame of the blank animation. (NOTE: Ignore the black backgrounds of the Vegeta sprites. This can be easily removed. I'll show you how, near the end of this tutorial.) Now, right-click on the third Vegeta sprite (The one where he's yelling, but still has his shirt on) and select “Copy”. Click on the 3rd frame of the blank animation, click the “Paste into selected frame” icon. Same as before, position Vegeta's foot against the corner of the + in the 3rd blank frame. Alright, you're almost done with the Vegeta sprites. Just bare with me, it's almost over. Ok, right-click on the 4th Vegeta sprite (The one him yelling, with no shirt) and select “Copy”. Not, click on the 4tf frame of the blank animation, and click the “Paste into selected frame” icon, and position Vegeta's foot against the center of the +. |
Registeration Mark icon: |

“Paste into selected frame” icon: |
This is how it should now look like, sorta, since you've placed all 4 Vegeta sprites
into their proper places: |
Alright, now go ahead and delete that empty frame on the right (The one you never
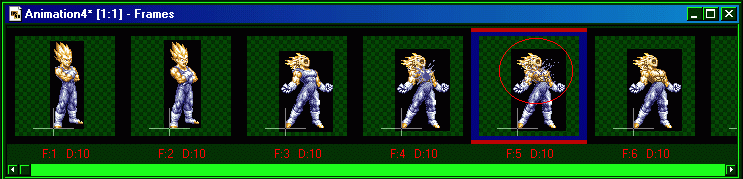
used) Just right-click on it, and select “Delete”. Now, click on the 4tf frame (The one of him with no shirt) and click the Duplicate icon exactly 4 times. Now, here is where you start to use the add-on. See that blue-looking explosion? That's actually his shirt, exploding off of him. Now, it's time to start applying this add-on to the Vegeta GIF. Right-click on the first frame of the add-on, and select “Copy” Now, click on the first frame of Vegeta with no shirt, then click on the “Paste into selected frame” icon. You'll be able to move the add-on around in this frame. Position the frame in the middle of his chest, like this: |
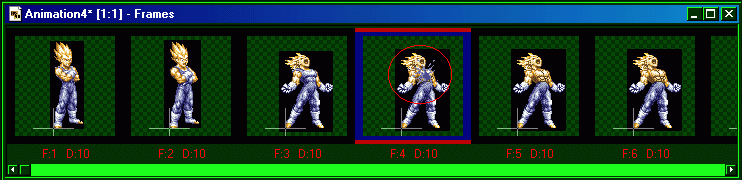
Now that you've done that, right-click on the second frame of the add-on, select
“Copy”, click on the second shirtless Vegeta, click on the “Paste into selected
frame” icon. Again, position the add-on over his chest: |
Same as before: Right-click on 3rd add-on frame, click on 3rd shirtless Vegeta frame,
click the “Paste into selected frame” icon, position the add-on over his chest
once more: |
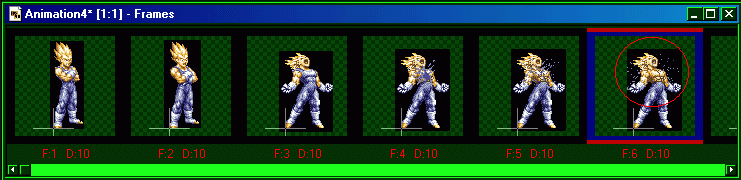
NOTE: I am not going to use the last 3 frames of the add-on. Using the first 3 like
you are, it makes it look more like his shirt is discintegrating. It wouldn't
look good, falling to the ground by his feet. Think about this: As much as energy
as he puts out, his shirt wouldn't just fall by his feet in shreads, no. The
whole thing would be gone. Alright, now, it's time to remove the frames from the black blocks they're in. Click on “Animation” on the top. A window will pop up. Now, click on the black area behind Vegeta. It doesn't matter which frame you click, just click the black area. Now, adjust the settings on the window to look like this: Check the box that says “All frames” Skip past the “Replace” section. Check the box that says “Transparent opacity” Now, click “OK” and the blocks around Vegeta will now be gone. Now, it's time to crop the animation. Select the Crop tool (circled in red) and click on bottom-left of any of the Vegeta frames, and drag it up to the top-right, making a box around Vegeta.. MAKE SURE the frames are all IN the box. Anything outside of the box will be cut from the GIF: |
Crop tool icon: |
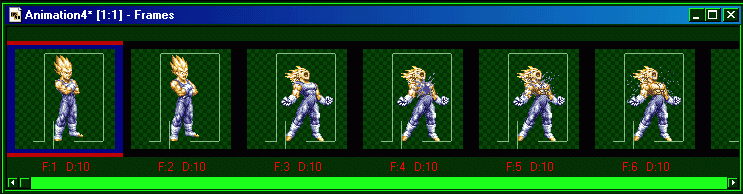
Ok, now simply place your cursor over one of the Vegeta frames. It will turn into
a . Just double-click, and this will crop all of the frames
down in size. Now, just go to “File”, “Save as...” and save it as anything you want! Just be sure it is saved as a .GIF. Well, that concludes this tutorial on how to use add-ons. I hope this clears some things up for everyone. Have fun, and good luck! |
