---> How Did I Make My Animated Water Balloon Toss Graphic <---
This tutorial is written on Wednesday, July 05, 2006 and copyrighted to me (Sajida Mansoor).
Please do not copy or place this tutorial or any graphics to any other place without written permission directly from me.
Thank you.
~~~~~~~~~~~~~~~~~~~~~~~

I used Adobe Photoshop 7 and Adobe Imageready 7 for this tutorial but it can be done in any software which supports layers and animation. Remember to make new layers for every new thing and also remember to save your work often. Also I'd like to mention that I'm writing this tutorial for the medium to advance users who have good knowledge of basics of layers and all.
1- First of all, make a doll or animal with a transparent background. Also add your name to the tag. I have three layers so far. In the first layer I have the doll base and in the second layer I've all the dressing and hair. And the third layer is the text one of my name.

2- Duplicate your doll base or animal. Hide the original base layer and start to erase the half arm of the duplicated base.

3- Now make a new layer and name it arm upside. Draw an arm in upside position like this.

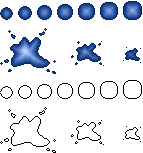
4- Now it's time to make our balloons. I've made seven balloons in total. I made one small balloon and then started to make bigger ones by adding one more pixel at all sides. I've saved my balloons, splashes and their outlines for you, if you want to color them in your own choice and style. Please feel free to do that. Just click on the samples image below and it'll open in a new window for you to save it.

5- When you're done with all the balloons and water splashes, just add the text layer above the biggest splash and write some Got You etc. And click the Jump to Imageready button under the toolbar for the animation.

6- Now we have only one basic frame in the animation palette. First of all, we'll have to duplicate our original frame like below.

7- When the original frame is duplicated, we'll click the Tweens Animation Frames button to get the required frames.

8- We have one basic frame, seven balloons and three splashes. So we require eleven frames in total for our animation. Since we already have two of them so we'll add nine more.

9- Now this part is little tricky. First of all, hide all the balloons and splashes from the layer palette. In the first frame, we'll have to keep our doll without any ballons etc. In the second frame, we'll hide the original doll base from the layer palette. And will show our erased arm base layer, arm upside layer and water balloon 1 (the smallest one).

10- After the water ballon 1, it's time to move our balloons in upward direction. In the third frame, just hide the water balloon 1 layer and make water balloon 2 visible. But move it upward to your liking. And just keep moving to next frames and keep moving your balloons upward untill you reach at water balloon 7. Don't forget to hide the previous balloons while working in the new frames.

11- When you're done with the last biggest balloon, go on the next frame and hide the water balloon 7 and make your biggest splash visible. And also show the text layer of "Got You" here on the splash. Another thing to do is hiding the arm upside layer and the base with erased arm and making original base visible.

12- In the next frame that is frame 10, hide the splash 1 and the text layer (if it's visible) and make splash 2 visible and place it to the center of previous one. Now move to the next frame, hide the splash 2 and show the splash 3 and place it too in the center of the previous one.

13- Our placement is done and it's time to set the frame delay time. I've set one second for frame 1, 0.15 for all the balloons, one second for the frame 9 with the biggest splash, 0.5 for the splash 2 and 0.3 for the splash 3. A handy tip to select more than one frames at a time is, just press SHIFT KEY while selecting the frames.

14- Now check the animation by pressing play/stop button. If you are not satisfied with it, keep trying and change the frame delay time until you get a nice smooth animation.

15- In the end, go to File ---> Save Optimized As ---> Save As Gif.

16- Our final graphic is ready. I've done another one to try a bouncy animation in the start.

~~~~~~~~~~~~~~~~~~~~~~~~ *** ~~~~~~~~~~~~~~~~~~~~~~~~
** Tips For PSP Users **
You'll have to save your files one by one in PSP format while moving your water balloon and hiding and showing the splash layers etc. In the end, jump to the Animation Shop Pro and open all your saved PSP files. And these files will be all your frames and you'll only have to set the delay time of them.
~~~~~~~~~~~~~~~~~~~~~~~~ *** ~~~~~~~~~~~~~~~~~~~~~~~~
I hope you had fun doing this tutorial. If you have any questions or comments please send me an email at sajidamansoor@hotmail.com
Also I'd like to see your results if you try out my tutorial.
Thanks.
All content, graphics and this tutorial on this site is copyright © Sajida Mansoor, 2006.
Copyright © 2006 ::: Sajiz.Creations ::: All Rights Reserved.