I remember it took me a long time to make my first flemish string. I couldn't find a how-to site that made it perfectly clear to me, and I read several of them. Finally, I just decided to do it. By doing it, a lot of my uncertainties got straightened out. So I recommend just doing it. Even if you aren't sure what you're doing, just do it. It's not like it costs a lot if you mess up. The first time you do it, a lot of things will become more clear. By the second time, you'll have it down pat.
In case you begin to wonder why it seems like the string I'm making in this build-along keeps changing colour, it's because I've done a few revisions to this build-along, and I used different strings to do them.
Making a string jig
The first step is making a string jig. The string jig is not necessary. A lot of people make fine strings without them. But I think it's easier to use one if you're new. The purpose of the string jig is to get the strands all measured right.
All you need is a piece of wood, some finishing nails, a hammer, and a yard stick or tape measure. I used a 2x4 I picked up out of a dump at a construction site. You'll hear me mention "construction site dump" a lot on this web page, because that's where I get a lot of my wood for making things like string jigs, bow forms, footed riser jigs, lam grinders, and cat trees. There's just no sense in spending money on wood when you can get it for free.
Anyway, I got a 2x4 and cut it to 30" long. I got a box of 1-1/2" finishing nails. If you're a garage sailor, you should keep your eyes open for these things, but keep in mind that you could spend a lot more money in gas looking for nails at a garage sale than if you just bought a new box at Home Depot.
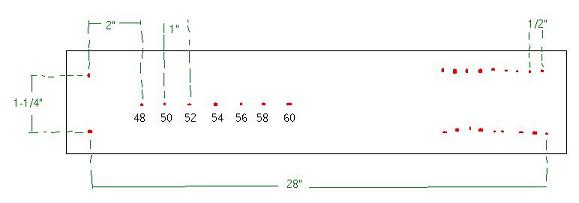
Here are the measurements I used.
All those red dots are finishing nails. I nailed them in to where they stick up about 3/4". On the right side of the jig, there are 18 nails--9 on each side. The nails in the middle that I have labled 48, 50, 52, ... , don't have to be nails. A lot of people drill holes in the wood and use a wooden peg. You can move the wooden peg to whatever hole you want depending on the string you're making. I used nails because at the time, I didn't have a drill.
In the picture above, the nails only go up to 60", but in real life, my jig goes up to 72". Now I'm going to tell you something very important, and I want you to pay attention. This is important. That 48, 50, 52, or whatever does not represent string length; it represents bow length. If you tell yourself, "Self, let's use the 64 inch slot soes we can make a 64 inch string," your string will come out way too short. The bow length should be measured from nock to nock along the back of the bow. If your bow length is 66", then you need to use the 66" slot on the string jig. Be sure to actually lable your string jig.
Using a string jig
Set the jig in front of you with the 16 nails to your right. Tie a strand on one of the nails like this picture.

Wrap the string around the nails like I have in this picture.

I'm doing this one 70", because I'm going to do a board bow build along, and that bow will be 70" nock to nock.
Now there's something you should know. The number of wraps depends on how strong your bow is. It might also depend on what you're making your string out of. I'm using B52 Dacron. I've read several different sources on the internet, and they all say something a little different, so use your own judgment. Here's the recommendations from this web page.
If you're going to make a two-ply string (which is what I'm doing), and you want to use 14 strands (which is what I'm doing), then wrap that stuff around the jig seven times. If you're going to do a three-ply string, and you want to do 15 strands, then wrap it around five times. You see, 5 x 3 = 15, and 7 x 2 = 14.
The next step is to cut the string. Use a razor blade, a sharp knife, or a wine bottle opener (which is what I'm using).

I know what you're thinking. You're thinking, "Wait a minute! Wasn't that string just blue? How did it turn brown?" Well, you see, I took a picture of me cutting the blue string, but it came out blurry, so I did another with the brown string.
You'll notice that you now have bundles where the length of the ends are staggared. That's the whole purpose of having those nails a half inch away from each other. By staggering the lengths, your flemish loops will be more smooth. You'll see what I'm talking about later.
Before taking the bundle off the jig, grab one end and slide your hand down to the end. That way, it'll all hold together.

This only works if the strands are waxed. If you buy your string from Three Rivers Archery, it will already be waxed. If not, you need to wax it as you smooth it.
Once you get one end smoothed, then grab it again, and smooth it as you take it off the jig until you have smoothed it all the way to the other end. Then wax about 18 inches on both ends, whether you got it from Three Rivers Archery or not. You don't have to measure the 18". Just use your eyeball. To wax it, I just hold the string between my thumb and the wax, and slide the string through. I do that on two sides.

Lay that bundle somewhere the cats won't get it, and do the exact same thing with a different colour. I'm doing blue and brown, because those are the colours on the bow I'm going to make for my board bow build-along. Don't feel like you have to be colour coordinated, though. :-)