
The making of the drummer
|
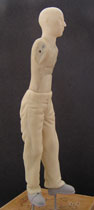
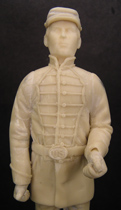
My intent is to scratch build the drummer as shown in another drawing by Don Troiani. According to the text, each company is allotted one drummer. Often, teenagers under the age of eighteen serve as drummers. They also double up as stretcher bearers and hospital orderlies. |
| Before
sculpting the model, I did a sketch to put on paper the body proportion as
shown on the right. For a 120mm model, the head is 16mm and base on the
proportion of 7.5 heads for the overall height, it works out to be exactly
120mm.
A good source of instruction for scratch building can be found in the Conversion and scratch building of model figures manual by Andrea press. |
 |
 |
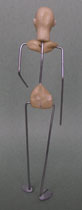
The head
for this project
was
from stock kit. (given to me by a friend) I held the wires in place by
a two part putty and eventually bended them to pose the figure once the putty had
cured as shown.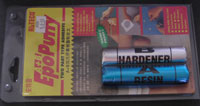 |
 |
 |
| Check out this two part putty as it's value for money. Please refer to my bugler's site for the reasons why. |
 |
I
recommend that the accessories or equipment be scratch built first so that
they may be used to help shape the clothing of the model.
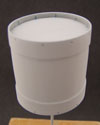
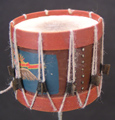
This drum was made in 5 parts. First I used a piece of transparency to form a cylinder. Next, I rolled and cut some putty into a rectangular shape and wrapped them around the cylindrical transparency. Once hardened, the top and bottom of the drum were made. I then sanded the drum to the required shape. When all was done, I wrapped rectangular strips of putty around the top and bottom of the drum to form the rims. Holes size of diameter 0.5mm were drilled when the rims had cured. |
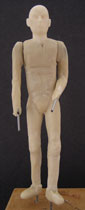 |
I
built up the
wire armature with putty as shown. Major muscle groups were
shaped in order to given the model its form, hence a book on anatomy would
be of help here.
After the putty had hardened, further shaping of the figure was carried out with a sharp blade. Eventually I saw off both arms so as to facilitate the easy forming of its clothing later on. |
 |
 |
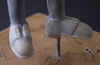 |
Next the shoes were made. It was done in two parts. First the shoes minus the flaps. Upon hardening, the flaps and the laces were added. | 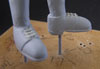 |
| I made the shoes before the pants as the latter would cover part of it. I primed the shoes at this stage in order to check for flaws before progressing to the next stage of work. | ||
 |
 |
The
trousers was made up of 5 separate parts: left leg, right leg, posterior,
left groin and right groin.
Again I kneaded some putty and cut them into rectangular shape before wrapping them around the legs. I formed the creases with a tooth pick. Water was also used to help smoothened the putty and was applied with my fingers.
|
 |
Similarly, its posterior and the groin regions were made using sheets of putty. The regions where all these parts met were smoothed over by running my finger, wet with water, along the lines. | 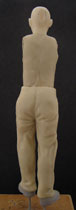 |
 |
 |
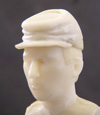
Before
sculpting the forage cap, I saw off the top of the head. I applied some
putty to the back and sides of the head. With the aid of a sharp blade, I
created the hair by pressing the cutting edge of the blade against the
putty.
The sculpting of the forage cap was a three step process: the peak, the cap and the tightening strap at the front. Each step was only carried out when the putty had hardened. |
 |
 |
 |
 |
| The peak of the cap was formed as shown so as to ensure that it would not break off easily. Once it had hardened, I formed the cap and created the creases by means of a tooth pick. The last to be added was the tightening strap. |
 |
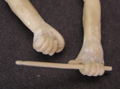
After the forage cap, I decided to work on the hands. As both hands were shown holding the drumsticks hence I made them using putty left over from the forage cap. The putty was rolled into thin long rod. Once hardened, the rod was cut to length and the tip of the drumsticks was shaped with a small file and blade. |
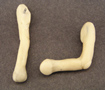 |
I made the hands of my model in 3 separate steps: the back of hand, fingers and thumb. Not much attention was given to the arms as they would be covered by the sleeves. | 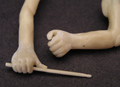 |
 |
 |
 |
When the hands had hardened, I wrapped a rectangular piece of putty around the arm and created the necessary creases. |
 |
 |
For man's shirt, it is always left over right hence I started with the right side first. After the creases had been added, the impression of the belt was made by wrapping a piece of aluminum foil, pulled taut (shown below), around his waist. The left side was added on after the right had hardened. I also used the tip of the blade to create 9 button holes for the musician frock coat. |  |
 |
Finally when all was done, the back was added. Again the aluminum foil was used to create the impression for the belt. If you look closely at the above picture you will be able to see a slight indent across the right shoulder, created by the foil again, where the drum strap will be placed. |
| To create the piping pattern at the front of the frock, I sketched an outline of the pattern onto the frock with a pencil. Next I rolled the putty into thin threads and placed them along the sketched outline. Once in place, I gently flattened them with my finger. Any excess putty was trimmed away with a sharp blade. The insignia on the belt buckle was made in the same manner. | 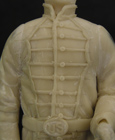 |
 |
When the putty for the piping pattern had hardened, I gently scraped them with a sharp blade to reduce their thickness. |  |
 |
 |
As the left thumb looked odd so I decided to re-sculpted it as shown on the right. Often parts of the model were re-sculpted or modified when it looked out of place or odd subsequently. | 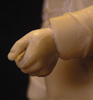 |
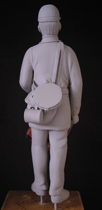
| Next I made the haversack and its strap. First the strap was made from rolled putty and the haversack was made in two parts: the haversack and its cover. The figure on the extreme right shows the haversack minus its cover. | 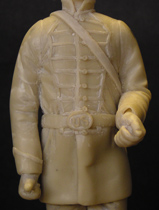 |
 |
 |
The adjustment leather strap for the drum was made separately from the drum strap. Parts of it was made from aluminum foil. I would like to take this opportunity to thank al17mass and garyjd from TNT forum for their help in providing some of the information regarding this strap.
|
 |
The drum stick holder was also made separately before gluing it to the drum strap as shown. When all had hardened, the adjustment strap made previously was attached to the strap. Similarly the water canteen was temporarily attached to the haversack with blue tack as I need to take them apart during painting. | 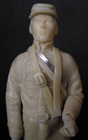 |
 |
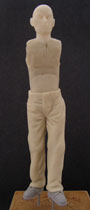
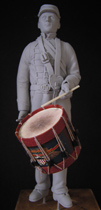
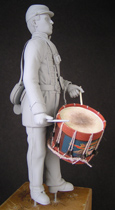
| With that the drummer was almost completed except for the drum. So I decided to complete the drum before taking photographs of the primed figure. |
 |
 |
 |
 |
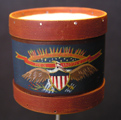 |
As
the ropes and ears of the drum would get in the way, the emblem on the
shell of the drum was painted first. It was painted with a size ' 0'
brush. I copied it from a book taken from the local library. The rope was
then pull through the holes at the top and bottom hoops. Finally the ears,
made from surgical tapes were applied as shown.
|
|
 |
|
With
that I conclude the scratch building of the US civil war drummer and I
hope you have enjoyed this article.
|
 |
 |
 |
 |
