


The making of the Nameplate
|
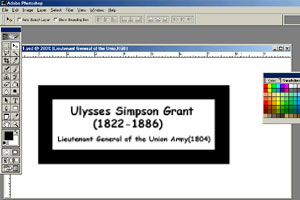
The design of the nameplate is done using Photoshop. Obviously it can also be done using other software, eg paint, powerpoint and etc. A shaded border is needed as the intent will be made known later. Different font types, size and images can be used hence making this process versatile. |
|
Once the design is ready, it is mirror imaged using the software. This will ensure that the wordings or images will be protected against the environment when it is adhered to the packing. |
|
With a pair scissors, cut along the edges leaving a generous excess around its perimeter. |
|
A piece of balsa wood is used as a packing even though one can use card board, plastic card sheet and etc. The intention is to have a nameplate with thickness. |
|
Instead of painting the packing, it is wrapped with a piece of gold coloured foil which can be easily purchased from an art supply shop. |
|
Wrapped the balsa wood with the gold coloured foil. In this instance, the reverse of the foil has adhesive. Obviously one can use whatever paper or material to wrap the packing. |
|
Paste the double sided tape along the shaded borders as shown. Try to minimize the gaps between the tapes Do not protrude into the clear area of the transparency. |
|
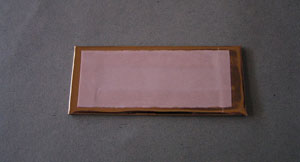
Align the foil covered packing over the transparency. Care should be taken as any misalignment will result in the shaded borders having varying thickness. Using the edges of the packing as a guide, use a sharp knife and slice off the excess transparency. |
|
A piece of double sided tape is placed across the back of the nameplate. |
|
This is how the nameplate looks like when it is ready. It should be obvious by now that the shaded edges are used to conceal the doubled sided tape. |
|
Finally
the nameplate is mounted onto the stand of the vignette with double sided
tape.
|