Introduction
Synthesis
Process Design Flow
Example
Sessions
ModelSim
RTL Simulation Session
Leonardo
Session
Alliance
Series Place and Route
Session
ModelSim
Gate-Level Simulation (with SDF) Session
Introduction
ModelSim performs pre-synthesis RTL simulation and post-place and route gate-level timing simulation with SDF backannotation of timing. Leonardo performs architecture specific synthesis and optimization for all Xilinx devices. Xilinx Alliance Series performs placement and routing of the synthesized netlist. This AppNote discusses methodology and optimization settings for Leonardo, Alliance Series and ModelSim when targeting Xilinx devices. The intent of this AppNote is, not to exhaustively explore all the different options in the Leonardo, Alliance Series, and ModelSim toolsets, but to present a single methodology that works. For information beyond the scope of this AppNote, refer to the following web pages:
Exemplar Logic
Model Technology
Xilinx
When targeting Xilinx devices, Leonardo maps the design into Xilinx lookup tables. Both Galileo Extreme and Alliance Series offer configuration options that dictate how this mapping takes place. In some cases both tools can perform the same functions but, with different results.
The Alliance Series allows the creation of VHDL or Verilog of the placed and routed design along with timing information in a SDF file. You can then compile and simulate this gate-level timing design in ModelSim (along with the Xilinx SIMPRIM library).
Figure 1. Comparison Chart

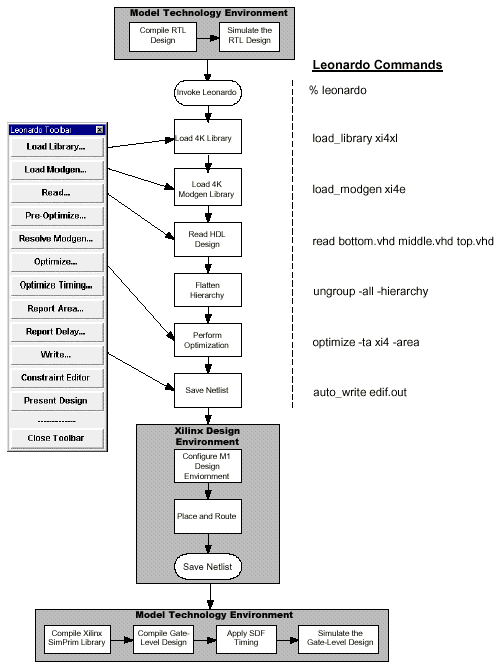
Synthesis Process Design Flow
Figure 2. Flow Chart
Example Sessions
ModelSim RTL Simulation Session
This section describes the basic steps to compile and simulate the pre-synthesis RTL design. Here you verify the functionality of the design prior to synthesis.
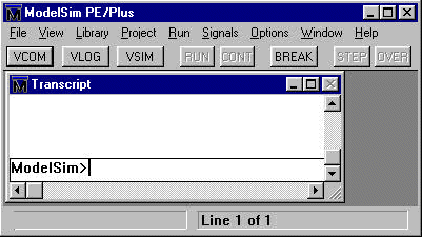
- Invoke ModelSim.
% vsim -or- Programs > Model Tech > ModelSimFigure 3. ModelSim PE/PLUS Dialog
- Set ModelSim to the directory where the RTL design resides.
ModelSim> cd c:\mydesign -or- File > Directory- Create a working library to store the compiled RTL design.
ModelSim> vlib work -or- Library > New- Compile the RTL design.
ModelSim> vcom bottom.vhd middle.vhd top.vhd -or- VCOM button- Start the ModelSim simulator.
ModelSim> vsim top -or- VSIM button- View all the ModelSim debugging windows.
VSIM> view * -or- View > All- Wave and list signals of interest in the design.
VSIM> wave /* -- Adds all top level signals to the wave window VSIM> list /* -- Adds all top level signals to the list window- Unless you have a VHDL testbench which stimulates the RTL design, you will need to force the inputs of the RTL design.
VSIM> force /clk 0 @ 0 ns, 1 @ 50 ns -repeat 100 ns VSIM> force /input 0- Run the simulation and analyze the information in the ModelSim debugging windows.
VSIM> run -all -or- Run > Run Forever
Leonardo Session
This section provides a detailed example using Leonardo with the Xilinx Alliance Series toolset targeting the XC4000XL device family. All commands are easily accessible via the toolbar, pulldown menus, or the Xilinx specific flow guide. This example demonstrates Leonardo shell commands.
- Invoke Leonardo.
% leonardo LEONARDO{1}- Load the Xilinx xi4e library. This loads only the cell data.
LEONARDO{1} load_library xi4xl- Load the Xilinx Modgen library. Modgen is a library of handcrafted implementations for all the inferred design elements. This includes operators, RAMs, and counters. There are typically multiple architectures for each element. If this library is not loaded, Leonardo uses a generic Modgen library which is not able to take advantage of Xilinx specific cells.
LEONARDO{2} load_modgen xi4e- Read in the HDL files. VHDL design files must be listed in their bottom-up order. Verilog users enjoy auto-top detection which means that Leonardo automatically detects the top-level module from files listed in any order.
Note: Leonardo uses file suffixes to figure out file formats; VHDL files = .vhd, .vhdl; Verilog files = .v, .ver; EDIF files = .edn, .edf, and .edif.
LEONARDO{3} read bottom.vhd middle.vhd top.vhd- Flatten the design. Hierarchical boundaries prevent or limit important optimizations from occurring. Sometimes there are good reasons to preserve hierarchy, i.e., design size or to separate out speed critical blocks. Keep only a minimum of hierarchy. The recommended standard is no more than 50K gates per hierarchical block.
LEONARDO{4} ungroup -all -hierarchy- Perform optimization. Leonardo performs both area and timing optimization. In this example, you perform optimization to achieve the smallest design. Additionally, you can specify the effort level. Quick performs one pass; standard performs four passes and takes four times longer to complete.
LEONARDO{5} optimize -ta xi4e -area -effort quick- Generate area and timing reports. The optimization runs displays a single area and worst case timing number. Reports are only necessary if you require more information.
LEONARDO{6} report_area LEONARDO{7} report_delay- Generate an EDIF netlist for Alliance Series. Leonardo has a built-in netlist pre-processor. Because the Xilinx XC4000E technology is specified, the correct netlist pre-processing takes place.
Alliance Series Place and Route Session
The Xilinx graphical tools are designed to behave, look, and feel like the XACT 6.0 tools. Even though the core technology algorithms have been redesigned, the graphical tools allow users to run the software in the same way as previous PC versions. For PC customers, the learning curve is short.
Design Manger (DM) is the graphical tool that manages the design files created during design implementation. The DM also provides push button access to the following Xilinx tools: Flow Engine, Prom File Formatter, Timing Analyzer, Hardware Debugger, and JTAG Programmer.
Start the Design Manager from the Windows 95 or NT desktop by executing the command:
Selecting Start > Programs > Xilinx > Design ManagerInvoke Design Manager from a shell by typing:
dsgnmgrFigure 4. Design Manager Dialog
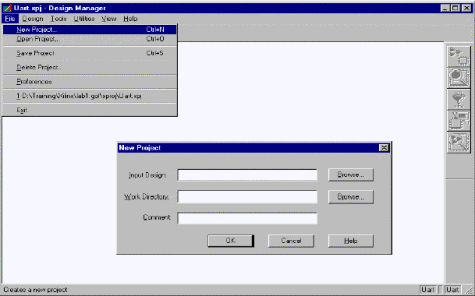
- Create a New Project in Alliance Series. From the Design Manager toolbar, execute the pulldown menu command.
FILE > New ProjectPush the Input Design button and navigate to the EDIF file generated by Leonardo. This file has the extension, .edn.
Figure 5. Design Manager - New Project Dialog
- Perform Implement on the design. From the pulldown menu, execute the command:
Design > Implement
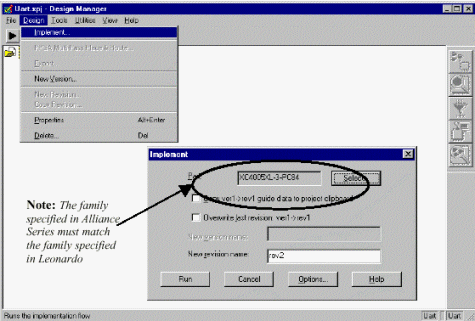
- Select a specific Xilinx part.
- Push the Select button. In the Part Selector dialog and choose the appropriate member, speed, and package combination from those available for the XC4000XV family.
Note: If you issue the the Leonardo command, generate_timespec, after optimization and before saving the EDIF netlist, then Leonardo includes clock frequency timing data in the EDIF netlist.
- Click OK, but do not hit Run on the Implement dialog box.
Figure 6. Implement Dialog
Note: The first step in implementing a design is the selection of a target device. If you specify a valid PART in Leonardo, it is pre-selected in the Part Selection dialog box. For designs that do not have the PART specified in the netlist (or the Design Manager is unable to detect its presence), you must identify the target part using this dialog box. You may define the part in Leonardo by setting the part variable, i.e., set part xc4005xl-3-PC84. Setting the part variable is a step of convenience and does not effect optimization results.
Setup Alliance Series to generate VITAL VHDL Simulation Model
- From the Implement dialog box select the Options button. This brings up the Options dialog box.
- In the Optional Targets field, check the box labeled, Produce Timing Simulation Data.
- In the Program Option Templates field, select the Edit Template button for Implementation. This brings up the XC4000 Implementation Options: Default dialog box.
- Once up Select the Interface tab and set the simulation data output to VHDL.
- OK all the dialog boxes.
Figure 7. Implement, Options and Default Dialogs
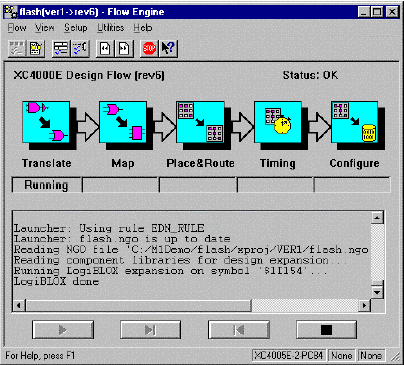
Run the Implement Command
To launch the implementation process, in the Implement dialog, push the Run button. This makes the Flow Engine graphical interface appear. This processes the design is through a five step sequence.
Figure 8. Flow Engine Dialog
Notice the arrow buttons on the bottom of the window. These look like CD player buttons and provide a similar function.
Figure 9. CD Play Buttons
Note: You can stop an Implement run after any step by hitting the Stop button which appears in the form of a stop sign.
Figure 10. Stop Button
Review the Alliance Series Implement Results
Once the Flow Engine has completed the Implement process, the Implement Status dialog box posts. To review the processing which has occurred, review the log file. In the Implement Status dialog box, push the View Logfile button that bring ups the Report Browser. View any report with a simple double click of the mouse.
Figure 11. Report Browser Dialog


ModelSim Gate-Level Simulation (with SDF) Session
This section describes the basic steps to compiling and simulating the post-synthesis/post-place&route gate-level design with SDF timing back annotation.
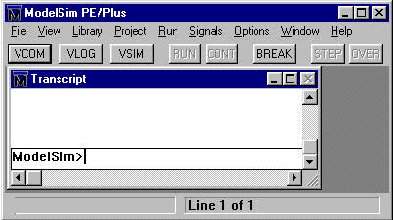
- Invoke ModelSim.
% vsim -or- Programs > Model Tech > ModelSimFigure 12. ModelSim PE/PLUS Dialog
- Set ModelSim to the directory that contains the gate-level VHDL netlist (from Xilinx Design Manager).
ModelSim> cd c:\mygatedesign -or- File > Directory- Create a working library to store the compiled design.
ModelSim> vlib work -or- Library > New- Create a Simprim library to store the compiled Xilinx Simprim packages.
ModelSim> vlib simprim_lib -or- Library > NewNote: A separate library is not required for the Simprim packages. You compile them into your work directory. Then you map the simprim library instead of simprim_lib as is shown in the next step.
- Map the Library name simprim to the library simprim_lib you just created. This allows ModelSim to know where to look when it encounters a library SIMPRIM; statement in the VHDL design.
ModelSim> vmap simprim simprim_lib- Compile the Simprim packages into the simprim_lib library.
   ModelSim> vcom -work simprim -explicit  \
              <Xilinx dir>\vhdl\src\simprims\simprim_Vpackage.vhd

   ModelSim> vcom -work simprim -explicit  \
              <Xilinx dir>\vhdl\src\simprims\simprim_VITAL.vhd

   ModelSim> vcom -work simprim -explicit  \
              <Xilinx dir>\vhdl\src\simprims\simprim_Vcomponents.vhd
Note: This step is easier using the ModelSim VCOM button which brings up the following dialog. Make sure you compile in the proper order (Vpackage, VITAL, Vcomponents). The Target Library setting is simprim instead of work.
Figure 13. Compile VHDL Source Dialog
- Compile the VHDL netlist created by the Xilinx Design Manager.
ModelSim> vcom time_sim.vhd -or- VCOM buttonNote: The place and routed time_sim.vhd gate-level design uses the IEEE & SIMPRIM VHDL libraries. The IEEE library comes pre-built in the ModelSim simulator. You built the SIMPRIM library in step six above. If you did not successfully compile the SIMPRIM libraries or properly mapped the library name simprim to the simprim_lib library above in step five, then the ModelSim compiler issues error messages complaining about Library simprim not found.
- Start the ModelSim simulator applying the sdf information in the file, tim_sim.sdf, to the root level of the design ( / ).
ModelSim> vsim -sdftyp /=time_sim.sdf topOr use the ModelSim VSIM button to start the simulator and apply the SDF info:
Figure 14. Simulate a Design Dialog
- View all the ModelSim debugging windows.
VSIM> view * -or- View > All- Wave and list signals of interest in the design.
VSIM> wave /* -- Adds all top level signals to the wave window VSIM> list /* -- Adds all top level signals to the list window- As was done in the RTL simulation, either use a VHDL testbench to stimulate the RTL design, or force the inputs directly in ModelSim.
VSIM> force /clk 0 @ 0 ns, 1 @ 50 ns -repeat 100 ns VSIM> force /input 0- Run the simulation and analyze the information in the ModelSim debugging windows to verify the results are the same as in the RTL simulation.
VSIM> run -all -or- Run > Run Forever