 |
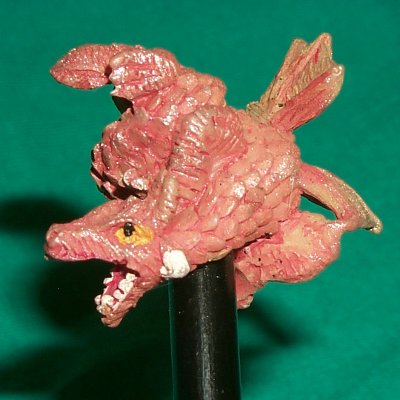
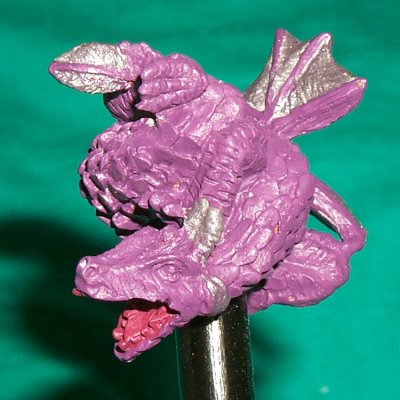
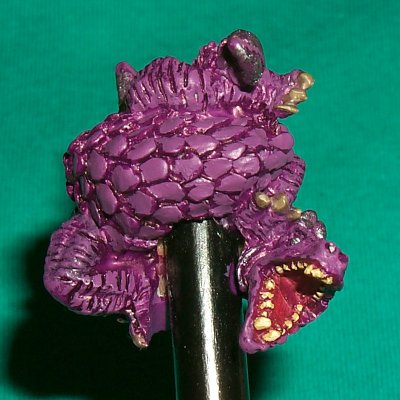
This is how the Dragon looked straight from
the shop. I really liked the look of it with the good scale detail and
the interesting coiled shape but the paint scheme didn't make it look
like the fearsome top-of-the-food-chain predator that I imagine Dragons
to be. The colour scheme has not yet been finalised, traditionally they
are portrayed in either gold, silver or one of the bold primary colours
of light (red, blue or green). I will probably go for one of the
primaries due to the increased scope of shading and highlighting but the
only way to find out will be to keep checking back regularly.
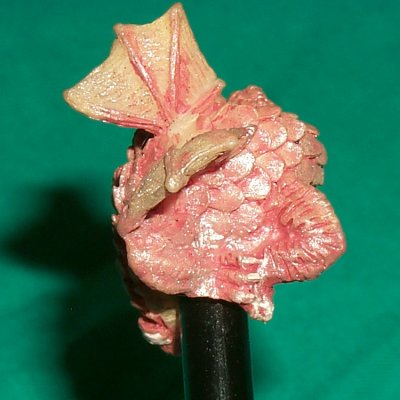
The first step in any project, whether it be painting or re-painting, is always clean up. Making sure that no mould lines (or flash) exists on the model, that it is free of air-bubbles and that the casting contains no obvious flaws can't be overstated. In a model this small a badly cast area could completely obliterate the detailing of a major part. Fortunately no major work needed doing although on closer inspection I found that the Dragon had been firmly glued to the pencil, this fact would make painting the underside difficult. My options were then either try to remove the pencil or paint around it. I have chosen to paint around it because the underside will not be visible at most times. |
 |
|
 |
|
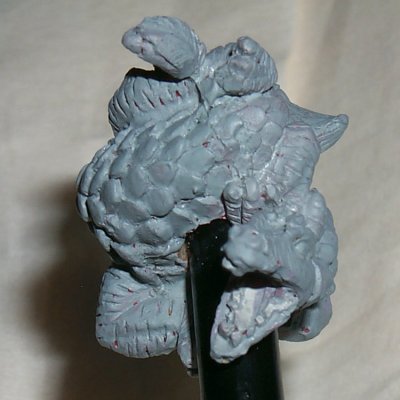 |
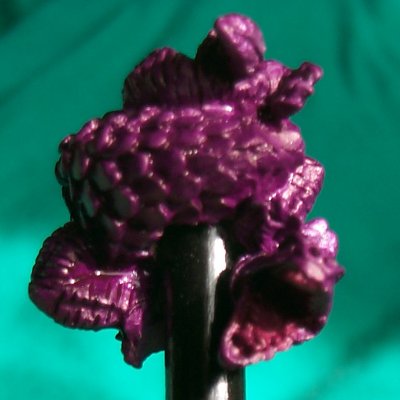
The next step is undercoating, for me this means in the almost obligatory Humbrol Matt Grey. I have in the past used primers and other paints specifically designed to undercoat models but I find that a thin covering of Grey acrylic makes a very good job of showing up the different textures and patterns of the model and so eases the base colour stage. As well as being a good indicator of textures and patterns, an undercoat usually acts as a good base on to which the paint is applied but in this case that wasn't necessary due to this being a re-paint. However, I didn't want the original colours to distract me from my rendering so that was another reason to undercoat (actually if the model had been larger I would have wanted to try to remove the original paint scheme anyway). |
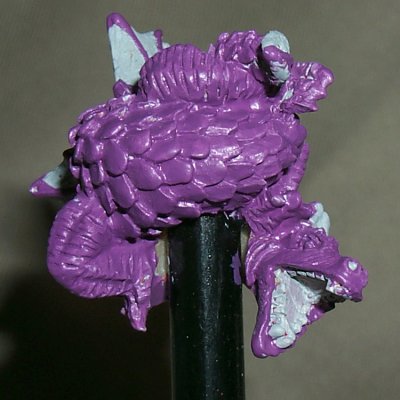 |
After lots of thought I decided that purple would be a good base colour for the Dragon. I chose Worm Purple by Citadel because it's a good strong purple colour and mixes well with white to give a nice lilac colour for the highlights. The mouth area will probably be a nice standard dark red but I'm not sure yet of the wing membranes and claws. I know that silver goes very well with purple (thank you for the tip Diana) but I may see what a metallic purple looks like. |
 |
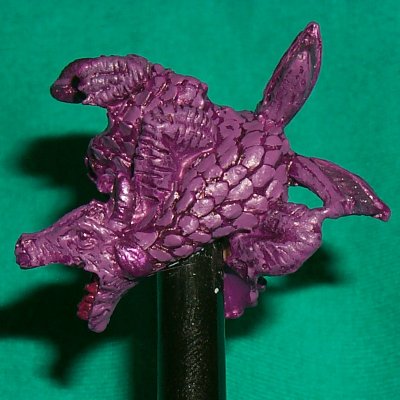
I decided that the wing membranes and tip of the tail would look better in a very pale metallic purple so I mixed Humbrol Acrylic Aluminium with a touch of the Citadel Worm Purple that I had base coated the model in. I also blocked the inside of the mouth in a mix of Humbrol Red and Citadel Worm Purple. I wasn't too concerned about leaving the teeth unpainted as they would be picked out later after the next phase which will be shading (time to find if I've still got some purple ink). |
 |
The entire model (mouth and metallic area included) was coated with Citadel's Purple Ink to provide some good deep shadows. The ink applied to the metallic areas was slightly thinner than to the rest of the model to allow more of the silver to show through because I don't want the wing membranes to have quite as much contrast between the light and dark tones as the rest of the dragon. |
 |
After the shading phase it was time to re-apply the base colours. Each scale was picked out with Citadel Worm Purple and the legs and head were dry-brushed with the same colour. At this stage you don't want all of the ink to be completely erased so make sure that enough is left in the recessed areas (in this case between the scales) to create a good contrast. With this particular model I intend to do several highlight stages so I wasn't needing this first stage to be perfect, I only wanted to block in the colours so that it would make the first highlighting stage easier. Nothing has been done to the wings, mouth or claws yet. |
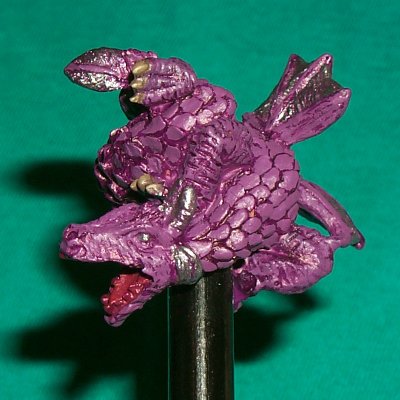 |
The next stage would normally have been the first highlights for the purple scales but instead I decided to dry-brush some Aluminium back onto the wing membranes, horns, ears and eyes. Whilst doing this I was unsure whether to paint the claws Aluminium, as well, to create a standard look throughout the model but in the end I thought that the model would benefit from another small area of different colour so I painted all of the claws in a mixture of Citadel Bestial Brown and Citadel Brown Ink. While this was still slightly wet I highlighted the claws with a mixture of the base colour and Citadel Orc Brown before finally highlighting with Citadel Bleached Bone. At this stage the inside of the mouth was dry-brushed with Humbrol Red and then a glaze of thinned down Humbrol Red was applied to the mouth and teeth. |
 |
There is usually a stage in painting any model when it seems to change from a flat object into a creation with real life (a bit of a flowery explanation, I know, but it is true). That occurred in this model when I picked out the teeth using Orc Brown and then highlighted them using Bleached Bone. |
 |
The first highlighting stage of the body was done using a mix of Citadel Worm Purple and Humbrol Satin White. Each scale was individually picked out using this colour, while the legs and face were dry-brushed. It's very important to make sure that enough paint is mixed at the start, as if you run out halfway through then trying to get an exact match can be very difficult. It's at this point that the model is nearing completion, I want to do one more highlighting stage - I did intend to do more but due to the models small size I don't think that will be necessary. |
 |
A next stage of highlights was completed using a lighter mix of Worm Purple and White. This time, because the model is small in size, I just very lightly dry-brushed the paint onto the model taking care to only brush following the contours of the scales so as to ensure that only the edges of the scales were highlighted.. |
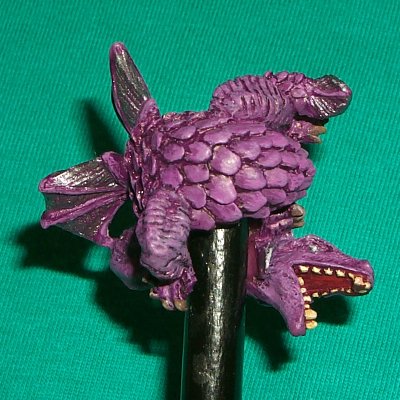 |
At first the next stage may seem a little strange but after applying two costs of lighter purple I then applied a glaze to tone the highlight down. I used an old Humbrol paint pot to hold the glaze (basically a very thin wash of Citadel Purple Ink - about one part ink to twenty parts water) and applied it to the model taking care not to get any on the wing membranes or into the mouth. The glaze does a few things: Firstly it tones down and blends together the highlights making a much more subdued but also more subtle range of colours from the shadows to the lightest highlight. Secondly it can give a nice sheen to the finished area - useful for depicting certain shiny materials (although that's not as important in this case as I want the scales to be matt so I'm going to apply a clear matt varnish next). Thirdly the glaze can also slightly strengthen the shadows, although not usually by much because of the very watered down nature of the paint. |
 |
As mentioned above I have applied Humbrol Matt Cote varnish to the entire model. This will give the model a layer of protection if the pencil is actually used (more on that later). Unfortunately this also dulls the silver colour and produces an unrealistically flat inner mouth, both of which will probably get a coat of satin varnish at a later stage but next I'm going to apply a little bit of work to the pencil. |
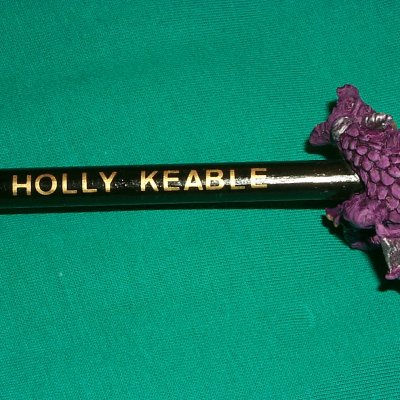 |
I'm really entranced by dragons but I thought this one would make a fantastic present for somebody that collects them (I just hope you like it Holly). To make it even more personalised I bought some DECAdry transfers so that I could write her name along the pencil. These are a standard rub-on alphabet transfer that come in several colours, unfortunately purple and silver aren't included in the range. Therefore I chose a sheet of uppercase Gold characters that I thought would stand out against the black of the pencil. Because the pencil was rounded and not hexagonal there were no flat surfaces so some care had to be taken to get the transfer on without tearing but overall they went on very cleanly with no problems. On the shiny pencil surface they are very delicate so the pencil and letters will need varnishing for protection, but all-in-all a very nice effect was achieved. |
 |
Finally, after applying a second coat of Humbrol Matt Cote to the Dragon, two coats of Humbrol Satin Cote to the pencil and a coat of Humbrol Satin Cote to the inside of the Dragons mouth, I am happy with the result. If I was feeling pedantic I could probably keep finding things that I didn't like or that didn't look right and continue but, then again, I could do that with every model in my collection. |


