|
The
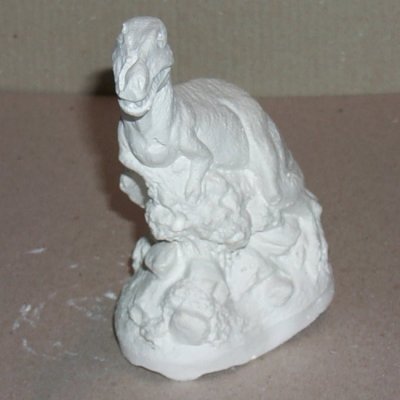
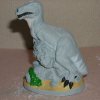
T-Rex came out of the mould with some slight damage. As is often the case with
using Plaster-of-Paris in moulds, air bubbles had formed and the mixture had not
quite reached all of the extremities. The main areas of concern on the dinosaur were
the head, the talons and the tail. The head was partially deformed at the right
hand side, the talons and tail having some air bubbles. The base had also
suffered from slight air bubbles but wasn't as noticeable due to the
detailing of the vegetation. |
 |
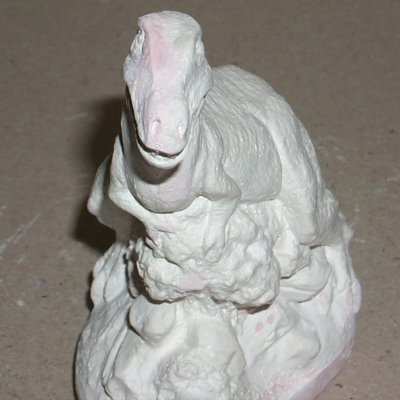
I started by mixing up some interior filler,
the kind of product you use for filling holes in walls, to a fairly
thick consistency. In order to aid myself with the repair work I added
some Citadel Blood Red acrylic paint to the filler so that it stood out
from the white of the Plaster-of-Paris. Applying small amounts of the
mixture using a cocktail stick, I gradually built up the areas that were
affected. After leaving the mixture to dry for a while I used a variety
of small tools to detail the filler until it blended in with the
surrounding area. As I have said previously, I have never tried
sculpting anything and my repair work has never been very involved so I
got this model to a stage where I was happy with the result without
trying to go over the top matching each crevice or wrinkle in the skin. |
 |
 |
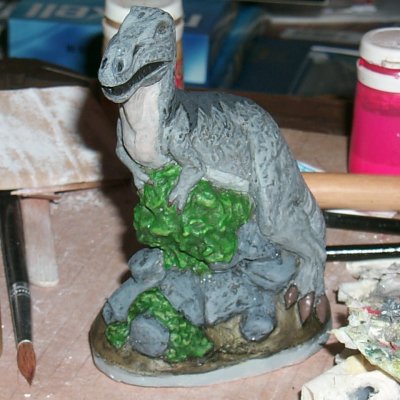
The next stage was a Humbrol Acrylic Matt Grey undercoat.
This served two purposes: Firstly, although I wanted the filler to be a
different colour to the Plaster while I was trying to fix the damage, a
flat colour always helps to show up any further irregularities and air
bubbles. And secondly, it provides a good base for the remaining paint
to adhere to. |
 |
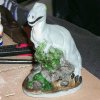
The colour scheme was something of a dilemma at first.
Being a large carnivore that probably wouldn't have relied on stealth
and had no known predators, it seemed that a camouflage pattern might
not be necessary. I decided to plump for a grey colouration since our
large mammals are that colour (elephants, rhino's, hippo's) but to make
it slightly more interesting I added a lighter underside with some stripes
on the tail. The lighter grey was a mixture of Humbrol Grey, Humbrol
White and a spot of Humbrol Flesh. All of the teeth and claws were painted a flat Citadel
black and the base elements were painted with Citadel's Orc Brown or
Striking Scorpion Green. |
 |
Citadel Brown Ink was washed all over the base to create
the shadows. Some areas getting several thin coats depending on the
level of shadows that was to be achieved. |
 |
While giving the base a wash of Brown Ink I decided that
the pattern on the Tyrannosaurus wasn't strong enough to hold interest.
Nature certainly has some striking colours and patterns in its
repertoire so I felt justified in adding a dark grey pattern down its
back - it may not have needed camouflage but it sure looks more
interesting. At this point I felt that the model needed some overall
consistency so I used a Brown Ink wash on the dinosaur. This helped to
bring the dinosaur and base together slightly. Using few colours
throughout the entire model can give a pleasing result and doesn't
distract the eye as much as wildly contrasting areas. |
 |
The highlights were done next. All areas of the model were
highlighted with their respective base colours except for the rocks
which were highlighted with a mixture of Humbrol Grey, Citadel Chaos
Black and Citadel Brown Ink because I wanted the rocks to be a different
shade of grey than the dinosaur. |
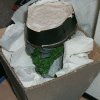 |
While painting the dinosaur I knew that I didn't like the
sides of the base as they were. Some air bubbles were still present and
it wasn't a constant height all the way around. I hadn't made up my mind
what to do with it but as the painting got close to completion I knew
that I had to make a decision. I actually made up my mind while writing
an e-mail about the model to the work colleague that it belongs to. I
was using a Jurassic Park Font and wondered if I could replicate the
font onto the base. I thought I could but would need the sides to be
larger. Wrapping electricians tape around the existing base I mixed some
more interior filler and filled the cavity that I had just made. |
 |
After the base had dried and had been sanded down I was
ready for the final details. The claws and teeth were picked out in
Citadels Bestial Brown and then highlighted with Citadels Orc Brown and
Bleached Bone. The base was painted Salamander Green. To make the
painting of the text easier an outline of it was printed out and stuck
onto the side before being painted over with Humbrol White, Humbrol Red
and Salamander Green. |