Vacuum-Bagged Kayak Paddle Blades
This page is currently under construction--thank you for being patient!
I started with a 3" x 8" x 24" chunk of EPS (Extruded Polystyrene) building foam which is sold under trade names like DOW BlueBoard and OC PinkCore. I carved the block to a rough curve with a hand saw and cut in a nice dihedral shape down the middle. Shaping progressed with a 60-grit disc in my ROS. Once I had a shape I liked, I glassed the surface and filled the weave with later coats of epoxy until it was smooth. It turned out to have some bumpy spots so I faired them out with epoxy and phenolic microballoons.
When the mold was finally fair, I gave it a good final sanding with 150 grit and gave it a skim coat of epoxy. I waxed the mold with Johnson's paste wax, buffed it, and then covered that with PVA mold release.
The first step in laying up the blades was a skim coat of resin on the mold. This will be the visible surface. A layer of thin colored cotton fabric was laid in the wet epoxy, and then fiberglass was applied over that.
I used stepped layers of 15 oz. biaxial cloth. 2 full-length layers, one from the third point to the end, one from the two-thirds point to the end, and one 2" "ding resistance" piece right at the end. I also used a single 3" wide piece of 15 oz. uniaxial running the length of the center of the blade to stiffen the end of the blade where it projects past the end of the shaft.
I coated the glass with just enough epoxy to saturate it, but not nearly enough to fill the voids between the glass warps. When all glass was in place, I draped a sheet of Saran Wrap over the glass to squish out all the larger bubbles. I put the whole shebang into a heavy, clear plastic bag on top of an old T-shirt (breather).
 The opening of
the bag was drawn tight around the end of the Shop Vac hose, and the Shop
Vac was turned on. I pulled the upper layer of plastic bag smooth where
it lay over the paddle blade. When all the air was sucked from the bag,
the glass was visibly drawn down in the mold and the air was sucked to
the sides. I was able to use a small roller to force any excess resin in
the middle of the mold to the outer edges where it was absorbed by the
T-shirt.
The opening of
the bag was drawn tight around the end of the Shop Vac hose, and the Shop
Vac was turned on. I pulled the upper layer of plastic bag smooth where
it lay over the paddle blade. When all the air was sucked from the bag,
the glass was visibly drawn down in the mold and the air was sucked to
the sides. I was able to use a small roller to force any excess resin in
the middle of the mold to the outer edges where it was absorbed by the
T-shirt.
It might have cost me a small amount of weight by not using a breather/peeler ply, but I saved a lot of money and hassle by not using them. I could also more easily see the saturation of the glass without the inclusion of an opaque peeler ply.
 This photo shows the blade in the
vacuumed mold.
This photo shows the blade in the
vacuumed mold.
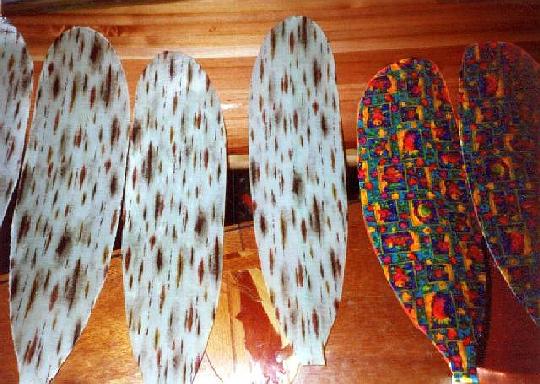 3 pairs of trimmed blades, ready
to be epoxied to birdsmouth shaft.
3 pairs of trimmed blades, ready
to be epoxied to birdsmouth shaft.
The blades and shaft were sanded smooth and varnished with spar varnish.
Back to the Paddle Building Page