
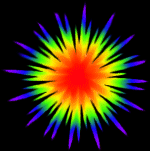
- Rainbow Star
|
|
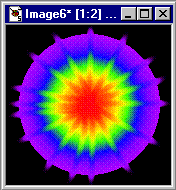
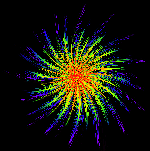
Finished Result:
1) Start off with a new, image. Rectangular, about 200 pixels by 70.
2) Mentaly mark out the image into 6 sections, take the selection tool (rectangle feather 0) and select the first section.
3) With red as the foreground and orange as the background, fill
the first selection with a horizontal linear gradient.
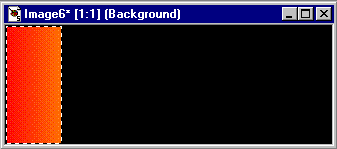
4) Select the next 1/6 of the image. Choose foreground colour orange and background yellow.
5) Repeat step 4 with colours:
Yellow : Green
Green : Blue
Blue : Purple
Purple : Pink/Red
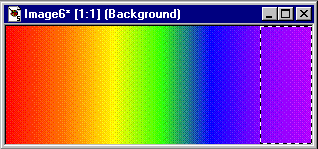
6) Enlarge the canvas, approx' 300x300. Move the rainbow section
so it is just off center.
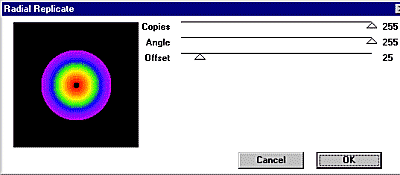
7) Filter Factory F: Radial Replicate: Copies = 255 Angle=255 Offset=default.
Don't worry if there is a hole in the middle (you can fill it in
next) but you should be seeing a rainbow filled circle.
8) With the smudge tool set to Size=15 Opacity=50 Density=100 Hardness=70
Step=0
Drag from the middle outwards so you are making rough spokes from
the circle. Neatness for this part is not neccessary.
9) New image, same dimensions as the one you have been working on,
300x300.
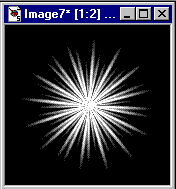
Filter Factory B: StarMaker.
Choose whatever settings you want just so long as the star is about
2/3 the width and height of the actual image.
10) Masks: New: From Image: This window.
11) Fill: Pattern: Opacity: 200: Options: Image *X* (the rainbow donut you made earlier)
12) Fill.

13) For those with PSP4 your rainbow star is done (delete the mask, resize, recolour, do what you feel), for those with PSP5 the back ground (once you've merged the mask and image) will be white and the star is all pixelated, so don't delete the mask yet!. Make a new layer, send it to the back and fill in with solid black and then merge all layers (which will include the mask)
14) You're done! The Rainbow star makes great bullets (resize to about 30x30) or if you want, try a few of these variations.
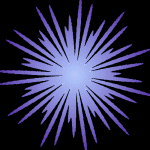
Instead of making a rainbow, this just has a sunburst gradient of
blue and purple, steps 9-14 are the same.

Mexican style, follow steps 1-14 then go to Filter Factory A: Seismic:
Settings=Default
Steps 1-14, Filter Factory J: Twister: Your own settings, they all
look great!