|


| |


WS_FTP Help Page
If you don't already have the latest version of WS_FTP (version 4.6 dated 3/17/98),
please go to the WS_FTP Download Page first :) If you are a
Macintosh user, please check out the information on Fetch.
If you are not qualified to use WS_FTP LE because you are using it for commercial
purposes or don't meet the requirements as described in the License
Agreement, please click here to evaluate
WS_FTP Pro version 5.
Setting Up WS_FTP
For the official GeoCities info on setting up and using FTP clients, check the new and
improved GeoCities FTP setup guidelines.
Follow me down for more detailed info on WS_FTP setup, in what I think is a little be
easier to understand language (and more updated).
- Download and install WS_FTP LE (or WS_FTP Pro. Windows 95 and Windows NT users
should download and install the ws_ftple.exe file (32 bit version). Windows 3.1
users should download and install ws_ftp16.exe (16 bit version).
- Start up WS_FTP. You will be presented with the Session
Properties dialog box that allows you to connect to an FTP site. If you need to, click
on the Connect button (usually on the lower left corner) to bring up the Session
Properties.
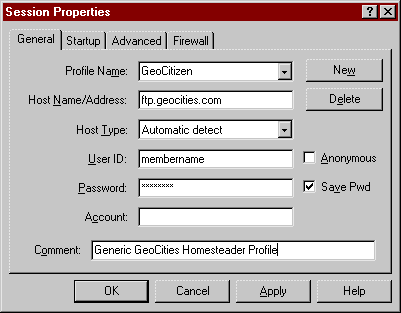
- Enter the following items for connecting to GeoCities in the General tab. You may need
to click on the New button if there is a default profile already listed (i.e., WS_FTP):
 | Enter a name for the profile (i.e., SiliconValley/Heights/7493 or your membername) |
| Host Name/Address = ftp.oocities.com |
| Host Type = Automatic Detect |
| User ID = Your GeoCities User Name! |
| Password = Your GeoCities Account Password! |
| Make sure "Save Pwd" is checked if you don't want to enter your password every
time you connect. |
| Account = leave blank |
| Comment = Whatever you like to describe what this connection is for. |
Click on the Startup tab.
| Initial Remote Host Directory = leave blank, or enter your actual homestead path. If you
do enter a path, be sure to enter it EXACTLY like it was given to you by GeoCities (i.e.,
"/SiliconValley/Heights/7493" instead of "/siliconvalley/heights/7493"
- the FTP server is CaSe SeNsItIvE). |
| Initial Local Directory = The directory/folder where you store your files for your
homestead/web pages. |
| Initialize Command = leave blank |
| Local File Mask = Leave blank. |
| Remote File Mask = Leave Blank. |
| Transfer Offset in Hours = If desired, put in your local time zone as a + or -
difference from GMT/UTC. For example, on the US West Coast, you can put in "-8".
This will synchronize the times so they match on both the local and remote sides. |
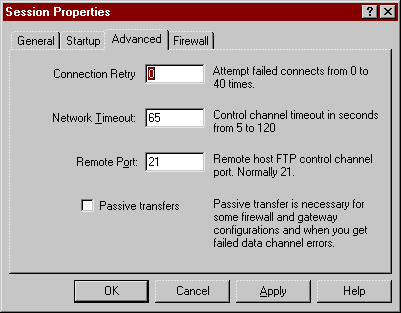
Click on the Advanced Tab.
| For "Connection Retries", you can put a number in here from "0" up
to "40". This is how many times WS_FTP will continue to automatically retry
connecting to the server if it is busy. |
| For "Network Timeout", I highly recommend increasing this to the maximum value
of "120" seconds at this time. The new FTP setup at GeoCities has increased its
popularity, making for some long delays at times of heavy usage. |
| Verify that "Passive Transfers" is not checked. GeoCities does not
support Passive FTP Transfers at this time. |
| Leave "Remote Port" set to "21" - DO NOT CHANGE IT! |
Click on the Firewall Tab.
| For most users, this tab should also be left at the default settings. |
| If you connect to the Internet through a Firewall, check with your Network Administrator
for details on what settings should be put in these fields. |
Click "OK" to save your settings and connect to GeoCities.
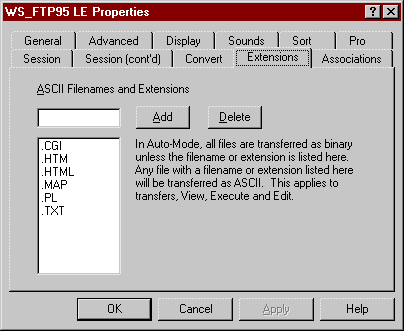
Once connected, click on the "Options" Button on the toolbar, then click on
the Extensions tab.
| This page is used by WS_FTP to determine what files to transfer as ASCII (text) files,
and which to transfer as Binary. Taking a few minutes to fill in these settings will save
you much time (and heartache) later on. |
| For every type of file that you will transfer as text, enter the extension (i.e., HTM,
HTML, TXT) in the top box, and click the Add button (this section is NOT case sensitive -
WS_FTP will match these extensions regardless of whether your file names are lower, upper
or mixed case). The most common ASCII extensions used at GeoCities are: HTM, HTML, TXT,
MAP and JS. |
Click on the Convert tab. In here, you can define
extensions that will automatically be converted during upload. For example, you can enter
".htm" in the first box, and ".html" in the second, then click the Add
button. Then (if Convert Extensions is turned on - see below) files you upload with a
".htm" extension will automatically be converted to ".html". This is
especially handy for Windows 3.1 users.
Click on the Session Tab.
| Leave Host Type at whatever was determined by WS_FTP when you connected.
If you haven't connected yet, leave it at "Automatic Detect". (If this ever gets
scrambled, or you get a "Undetermined Host Type" error message, try setting it
to Unix Standard |
| Make sure Update Directories After Transfer IS checked (This is new
- now you do want updates, since you can see your files on the GeoCities side). |
| If you wish to see a progress/thermometer bar while transfering your files, check Show
Transfer Progress Dialog. |
| DO NOT check Use Passive Transfer Mode. (This new FTP server might support
PASV transfers now, but I haven't been able to test this. If you have information about
doing Passive Transfers with the new FTP server, please let me know) |
| Check Use Firewall only if you are using one. |
| If you want all your files to be uploaded with lower case names (recommended) check Force
Lowercase. Make sure you use only lower case names in your HTML files if you do
this, or your pages will not be correct. |
| If you chose to use extension conversions in the step above, check Convert
Extensions here. |
Click on the Session (cont'd) tab.
| Make sure "Send Unique" and "Receive Unique" are not checked. |
| If you are using Windows 3.1, and you want to give long filenames to your files in your
GeoCities directory, check "Prompt for Destination Names" here. This will
present you with a dialog box to give the name for the file after upload for every file
you transmit. Normally this will not be checked. |
The rest of the tabs (General, Advanced, Display, Sounds, Sort and Pro) affect the way
WS_FTP looks and acts for you, but do not change the way it operates with regards to
GeoCities file transfers. I recommend that you read the Help File for information
regarding these tabs.
Save the settings by clicking on the OK button.
That's it - you are now set to go. You should see something similar to this window on your screen. To upload files to your
homestead, just use one of the following options:
- Double click on a file name in the left (local) window, and it will be uploaded to
GeoCities, or
- Hold down your Control key and click on multiple files to select them, then click on the
"-->" button to transfer them all at once.
- To download your files from GeoCities, just do the exact opposite - select the
files you want to download and click the "<--" button.
After the files transfer, the display should update to show the new files uploaded (if
you set the "Update Directories After Transfer" option above). If not, click the
"Refresh" button to force an update of the listing.
GeoPlus Members Only
You can now create, rename and delete subdirectories in your homestead through FTP!
To Create A Directory
- Make sure you are in the directory you want to create the subdirectory under. (Look at
the drop down box above the right side of the WS_FTP screen to see where you are now).
- Click the "MkDir" button on the right side of the screen.
- Enter a name for your new subdirectory EXACTLY AS YOU WANT IT TO APPEAR! Remember, the
GeoCities server is case sensitive, so "Images" is NOT the same as
"images" or "IMAGES". In fact, you could have all 3 of those in your
homestead at the same time!
- If needed, click the "Refresh" button to update your display.
Renaming a Directory
To rename a subdirectory, just click on the directory in the file listing, and either
click the "Rename" button on the right, or right click on the directory itself
and choose "Rename Directory" from the popup menu.
Deleting a Directory
To delete a directory, you just need to click on it in the file listing, then either
click the "Delete" button on the right, or right click ono the directory itself
and choose "Delete Directory" from the popup menu.
IMPORTANT: In order to delete a directory, you must delete all the files and/or
subdirectories underneath it first. You cannot delete a directory that has anything inside
it.
Having problems not covered here?
For help in GeoCities, you can visit the GeoCities Online Help
Guide or the GeoCities Help Forums for help from
your fellow GeoCitizens.
|

