 Think
of the X value as a 'tilt-up or tilt-down' adjustment in your view. A positive
value of X will tilt the viewpoint down, and a negative value will
point the camera up. 90 degrees positive would point the camera
straight down.
Think
of the X value as a 'tilt-up or tilt-down' adjustment in your view. A positive
value of X will tilt the viewpoint down, and a negative value will
point the camera up. 90 degrees positive would point the camera
straight down.How Do I Make An Info_Intermission Camera?
This is one of those projects that started from my own frustration at seeing lots of explanations floating around, most of which were inaccurate or incomplete. After a lot of experimentation, I believe I understand how the intermission camera works well enough to explain it.
First, I will assume you are using an editor like Worldcraft(tm) that allows you to insert the info_intermission camera as an entity. The first step would to insert your info_intermission entity at the point you want the camera to be, i.e. the origin of the camera view.
After you have your camera placed, you will need to add a keyvalue to the info_intermission. Using Worldcraft as an example, right-click on the entity and select 'properties', then make sure the 'SmartEdit' is OFF (click on it if necessary to make it look like it is NOT depressed). Click the Add button, then in the attributes dialog box, under 'Key' type in mangle (make it all lower-case letters), then under 'Value' type in the X Y Z rotation values (I will explain these below) separated by spaces - NOT commas - for example, 45 270 0 , then click on 'OK'. That's it! Your camera is ready... I think the info_intermission works for both deathmatch and single-player levels (single player levels are ended with info_changelevel entity, which is set like a trigger - you make a brush, then tie it to the info_changelevel entity).
Determining the Mangle Values
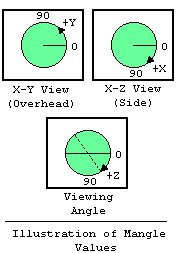
This is the most confusing part of setting the info_intermission. The values of 'mangle' determine a viewing angle in x, y, and z planes. I have illustrated below how the X, Y, and Z values are determined.
 Think
of the X value as a 'tilt-up or tilt-down' adjustment in your view. A positive
value of X will tilt the viewpoint down, and a negative value will
point the camera up. 90 degrees positive would point the camera
straight down.
The Y value sets the rotation about the Z axis. The easiest way to visualize this is to use the XY 2D view (the 'overhead' view). A 0 value for Y will make your view point in the +X direction (to the right), and a 180 value would make your view point to the -X direction (to the left), and a +90 value would make your view point in the +Y direction (towards the top of the XY view).
Finally, the Z value sets a rotation about the XY plane. I can't imagine too many cases where I would set this to anything other than 0 - it will tilt your viewing angle clockwise for a positive value of Z (for example, when you get gibbed, your viewpoint changes in this fashion, changing 90 degrees in the Z direction plus or minus). I would suggest leaving this at 0 for most cases.
I have included a small .map file that demonstrates this. In my example map, there are a few 'objects' in the room. I set the info_intermission to point at the pyramid-shaped object. Step on the slipgate pad to end the level and show the intermission view. In the example, the value for mangle is 45 270 0 (45 points the camera down 45 degrees, 270 rotates it, and leave Z at 0). One final note, when you use an editor to insert the info_intermission, there is no need to add an 'origin' key - the process of inserting the object creates the origin key, although it does not show up in the entity's attributes field. Now, go out there and make some cameras!
Direct comments on this article to Zaphod