![]() Exercise
1:Creating a New HTML Document
Exercise
1:Creating a New HTML Document
![]() Exercise
2:Inserting Line Breaks
Exercise
2:Inserting Line Breaks
![]() Exercise
3:Inserting Paragraph Breaks
Exercise
3:Inserting Paragraph Breaks
![]() Formatting Your
Page with Headings
Formatting Your
Page with Headings
![]() Exercise
5:Inserting a Heading 1 Style
Exercise
5:Inserting a Heading 1 Style
![]() Exercise
6:Inserting a Heading 2 Style
Exercise
6:Inserting a Heading 2 Style
![]() Exercise 7:
Inserting a Heading 3 Style
Exercise 7:
Inserting a Heading 3 Style
![]() Exercise 8:
Inserting a Heading 4 Style
Exercise 8:
Inserting a Heading 4 Style
![]() Exercise 9:
Inserting a Heading 5 Style
Exercise 9:
Inserting a Heading 5 Style
![]() Exercise
10: Displaying Your Document In a Web Browser
Exercise
10: Displaying Your Document In a Web Browser
![]() Exercise 11: Creating Bold
Text
Exercise 11: Creating Bold
Text
![]() Exercise 12:
Creating Italic Text
Exercise 12:
Creating Italic Text
![]() Exercise
13: Creating Underlined Text
Exercise
13: Creating Underlined Text
![]() Exercise 14:
Making a Horizontal Line
Exercise 14:
Making a Horizontal Line
![]() Exercise
15: Opening an Existing HTML Document
Exercise
15: Opening an Existing HTML Document
![]() Exercise 16:
Converting an Existing Document to HTML
Exercise 16:
Converting an Existing Document to HTML
![]() Exercise 17:
Creating a Target or Anchor
Exercise 17:
Creating a Target or Anchor
![]() Exercise 18:
Creating a Hypertext Local Link
Exercise 18:
Creating a Hypertext Local Link
![]() Exercise
19: Inserting a Graphic
Exercise
19: Inserting a Graphic
![]() Exercise
20: Inserting a Graphic Hyperlink
Exercise
20: Inserting a Graphic Hyperlink
![]() Exercise 21:
Inserting an Unnumbered List
Exercise 21:
Inserting an Unnumbered List
![]() Exercise 22:
Inserting a Numbered List
Exercise 22:
Inserting a Numbered List
![]() Exercise 23:
Creating Definition Lists
Exercise 23:
Creating Definition Lists
![]() Appendix
Appendix
![]() How to
Obtain Graphics for Your Pages
How to
Obtain Graphics for Your Pages
 Using Windows
Paintbrush to Obtain Graphics
Using Windows
Paintbrush to Obtain Graphics
![]() Glossary
Glossary
Notes
This primer assumes that you have:
HTML documents are in plain (also known as ASCII) text format and can be created using any text editor. For example, you may use Edit on DOS machines, or Notepad on Windows machines.
However, the simplest and fastest way to edit HTML documents is to use a Web Page creator, such as Corel's Internet Mania, HTML Writer, or Hot Dog. You may also download "add-in" products to popular word processors such as Microsoft Word and Wordperfect. These products are called Internet Assistant and Internet Publisher, respectively. In these lessons, we will discover how to create a Web page using 's HTML Writer for Windows.
Normally, most new web page creators, whether commercial or shareware, will hide HTML tags by default. HTML Writer does not. You may, however, view the document without tags using Netscape.
| <HTML> |
| <HEAD> |
| <TITLE>My First HTML Document</TITLE> |
| </HEAD> |
| <BODY> |
| <H1>This is heading style 1</H1> |
| <H2>This is heading 2</H2> |
| <H3>This is heading 3</H3> |
| <H4>This is heading 4</H4> |
| <H5>This is heading 5</H5> |
| This is normal text<BR> |
| <B>This line is in a bold style</B><BR> |
| <I>This line is in italics</I><BR> |
| <U>This line is underlined</U><BR> |
| </BODY> |
| </HTML> |
HTML uses markup tags to tell the Web browser how to display the text. The above example uses:
HTML tags consist of a left angle bracket (<), (a ``less than'' symbol to mathematicians), followed by name of the tag and closed by a right angular bracket (›). Tags are usually paired, e.g. <› and </H1›. The ending tag looks just like the starting tag except a slash (/) precedes the text within the brackets. In the example, <› tells the Web browser to start formatting a level-one heading; </H1› tells the browser that the heading is complete.
The primary exception to the pairing rule is the <› tag. There is no such thing as </P›.
HTML is not case sensitive. <TITLE> is equivalent to <title> or <TiTlE>. But you may want to put your HTML in upper case, to make it easier to distinguish from your page content
Not all tags are supported by all World Wide Web browsers. If a browser does not support a tag, it just ignores it.
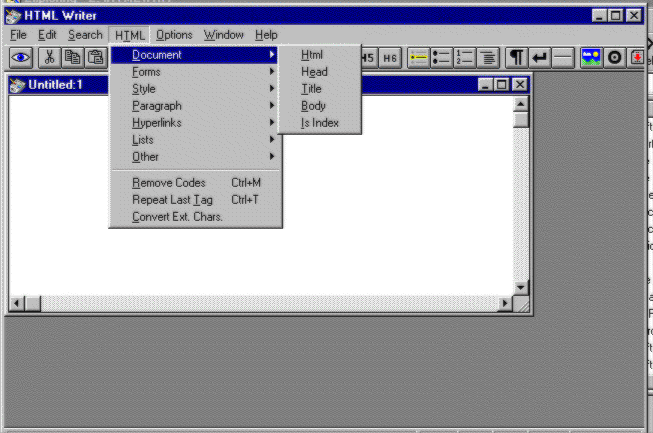
When you first open HTML Writer , this is what you will see:
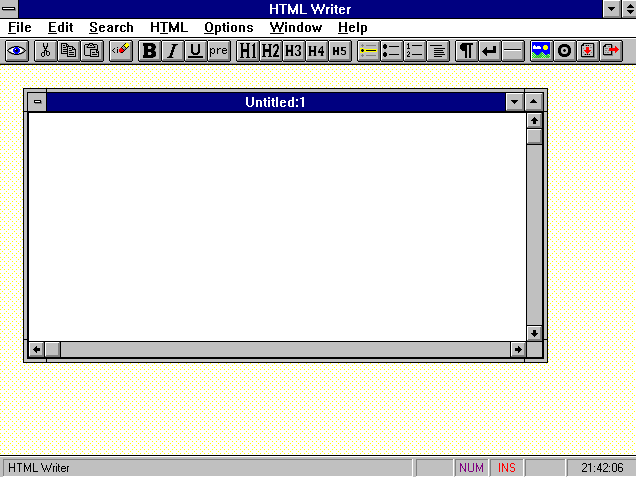
It's easy to use HTML Writer to create Web pages. You can create an HTML document without even knowing HTML markup.
Now you're ready to get started. What we will do is create a new HTML document.
To create a new HTML document:
This is heading style 1
This is heading 2
This is heading 3
This is heading 4
This is heading 5
This is normal text
This line is in a bold style
This line is in italics
This line is underlined
Yo probably noticed that the sample HTML document had extra codes at the end of each line. It was the line break, or <br> code. You may have also seen other code like this: <P>. This indicates that the section of the doculent should be treated as a separate paragraph. You may have also seen the </P> tag. It is optional. These codes would be equivalent to the [Hrt] code in Wordperfect.
To inset a line break:
Inserting paragraph breaks is similar to inserting a new paragraph in Wordperfect, except instead of typing [HRt][HRt] you use the paragraph or <P> code.
To inset a paragraph break:
As you can see, inserting new lines and paragraphs in HTML writer is accomplished by using the <BR> and <B> codes. Although it may appear that you are inserting a line break when you press ENTER, all the text will appear on one line when you look at your document in a Web browser, such as Netscape, Mosaic, or Internet Explorer.
It is important to note that Web page authoring programs fall into two categories: those which allow you to edit codes or tags, and those which do not. Since HTML Writer lets you design Web pages by editing codes, it follows standard HTML conventions. In particular, spaces and blank lines are ignored. If you use an add-on product to a word processor such as Wordperfect or Word, it will not be necessary to insert the line and page breaks; they will be put in automatically!
Once we have named it, we can give it a title. Every HTML document should have a title. A title is generally displayed separately from the document and is used primarily for document identification. In Netscape, the Document Title text tagged as <title> appears as the window title. Note that the Title tag must be contained in the <head> tag.
To insert a title in the document:
Now that we have some text on our page, it's time to create the different styles for the paragraphs.
To insert a heading 1 style in the document:
Hint: You do not have to select the entire line. Just click anywhere on the line, and choose a style!
To insert a heading 2 style in the document:
To insert a heading 3 style in the document:
To insert a heading 4 style in the document:
To insert a heading 5 style in the document:
To make bold text:
To make italic text:
To make underlined text:
Adding a ruled line in your document is easy!. To add a horizontal rule:
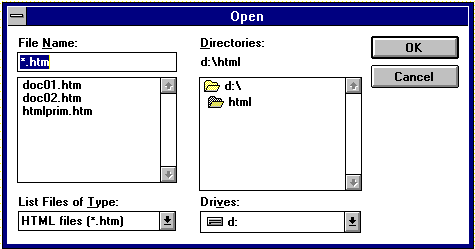
To open an Existing HTML document:
We have seen how easy it is to create new Web documents using HTML Writer. But it is also very useful, and time-saving, to take an existing document and convert it to HTML. For example, you may have a project or essay that you want the world to see. Most word processors, such as Word or Wordperfect, can export the document in ASCII or text format. This may be the fastest and simplest way to get publishing your Web page. The thing to remember is that the file must be first converted to text if it isn't already.
A Target or anchor is the destination of hyperlinks. An anchor can be a single "point" in your document, or you can associate the anchor with a string of text.
To create an anchor that is a single point in your document:
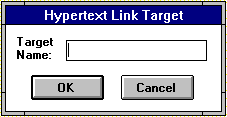
To create an anchor associated with a string of text:
Now the location where you created your anchor can serve as the destination for hyperlinks.
You use the Hypertext Local Link button to create hyperlinks to a relative link or to an anchor or target.
Before you begin this procedure, save the file in which you are creating the hyperlink.
To create a hyperlink to a relative link:
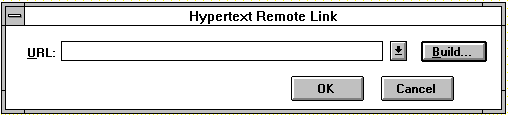
To create a hyperlink to a URL:
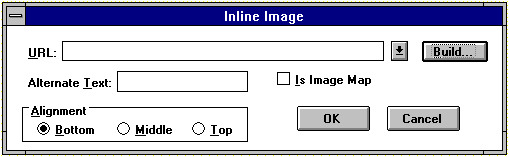
You can insert an inline graphic into your HTML document either for illustrative purposes or as the starting point for a hyperlink.
To insert a graphic as an illustration:
HTML supports unnumbered, numbered, and definition lists.
To make an unnumbered list:
This is what you will see:
A numbered list is identical to an unnumbered list, except it uses numbers instead of bullets
To make a numbered list:
This is what you will see:
A definition list usually consists of alternating a term and a definition. Web browsers generally format the definition on a new line.
To make a definition list:
The following is an example of a definition list:
Lists can be arbitrarily nested, although in practice you probably should limit the nesting to three levels. You can also have a number of paragraphs, each containing a nested list, in a single list item.
An example nested list:
Use the Preformatted style to to generate text in a fixed-width font and cause spaces, new lines, and tabs to be significant. (That is, multiple spaces are displayed as multiple spaces, and lines break in the same locations as in the source HTML file.) This is useful for program listings.
For example, this is preformatted text:
      #!/bin/csh
      cd $SCR
      cfs get mysrc.f:mycfsdir/mysrc.f
      cfs get myinfile:mycfsdir/myinfile
      fc -02 -o mya.out mysrc.f
      mya.out
      cfs save myoutfile:mycfsdir/myoutfile
      rm *
To make the section preformatted, select the text you want to display preformmattd. Then Click pn the PRE button.
The <› tag is generally used to specify the author of a document and a means of contacting the author (e.g., an email address). This is usually the last item in a file.
For example:
Creating Web Pages Using HTML Writer dossettd@yahoo.com
WWW pages support only JPEG and GIF type grahics. Windows BMP and PCX, as well as TIFF formats are not supported. There are several ways to obtain graphics for your pages:
Most of the time, it will be more convenient to use BMP graphic formats, because you will be using Windows. To create a graphic, you would likely have to convert it to GIF format.
Using Windows Paintbrush
to Obtain Graphics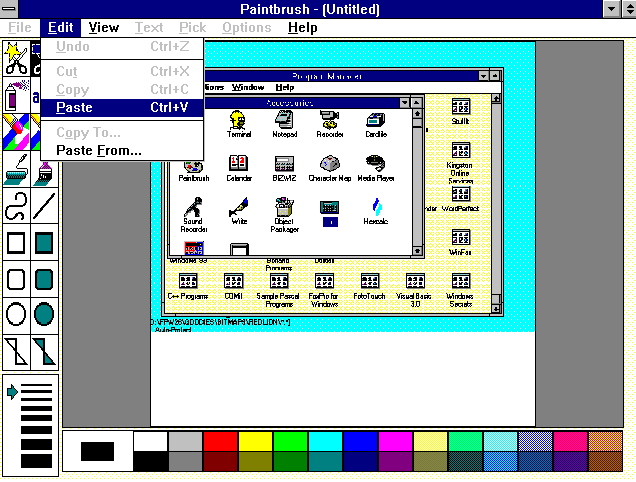
Click on View | Zoom Out. Then click on Edit | Paste.
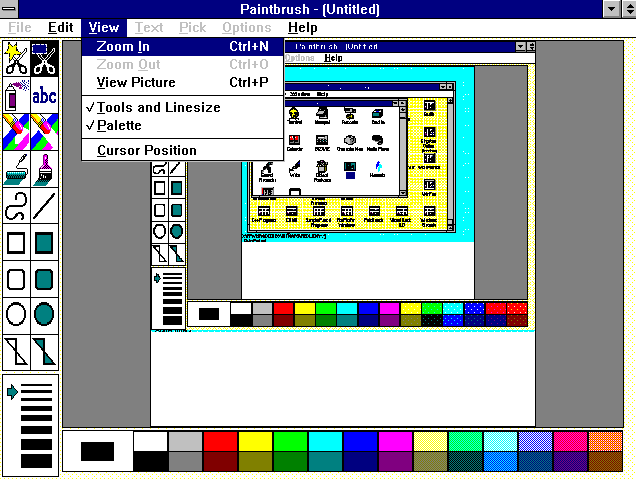
Click on View | Zoom In.
Use the square select tool to select the area of the picture you want to crop.
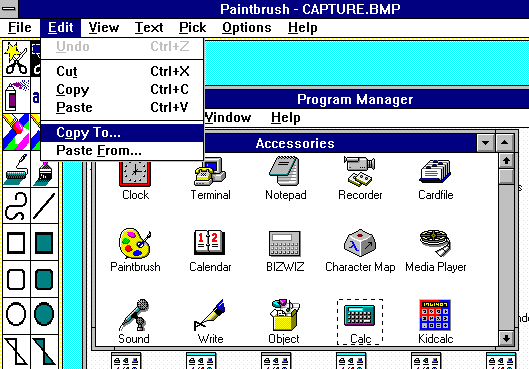
Select Edit | Copy To... to copy the cropped portion of the image to a file. Give it a name. You can only save it as a BITMAP (BMP) or PAINTBRUSH (PCX) file.
________________________________________________________________
________________________________________________________________
________________________________________________________________
________________________________________________________________
________________________________________________________________
________________________________________________________________
________________________________________________________________