The calendar should look like the following:
Let's start off with the basic tags to make a basic table as follows:
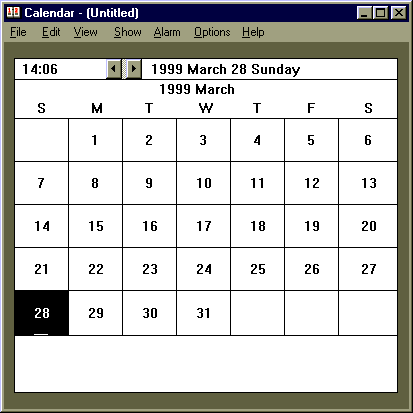
In this exercise we will create a sample table which liiks
like a calendar. We will use the example of a calendar based on
the calendar accessory which comes with Windows 98.
The calendar should look like the following:
Let's start off with the basic tags to make a basic table as
follows:
| 1 | 2 | 3 | 4 | 5 | 6 | |
| 7 | 8 | 9 | 10 | 11 | 12 | 13 |
| 14 | 15 | 16 | 17 | 18 | 19 | 20 |
| 21 | 22 | 23 | 24 | 25 | 26 | 27 |
| 28 | 29 | 30 | 31 |
Notice that we use the <TABLE> and </TABLE>
tags to set up the table. <TR> AND </TR>
tags are used for each row. The data which goes in each
"cell" is placed between <TD> and </TD>
tags. If the cell is empty, leave it blank. That's it!
Let's modify the table so that it has a border:
| 1 | 2 | 3 | 4 | 5 | 6 | |
| 7 | 8 | 9 | 10 | 11 | 12 | 13 |
| 14 | 15 | 16 | 17 | 18 | 19 | 20 |
| 21 | 22 | 23 | 24 | 25 | 26 | 27 |
| 28 | 29 | 30 | 31 |
We're coming along! Now we should add a header to our table. To
do that, add the <TH> and </TH>
tags. These are similar to the <TD> and </TD>
tags. As well, we need to indicate that the cell which we are
placing wil span the entire width, or 7 columns. Therefore we
need to:
This is what you will get:
| March 1999 | ||||||
|---|---|---|---|---|---|---|
| 1 | 2 | 3 | 4 | 5 | 6 | |
| 7 | 8 | 9 | 10 | 11 | 12 | 13 |
| 14 | 15 | 16 | 17 | 18 | 19 | 20 |
| 21 | 22 | 23 | 24 | 25 | 26 | 27 |
| 28 | 29 | 30 | 31 | |||
Great! The next thing to do is to make the cells, and therefore
the table larger.
An important thing to note: Each cell of a table will adjust in size to fit the contents by default. You have to insert code to override the autosizing of cells. All the cells in a column will automatically adjust to match the width of the widest cell of thet column. Therefore, in order to make all cells wider, we only have to widen the first row of cells. The code will look something like this:
<td width = 60> Some data </td>
We apply the same logic for cell height. We only have to adjust the first cell in each row so that it is higher. The code will be similar to:
<td height = 60> Some data </td>
The very first cell, or row1, column1 should have height and width specified as in the following code:
<td width = 60 height = 60> Some data </td>
This is what you will get with the changes in place:
| March 1999 | ||||||
|---|---|---|---|---|---|---|
| 1 | 2 | 3 | 4 | 5 | 6 | |
| 7 | 8 | 9 | 10 | 11 | 12 | 13 |
| 14 | 15 | 16 | 17 | 18 | 19 | 20 |
| 21 | 22 | 23 | 24 | 25 | 26 | 27 |
| 28 | 29 | 30 | 31 | |||
Bravo! Now we will make the contents of each cell appear in the
upper left hand corner of each cell. All we need to do is add the
code:
align=left valign = top
to the existing code in the <td> tags. For your information, text in a cell can be lined up horizontally and vertically. Horizontal options are:
Vertical options are:
You can specify none, one, or both to place your text. We will
align both ways: horizontally(left) and vertically (top). This is
what you will get with the changes in place:
| March 1999 | ||||||
|---|---|---|---|---|---|---|
| 1 | 2 | 3 | 4 | 5 | 6 | |
| 7 | 8 | 9 | 10 | 11 | 12 | 13 |
| 14 | 15 | 16 | 17 | 18 | 19 | 20 |
| 21 | 22 | 23 | 24 | 25 | 26 | 27 |
| 28 | 29 | 30 | 31 | |||
Next we will add colour to the cells which represent weekends. We
will make them grey. We have the option of applying a background
colourat the table, row or cell level e.g.:
Note the American spelling on the colour constant GRAY!
In addition, we will add additional formatting to make the text
appear in bold. We just need to add the <b>
</b> tags. Other tags, such as italics, underlined,
images, and hyperlinks work the same way.
This is what you will get with the changes in place:
| March 1999 | ||||||
|---|---|---|---|---|---|---|
| 1 | 2 | 3 | 4 | 5 | 6 | |
| 7 | 8 | 9 | 10 | 11 | 12 | 13 |
| 14 | 15 | 16 | 17 | 18 | 19 | 20 |
| 21 | 22 | 23 | 24 | 25 | 26 | 27 |
| 28 | 29 | 30 | 31 | |||
For more information on tables and what you can do, visit the Tables tutorial at the Maricopa HTML site.