How 2 Scan
…introduction…
…optical resolutions…
…minimising errors…
…image resampling…
…image backing…
…editing the image…
…reducing the file size…
…adjusting the compression ratio…
…sample scan…
How 2 Scan
…introduction…
This is a quick bit of information about how to achieve the best results from your flatbed scanner. I get really annoyed at the number of poor quality scans that are kicking around on the Internet. There is no excuse for these, as even the cheapest and nastiest scanner (like mine) can produce very impressive results if used correctly.
…optical resolutions…
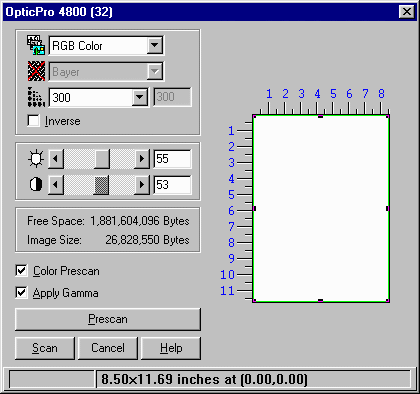
Most flatbed scanners will have a true optical resolution of at least 300dpi. Scanning a full A4/letter 24-bit colour image at this resolution takes around 27Mb. This is quite a lot, so you might want to use some software that allows you to acquire images to disk rather than placing the image in RAM. Alternatively you can fit a bucket load of memory in your machine like I have done! As I have been noted to say, RAM is cheaper per Mb than a loaf of bread at the moment.J
…minimising errors…
For the best photographic results, you need to scan at 300dpi. This minimises errors, as does scanning at the 30 or 36-bit colour depths offered by newer scanners. Then you need to use some good software to re-size the large image produced to fit in a sensible screen size; this is how you achieve results. Scanning any image at 300dpi and then re-sampling gives a much better image than scanning at, say, 150dpi in the first place.
…image resampling…
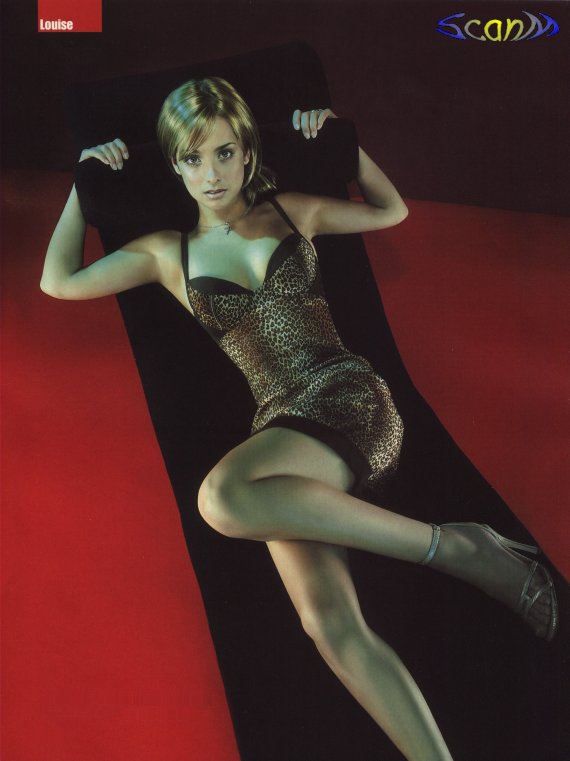
It is important to use the correct method when resizing your image. What you in fact want to do is re-sample the image rather than re-size it. Re-sizing generally means re-sizing on a pixel level, without giving any consideration to the quality and definition. Re-sampling on the other hand produces much better results, with generally smoother images. My sample scan, which you can view by following the link towards the end of this document, was re-sampled using Paint Shop Pro 5.0 which is as good as any program can be.
…image backing…
Another consideration is what you place behind the image when scanning it. If you are scanning a photograph featured in a magazine or newspaper, you may be able to see through to newsprint on the other side. This problem can be alleviated by placing black paper or plastic behind the page you are scanning. A side effect however is that your image may appear darker as less light is reflected through from the scanner’s lid, which usually has a white reflective surface. You can compensate for this by adjusting brightness and contrast settings in your Twain driver. Alternatively, you can perform the adjustment to the acquired image from within your software, although this may yield poorer results.
…editing the image…
If you are wanting to make alterations to the image (such as removing accompanying text), you should always keep the image in BMP format. This is a bitmap format which does not result in any loss of information. If you save as JPEG for example, the number of colours used is reduced and pixel information is lost in the compression. You should also avoid saving in JPEG, deciding to make a few changes and then saving back in JPEG.
…reducing the file size…
It’s likely that you will want to distribute or store your finished image in a compressed format such as JPEG. Before you save the image, it may be worth making alterations to the image first, to reduce the resultant file size. Because compression works by eliminating redundant data, you can improve the efficiency of the compression by giving it just that. For example, your image may appear to be on a white background. However, because of the relative inaccuracy of scanning, the background is unlikely to be pure white and would probably be lots of different but similar whites. You can use some image software to fill the background with pure white, giving a cleaner image and improving the compression ratio. I use Corel Photo-Paint 3.0 for this, since the Corel Draw 3.0 package was given away free on the cover CD-ROM of PC Plus (UK) magazine. This allows you to specify a colour tolerance so that all white-ish pixels are replaced with pure white ones.
…adjusting the compression ratio…
Most image manipulation packages will allow you to adjust the compression factor for JPEG images, along with other options for this file type. A sensible compression quality is 85%, which is equivalent to a compression factor of 15%. Providing you have prepared your image well, this is a good balance between quality and compression.
…sample scan…
Here is a sample image, which I consider to be good quality but I might be wrong J . I have chosen the lovely Louise Nurding, this time posing for GQ magazine. This was produced using Paint Shop Pro 5.0 for scanning and re-sampling and the indispensible Microsoft Paint for applying the logo and cropping. Notice that despite the fact that the image is a good 570x761 in dimensions, it is only 47k.