- Special Thanks to Tobe Davidson for letting me play w/her childhood dog for a while *s* (she's also a vet now, following in her father's footsteps!), the Monticello Vet Clinic for putting up w/my endless H202 deliveries and phone calls, and to my bone friends for listening to me complain about how damn ORANGE Butch was...err..is. Thanks guys!!
- Super huge thanks to the "Boneman" (you know who you are) for the articulation ideas, while I wasn't so sure my fingers were gonna make it through siliconing, it turned out great. I owe ya! Thanks!!


Welcome to Butch's page. Butch was an English Bulldog that belonged to a friend of mine. Butch died of natural causes several years ago (25 give or take). He belonged to a veterinarian. Before his death, Butch, showed signs of severe arthritis, so when he finnaly did pass, his owner, the vet, decided to boil his remains and see what his skeleton looked like. The boiling was as far as Butch went. Now, some 25+ years later I articulated Butch...you can follow this story from start until finish!

Butch was an English Bulldog. He died when he was about 12 years old. He belonged to a veterinarian and when he died the man decided to boil him and examine his skeletal remains. Butch had severe arthritis when he died, this is something that makes his skeleton so unique.
Cleaning:
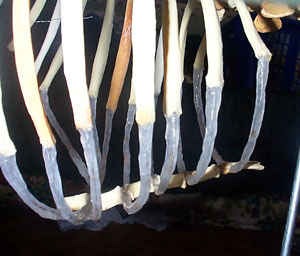
You can see from the picture below that his skeleton was very orange in color when he came to me. There are a couple reasons for this extreme coloring. First, when you boil bones you need to degrease them. Bones have a natural grease in them and the combination of heat and rapid removal of the skin induces the grease to come out. If you do not degrease bones they become discolored and very sticky, obviously w/time this evaporates and all that is left is a very orange bone. The other suspected factor is that Butch was boiled in a copper pot, this would also discolor bones. In attempts to whiten Butch he was soaked in at least 10 rounds of H202 (ranging from 3% to 35%), I reboiled him and degreased him properly (soaking in acetone), I even used a strong 40% H202/paint whitener combo paste...nothing worked very well. You can see the change in some of the bones, but nothing major. After 2 months of trying, we decided to live w/orange bones.
Articulation: Butch was a fun boy to articulate. I was fortunate enought to find a great friend who was willing to share his bone building secrets w/me, thus creating a new method of assembly! This method included using threaded rods as 'pins' rather then wiring each bone together. This method gave me a much more solid skeleton and a lot less eye sore! I was told to give Butch a full rib cage, by doing this I connected the ribs to the sternum via wire and used silicone (Goop) to recreate a cartilaginous rib cage.


Butches femurs are connected to his pelvis via a threaded pin and bolt (so they are removeable if need be). His scapulas are connected to his ribs via very small pins (I took finish nails and cut them to the size needed and glued them into place). You can see the scapulas on the last rib picture.

The only wire visable on Butch is the wire that connects his jaw to his skull, his skull to the atlas vert. and the atlas to the axis vert. There is also a bit of wire running through the pelvis and the sacrum (this is for stability reasons). I normally do not put wire on the ribs, but I did add some to give Butch a bit more stability on the ribs that were not connected to the sternum. Since Butch will be making the long trip back to Kentucky to live out the rest of his days in the Vet's office, I need him to be solid.

Butch was also missing some smaller bones in his wrists/ankles and toes. I left the gaps in the metacarples, but I did make replacement bones for the toes. He has 3 fake claws and 2 other fake bones (all made out of Fimo and painted to attempt to match). Since Butch was male he also had a baculum to place. I attached it w/a peice of 20g wire and put silicone over the wire. Butch is mounted to his base via two upright rods, his feet are also lightly wired to the base.
Finishing Up: To finish Butch off, I mounted him to his base, popped a ball in his mouth (he's the new Dog Chow spokes dog!) and gave him a couple coats of clear acrylic spray. This spray gives him a nice, shiney finish and protects him from mild weathering!
Final Notes:
- Be sure to take a peek at the page dedicated to comparing Butches skeleton to that of a normal canine (Coyote), those pictures can be found Here.
 Back
Back