Ā
Homemade Flogger Construction
![]()
How To Make Floggers
These
Floggers are simple but servicable, thrifty, and a good choice for beginners seeking an
inexpensive first flogger. They can also be tailored for different feels by changing the
type of leather used, the length, number and width of the tails. Heavy Suede or Chap
leather as well as Latigo or Deerskin all have been used for different effects.
| A piece of leather, 10"x25" or so minimum. (Tandy Leather) | |
| Contact Cement (The old-fashioned kind, Hardware Store) | |
| A piece of 1/2" dowel (Hardware Store) |
| A Sharp Utility Knife (Hardware store) | |
| A metal straight edge (A steel square works well) | |
| A cutting surface (High Density Poly plastic) |
| A Rotary cutter (Wal-Mart) | |
| Jerry's Stripper (Tandy Leather) |
![]()
Construction Details
Ā Start by
cutting a rectangle from the hide. The width will be the tailwidth multiplied by the
tailcount. For 20 tails 1/2" wide, the leather rectangle would need to be 10"
wide. The length is the handle length + the tail length. For 18" tails and a 7"
handle, the length would be 25 inches.
Start by
cutting a rectangle from the hide. The width will be the tailwidth multiplied by the
tailcount. For 20 tails 1/2" wide, the leather rectangle would need to be 10"
wide. The length is the handle length + the tail length. For 18" tails and a 7"
handle, the length would be 25 inches.
Leather is uneven because cows aren't square. I typically cut the leather so that what will be the end of the tails ends in an uneven side of the hide and trim the tails to length.
Here's a picture of an uncut Black Heavy Biker hide from Tandy Leather. It has a pebble finish but for a flogger, that's not really important.
 Here I'm cutting out a rectangle of the Black Chap. I'm using a steel square as a straight
edge and the Rotary Cutter to cut the material with a poly cutting board. The Rotary
Cutter makes cleaner cuts in the leather than the utility knife, but be careful, it's
quite sharp! I bought my Rotary cutter at Wal-Mart.
Here I'm cutting out a rectangle of the Black Chap. I'm using a steel square as a straight
edge and the Rotary Cutter to cut the material with a poly cutting board. The Rotary
Cutter makes cleaner cuts in the leather than the utility knife, but be careful, it's
quite sharp! I bought my Rotary cutter at Wal-Mart.
 Next we
cut a piece of dowel to be the core of the handle. I'm using a scroll saw, but whatever
works is fine. the dowel should be slightly shorter than the length of the handle part of
the flogger. This dowel is 1/2", but you can use different sizes for different
effects. I suggest rolling the leather around the dowel before gluing to get an idea of
the final product.
Next we
cut a piece of dowel to be the core of the handle. I'm using a scroll saw, but whatever
works is fine. the dowel should be slightly shorter than the length of the handle part of
the flogger. This dowel is 1/2", but you can use different sizes for different
effects. I suggest rolling the leather around the dowel before gluing to get an idea of
the final product.
 In this
picture you can see the relationship between the dowel and the leather rectangle. In the
next step we'll be cutting the tails of the flogger. They need to stop just before meeting
the dowel.
In this
picture you can see the relationship between the dowel and the leather rectangle. In the
next step we'll be cutting the tails of the flogger. They need to stop just before meeting
the dowel.
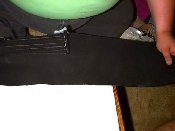
Now we cut the leather that will be tails into strips. The strips run from one end to a
line across the leather where the handle will begin.
You can use the utility knife or rotary cutter and straight edge, but we get better, faster results with a Jerry's Stripper from Tandy Leather. Jerry's Stripper has plastic waffers 1/8" thick that hold utility knife blades between them. By loading multiple blades, you can evenly cut multiple strips of leather with each pass. The leather will stretch some and using the Stripper accurately takes some practice.
 The picture on the left shows leather being pulled through the Stripper. On
the right, we're near the end of the leather. Notice the uneven edge. This will be trimmed
later, after the flogger has been assembled.
The picture on the left shows leather being pulled through the Stripper. On
the right, we're near the end of the leather. Notice the uneven edge. This will be trimmed
later, after the flogger has been assembled.
It's VERY important to pull with a straight, firm, even motion through the stripper.
 We then apply a liberal coat of Contact
Cement to the leather. This need to be the old-fashioned, non-environmentally friendly
kind! The newer water-based types won't work well. You're trying to get an even coat of
cement, not dripping, but not all soaked into the leather either. Be careful to not use
too much on leather like deerskin, which soaks up cement more than suede or latigo.
We then apply a liberal coat of Contact
Cement to the leather. This need to be the old-fashioned, non-environmentally friendly
kind! The newer water-based types won't work well. You're trying to get an even coat of
cement, not dripping, but not all soaked into the leather either. Be careful to not use
too much on leather like deerskin, which soaks up cement more than suede or latigo.
 When the glue has dried so that it's
just tacky to the touch, we roll up the leather onto the dowel. Place the dowel on one
edge as shown in the picture, and with FIRM pressure, slowly roll up the leather onto the
dowel so that a handle is formed.
When the glue has dried so that it's
just tacky to the touch, we roll up the leather onto the dowel. Place the dowel on one
edge as shown in the picture, and with FIRM pressure, slowly roll up the leather onto the
dowel so that a handle is formed.
 And, here's a finished Purple Suede Flogger!
At this point, the handles can be decorated with knots, tacks, or left plain.
And, here's a finished Purple Suede Flogger!
At this point, the handles can be decorated with knots, tacks, or left plain.
Ā