
*There are only afew constuction photo's of this fox, but here are the ones I took during construction.
Table of Contents
Getting Started
Carving the Head
Air Conditioning
Adding Fur to the Head
Foxey's Feet
Planning Stage:
Before I went off to get materials, I did a number of doodles/sketches to determine the critter I wanted to create. I now have several ideas just waiting to become a furry reality. I decided that I would pick just one, in this case, a fox.
Here are a few of the preliminary sketches I did. Since color plays an important role in establishing the foxiness of the fox, so I also added them into my plans.


Now that I had an idea, I took the proportions of my head, and resized the fox head in 2D to fit my head. I took careful thought on size and placement of the eyes and muzzle, so that I would have the most visibility possible. I positioned the eyes to be at the same height as my eyes, and planned on hollowing the nose/muzzle for added vision.

Foam Construction-Getting Started
For this Foxhead, I first created a 1.5'x2' foam block from some 4" cushion foam that I had. I adhered the foam layers to each other using "FoamFast 74", an aerosol product put out by 3M. I got mine through a local hardware store, but you may have to look a bit.
Note: I found that "FoamFast74" (3M) works much better with foam than "Super 77" (3M), but it is more difficult to find locally. You can special order through ACE Hardware!
I did my adhering outside, as most adhesive sprays carry strong warnings due to fumes. After allowing the adhesive to set firmly (I waited an hour), I traced my 2D paper forms with sharpie pens onto the foam.
Now that I had the outline on the head, I took scissors, an electric knife and Exacto blades and began carving the outside shape of the head. I continually checked my head shape against the 2D models, and would use my Sharpie to re mark the shapes as needed.
For the white cheek ruff's which angle down from the side of the head, I carved two identical shapes from foam and attached them to the head with Foam Fast.
 Ā
Ā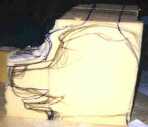 Ā
Ā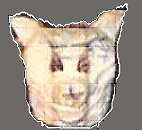
Once the outside shape was basically shaped, I began carving out the inside of the head, generally carving the foam to a thickness of about 1-2". I then carved out the muzzle and cut the eyeholes. For added range of vision, I beveled the inside edges as much as possible. Throughout this part of the process, I constantly tried on the head to make sure the proportions looked OK, but also to ensure that I had carved out enough for my vision. After I was satisfied with the vision, I did a bit more head shaping, & added the ears. I cut 1" "trenches" on the top of the head where I wanted the ears to sit, slightly narrower than the ears, and adhered them in place.
Covering the Eyes
To cover the eye & nose holes, I used a stiff, but sheer drapery fabric. (it looks like soft screen) I cut 3 strips of this fabric, one long rectangle for the pair of eyes, one for inside the mouth and one for the nose. I used acrylic paints, and painted the appropriate feature on the "outside" of this fabric for my eyes, nose & mouth.( before attaching the screen to the head.) From inside the head, this paint did not inhibit my ability to see out, but did inhibit others from seeing in. Once the paint was fully dry, I used FoamFast to tamp the edges down to the foam.
(whee! my head was taking shape) :)
The Fan:
The last item I added to my head was a fan. You can never have enough ventilation when you are wearing a fur suit. :)
At the recommendation of an experienced fursuiter (who is a great friend too), I went down to my local Radio Shack, and picked up a 1 1/2" to 2" CPU fan. (the 12V size.)& I changed the wiring to accept a 9V battery. To make the fan easier to mount, I added 2" wire "arms" to the four corners of the fan. (picture to be added)
The fan is very quiet, and difficult to hear even when you are listening for it.
Then I cut a regtangular vent at the top of the head, just in front of one of the ears, and mounted the fan by inserting the wire arms into the foam around the vent. When I added the fur (see below) I did not actually cover the fan-vent, to allow the most ventilation. Once the fur was added to the head, no one could see any obvious evidence that there was a hole in the head.

After being sure the adhesive was fully dry. I was ready to figure out the fur pattern. First, I first drew arrows on the foam indicating the direction I wanted the fur to lay and what colors I wanted where. I made my patterns so the fur would lay flat toward the back of the head & down the back of the head. Then below the eyes and on the sides of the head, the fur lies at a diagonal toward the back.
Then, I took some scraps of a bedsheet and created my fur pattern by draping the fabric on the head and cutting the pieces to make my pattern, making sure to allow an seam allowance of about 1/2" for the overlaying pieces. When I was through making my patterns, I had 7 pieces.
Now I began attaching the fur to the head with a low temp hot glue gun. I glued each piece down separately, to 1" from the edges. After all pieces were glued in place I handsewed each long seamedge down with a similar color thread and using a hidden running stitch. Then after the seams were sewn down, I carefully combed the fur out to hide the stitch lines.
Feet:
The general idea for how I did my first pair of feet.
Sorry. Haven't found photos yet. Guess I'll have to take some
I will also be changing my foot design after this set. They will work when constructed this way, but don't seem to be as long lasting in this design, at least if you are planning on doing alot of outside activity.
Perhaps they will work better on different shoes than what I used.
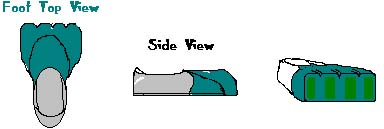
For the feet of this costume, I took a pair of comfortable terrycloth "hospital slippers" (very similar in shape to Keds)that had a rubber sole, and a rectangular piece of foam approximately 6"Wx4"Hx6"L.
I drew & then carved the toe shapes onto the top and toe-end of the foam, then carved out a semi-circle on the back half of the bottom to allow the foam to sit on my foot, and positioned so that the foam "toes" extended about 3" beyond my own.
Once I was satisfied with the general shape of the foot/toes, I handstitched the foam through the slipper-top & sides. I also added a half circle of canvas to the bottom edge of the foam toes & across the sole of the slipper, to help keep the foam in place.
After the foam was in place, I created a pattern for the fur as I did for the head, and hot glued & stitched in place. I cut the fur so that I had a "sock" that reached above the ankle, so that the leg fur would be able to easily overlap and hide the ankle seam.
There are photos of a similar foot that we did for the Ferret
These feet will be more durable when an outside sole is added to them.
More to come: paws, body, other creations.
To be continued....