


Not too many construction photos this time around, as construction of the suit began less than a month before competition. But I will try to explain the new methods I used. Additional closeup photos & diagrams to be added as time allows.
Have several photos to add in.
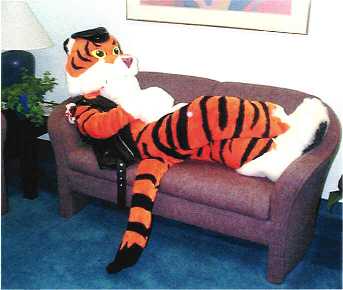
The Finished Suit:
Not too many construction photos this time around, as construction of the suit began less than a month before competition. But I will try to explain the new methods I used. Additional closeup photos & diagrams to be added as time allows.
Table of Contents
Getting Started
Digigrade Legs
Building the fursuit
Built Foam Head
Furring the Head
Adding Stripes/Spots etc. to your fur
Getting Started
Digigrade Legs
Materials used: 1" thick white sheet foam, Foam Fast 74
I wanted to create a digi-grade look without changing the angle of my feet (i.e. no heels), as much bouncing about was anticipated.
These images indicate the shape of the foam to create the look I was aiming for.
Building the fursuit:
I used the same muslin concept as the lioness, only I just made a half suit of the top body from the shoulders to about 2" below the crotch. To accommodate the foamed legs, I altered the leg pattern so that the seams were at front and back, as opposed to the inseam/outseam that the pattern has.
Essentially, the foamed leg pieces were used as the pattern for the shape of the muslin (& the actual fur), only, I added an extra 2" to allow for seam allowance and movement.
The hidden zipper panel:
The last part of the fursuit was to add the white belly fur. I wanted to center the zipper inside the suit, and to have the front opening to be along one side of the white fur. So, I created the shape of the belly fur as a long "U" shape, and cut a similar shape from a heavy linen sheet. The zipper was added to the linen "U" and then the linen was sewn in place. After attaching the linen piece, I cut the extra orange fur away from the suit. Finally, I sewed the white fur along the edge of the left side of the linen, and attached velcro to hold the bottom & right side of the belly fur to the suit.
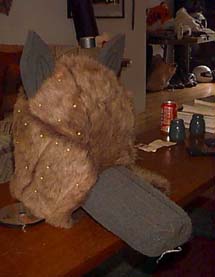
Built Foam Head
This head was constructed from acoustical 1" gray sheet foam and a 4"x8" block of gray foam, which was carved for the muzzle.
Basically, the same instructions as used in the Lioness, but repeated here for easy reading. here are a couple of pictures of the unfurred & furred head to add in, showing the separate jaw.
The general construction procedure:
Then, make the top of the head rounded (see red area), by cutting narrow "V's" at one end of cylinder (Like narrow pie pieces). I'm not sure how else to explain making the top round. The best & most economical foam glue I have found is "FoamFast 74" produced by 3M. I generally don't use "Super 77" for adhering foam to foam, as in my experience, it really doesn't adhere the foam nearly (or as long-lived) as FoamFast 74.
You should be able to order FoamFast 74 from most hardware stores, including ACE Hardware.
The Muzzle:
Next, carve a muzzle piece from solid foam. Plan to either have the wearer see out of the eyes, or through the mouth, and scale the head accordingly.
If using a more rigid foam, you can usually use an electric carving knife (from the kitchen) to shape the foam. If you are using a softer foam use scissors & Xacto blades.
The pictures below give a general idea of shaping.
Ears, cheeks & other facial features:
The finished foam heads, prior to furring. Eyes have been drawn in at the desired location.
Several images of Khan at different angles were examined, and a 4" clay model was ,made of the head to get an overall 3D model to start from.

Materials List:
Pattern - Simplicity Pattern -Wizard of Oz Cowardly Lion.
Fur - 3&1/2 yds 3/4" plush fur (Poppy Orange)from Monterey Furs 1yd 3/4" plush Black Fur; 1 yd 1" white plush fur
 Must take picture...

First, create a cylinder from 1" foam. I've found that using a open cell gray foam works the best, so far. It's a little stiffer than closed cell foams, so would have more durability for abuse.


Add the eyeholes, by cutting 2"-3" circles where the wearer will see out. I have used the eyeholes to determine the "pupil" location on the character's eyes.

Cut, carve, etc. whatever features you wish to add, and just adhere well to the head.
**With Khan, as you can see in the photos above, vision is through the eyes.**