
Construction Photos have been taken, and need only to be scanned in.
10/19/99 added the rest of the known photos for head construction.
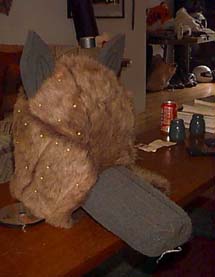
The Finished Head:
Construction Photos have been taken, and need only to be scanned in.
Table of Contents
Getting Started
Padded Bodysuit
Building the fursuit
Built Foam Head
Furring the Head
Adding Stripes/Spots etc. to your fur
Air Conditioning
Getting Started
Concept Sketch: Here's a concept sketch of my lioness in costume. The sketch was made sometime around March 1999, and the construction began in early May.
The Body Padding (Padded Bodysuit)
Materials used: 2 T-shirts, one pair stretchpants, 1 yd. sq. of 2" polyfill (for quilting)
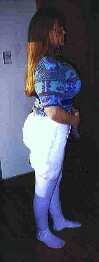
I wanted to create a storybook-type character, so started by making my lioness have a more feminine/matronly appearance that would allow relatively full movement.
To make construction simpler, I adjusted a dressmaker's mannequin to my approximate proportions, and put a T-shirt on it. I then took 2" thick polyfill and began layering it into the body shape I desired, initially pinning in place. Once I was basically happy with the proportions, I took a second T-shirt and "sandwiched" the polyfill in between the two T-shirts, again pinning the polyfill in place. After carefully trying on the pinned shirts, and making fine tuning adjustments, the two shirts were sewn together, using a zigzag stitch. I also tried to stitch in some musculature, although some of the musculature was not visible when wearing this particular fursuit with a costume.
For the hip padding, I put on the stretchpants, and had another person add padding from the hips to the rump, extending down mid thigh. The aim of the hip padding was to add more width to the hip, but not really increase the rump.
Photos of the body padding:
Building the fursuit:
After finishing the body padding, the next step was to make the fursuit. Since the pattern itself is relatively straight cut & baggy, I took only a couple of initial measurements while in the body padding (back & front measurments for hip & bust) and copied the pattern pieces with the extra adjustments onto paper. At this point, I was only enlarging the pattern to encompass the overall width adjustments, no real shape tapering was made at this point.
I made a muslin using this bright pink material (that I wouldn't use for anything else) of the expanded pattern, and then pulled it on (over the body padding) inside out. Then I pinned the side seams in (& then the back seam) to fit to the hourglass figure the body padding created. Next, I transfered measurements of the tailored muslin to the paper pattern and then cut the fursuit out of fur.
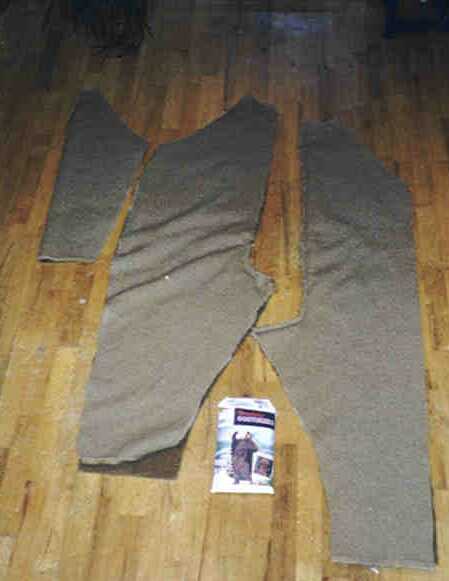
Photos of Fursuit layout
Note: I didn't actually cut material away from the muslin. Rather, I primarily left the seams pinned or basted as needed so that I can use the same muslin to fit other costumes.
The hidden zipper panel:
The last part of the fursuit was to add the white belly fur. I wanted to center the zipper inside the suit, and to have the front opening to be along one side of the white fur. So, I created the shape of the belly fur as a long "U" shape, and cut a similar shape from a heavy linen sheet. The zipper was added to the linen "U" and then the linen was sewn in place. After attaching the linen piece, I cut the extra brown fur away from the suit. Finally, I sewed the white fur along the edge of the left side of the linen, and attached velcro to hold the bottom & right side of the belly fur to the suit.
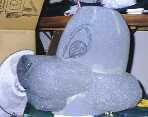
Built Foam Head (as opposed to my carved fox's head)
This head was constructed from 1" sheet foam and a 4"x8" block of foam, which was carved for the muzzle.
First, create a cylinder from 1" foam. I've found that using a open cell grey foam works the best, so far. It's a little stiffer than closed cell foams, so would have more durability for abuse.
Then, make the top of the head rounded (see red area), by cutting narrow "v's" at one end of cylinder. I'm not sure how else to explain making the top round. The best & most economical foam glue I have found is "FoamFast 74" produced by 3M. I generally don't use "Super 77", as in my experience, it really doesn't adhere the foam nearly (or as long-lived) as FoamFast 74.
You should be able to order FoamFast 74 from most hardware stores, including ACE Hardware.
The Muzzle:
Next, carve a muzzle piece from solid foam. Plan to either have the wearer see out of the eyes, or through the mouth, and scale the head accordingly.
If using a more rigid foam, you can usually use an electric carving knife (from the kitchen) to shape the foam. If you are using a softer foam use scissors & Xacto blades.
The pictures below give a general idea of shaping.
Ears, cheeks & other facial features:
The finished foam heads, prior to furring. Eyes have been drawn in at the desired location.
Furring the Head:
Here is a rough shape idea of what I cut for furring the head. I have indicated the direction the fur pile should lie. Please forgive the crudeness of bitmap image, and realize the scale is not exactly perfect, as the shape and size for the pieces varies from headshape to headshape.
After cutting the pieces, I usually just pin them into the head, to make sure I like the way the fur is lying, then use hotglue the pieces directly to the foam. I personally do not glue the outside 1" margin of any of the fur pieces. I prefer to handsew the edges in place, with a spiraling running stitch.
A more complete photo documentary was taken during the construction of the body padding, head & fursuit.
 Sigh. Pencil just doesn't scan.
 Ā
Ā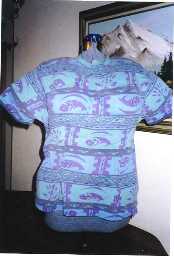
Materials List:
Pattern - Simplicity Pattern -Wizard of Oz Cowardly Lion.
Fur - 3&1/2 yds 3/4" plush fur (Honey Bear)from Monterey Furs
1 yd 1" white plush fur
 Must take picture...


Add the eyeholes, by cutting 2"-3" circles where the wearer will see out. I have used the eyeholes to determine the "pupil" location on the character's eyes.

Cut, carve, etc. whatever features you wish to add, and just adhere well to the head.

I described this somewhat on my SeaFox instructions, but basically I just take some scrap fabric, and create patterns for the fur pieces. Generally you want the fur to lie flat along the bridge of nose towards the back of the head, and angled towards the back of the from the temples.

(it's not the lion, but it does illustrate the furring process)


