First I took my measurements.
Bust
Underbust,
waist
Hip
length from side hip to side waist.
length from side bust line to side waist
length between top of hip bone and bottom of ribs
(I would recommend for others to also measure the distance from nipple to nipple to assure correct placement of fullness.)
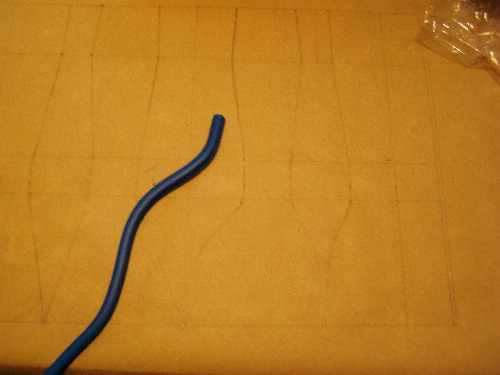
From these measurements I did a whole lot of math that I would never wish on anyone, but I'm not forcing you to make a corset using my method. first I decided that I wanted a 6 inch reduction in the waist, so I subtracted 6 from the waist measurement to make a new waist measurement. Then I subracted 4 from all the "around" measurements to allow for the lacing space in the back. I divided these new numbers by two so that I was dealing with one half of the corset. I figured out the difference between the underbust and bust measurements and decided that the difference should be made up between the center front and front pieces like a princess seam. Then I figured the difference between the waist and hip measurements and figured how to allow for that difference over the three seams near the side, putting the largest amount in the side seams with a change in the seam to either side of that one as well. I also decided that the center back and center front pieces should be straight (except for the center front where it allowed for the bust fullness). I drew a large rectangle with 5 lines dividing it to plan my numbers in. I then drew lines to indicate the waist line and underbust line. I divided the half new waist measurement by 6 and penciled in the number in each section along the waist mark. I proceded this way while allowing the fullness addition in the areas I had planned. After killing myself with math, I started drafting. First I drew a rectangle the length of the half hip measurement and as tall as the height I wanted (I chose 13 inches because I have 12 inch busks). I then found the side point and drew a line in the middle there and drew lines to incidate the top and bottom of the waist point and the underbust point. Then I measured out the inches that I had planned for each area previously. The only thing is that the center front and front pieces would have to stay straight next to each other for now. I roughly drew in the shape with straight lines to make sure it was approximately correct.

when I felt it was correct, I used a flexible curve to simulate my actual shaping for the seams where an expansion had to be made.
When I was happy with that, I cut out the pieces and tapes the center front and front pieces to more pattern paper and sketched in the bust allowance that I had planned.
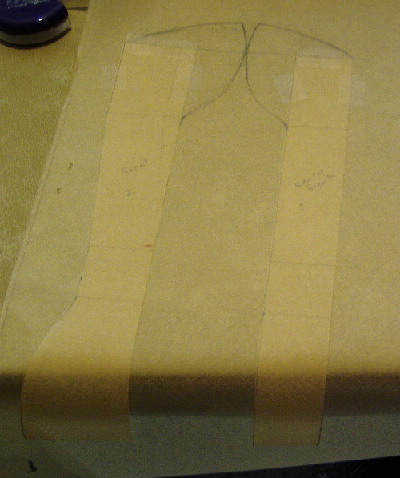
I recut those pieces out and taped all the pieces to computer paper.

then I added a 3/4 inch seam allowance between pieces and a 1/2 inch seam allowance to the top and bottom of the pieces. I took the picture before I realized that I needed to add extra allowance to the front and back to allow for sewing in the busk and the boning that go on either side of the grommets.

Then it was time to cut them out again, and cut my fabric. I used 3 layers: green satin, cotton duck cloth, and fabric left over from my shamrock corset to line it. I sewed the green satin pieces together, then sewed the canvas interlining and the lining together treating them as the same fabric together. I had cut "fish tape" (electrical supply) to 12 inch lengths and coated the ends with "plastic dip" to use as boning. I sewed a length on each side of each seam inside the seam allowance of the lining. I sewed the satin to the lining, right sides together with a piece of twill tape sewn in at the waist point. When sewing one of the fronts, I left small spaces for the busk "hook" parts to fit through.

Then I hand stitches holes for the knobs of the other half of the busk. I sewed the busk halves in and sewed in the boning in the back, put in grommets, and sewed the top and the bottom closed. (I used bias tape on the bottom and should have done the same on the top as it came out better and was hidden by the trim anway). Then I added the gold trim by hand. Then I tried it on and discovered that a)I had lost weight in my hips and it no longer fit right there, or my sewing skills really flew out the window on those curves, b) there was too much fabric bulk in the princess seams at the bust, c) the center front pieces should have been wider so the bust allowance was in a more natural position, and d)when the 6 inch reduction in the waist in pulled in, an unflattering pooch of flesh will sneak out the opening where the laces are. The first three problems will have to be addressed by my next corset, the final problem I hope will be cured by a "modesty panel" with boning.
My next corset will definitely use real boning. I used duct ties for the shamrock corset and the fish tape in this one and I think both are too rigid for the shaping I want my corsets to do over my curves.