Adding Images
In its simplest form, the HTML tag needed to add an image to a web page
looks like this:
where file_name is the name or address (URL) of the image file.
Say, for example, you want to display a certain image named sb7.gif
to your web page. Provided the file is already in your GeoCities
homestead, then you would simply include the tag  to the HTML code of your page. Similarly,
if your image is named sb7.jpg, then you can have an image tag
similar to this:
to the HTML code of your page. Similarly,
if your image is named sb7.jpg, then you can have an image tag
similar to this:  .
.
NOTE In GeoCities, file names are case sensitive. Therefore sb7.jpg is different from Sb7.jpg .
NOTE For example, if your GeoCities address is http://www.oocities.org/SouthBeach/Port/9923,
you could opt to use the following tag:  . Though it is much longer, it still works the same.
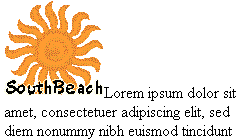
Below is the piece of HTML code used in the screen shot above.
Lorem ipsum dolor sit
amet, consectetuer adipiscing elit, sed diem nonummy nibh euismod tincidunt
It's now time to expand your knowledge of the image tag. In the examples below, we'll experiment with the height, width and alt attributes of the said tag.

Again, below is the piece of HTML code used in the screen shot above.
Lorem ipsum dolor sit amet, consectetuer adipiscing elit, sed
diem nonummy nibh euismod tincidunt ut
Notice the addition of the height="100" width="100" attributes in the tag. The height attribute actually specifies the height of the image to be displayed while the width attribute (you guessed it!) specifies the width of the image. We advise that you add these two attributes in your image tags as including them will make your images appear to load faster.
What about the alt attribute? Consider the example below.

The image rendering function of the browser is turned off in the screen shot above. Below is the piece of HTML code that was used.
Lorem ipsum dolor sit amet, consectetuer adipiscing elit,
sed diem nonummy nibh euismod tincidunt
Notice that the contents of the alt attribute was the one displayed instead of the image itself. Use the alt attribute to specify the text you want those with their browser's graphics rendering function turned off to see.
At this point, you might wonder
how to make text flow around your images. This is when the align attribute
comes in handy. The said attribute lets you specify the alignment of an
image against the text surrounding it. So if you want your text to flow
to the right of your image, then you would have an image tag that looks
like this:
. An example is given below.
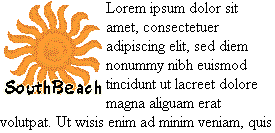
Below is the piece of HTML code used in the screen shot above.
Lorem ipsum dolor sit amet, consectetuer adipiscing elit,
sed diem nonummy nibh euismod tincidunt ut lacreet dolore magna aliguam
erat volutpat. Ut wisis enim ad minim veniam, quis
Here are two examples where text flows to the left of an image.
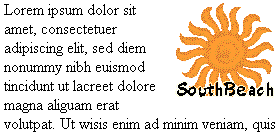
As usual, below is the piece of HTML code used in the screen shot above.
Lorem
ipsum dolor sit amet, consectetuer adipiscing elit, sed diem nonummy nibh
euismod tincidunt ut lacreet dolore magna aliguam erat volutpat. Ut wisis
enim ad minim veniam, quis

Again, below is the piece of HTML code used in the screen shot above.
Lorem ipsum dolor sit amet, consectetuer
adipiscing
elit, sed diem nonummy nibh euismod tincidunt ut lacreet dolore magna
aliguam erat volutpat. Ut wisis enim ad minim veniam, quis nostrud exerci
tution ullamcorper suscipit lobortis nisl
Another set of attributes, the HSPACE and VSPACE attributes also come in handy when you want text to flow around your images. The HSPACE attribute specifies the horizontal space while the VSPACE attribute specifies the vertical space in pixels between an image and text. In the case of the example below, text will will flow to the left of the image, and at the same time ten pixels of space will separate them.
Lorem ipsum dolor
sit amet, consectetuer adipiscing elit, sed diem nonummy nibh euismod
tincidunt ut lacreet dolore magna aliguam erat volutpat. Ut wisis enim
ad minim veniam, quis nostrud exerci tution ullamcorper suscipit lobortis
nisl
Finally, in Netscape, you could make a border appear around your image. You can do this by adding the border attribute to your image tag.
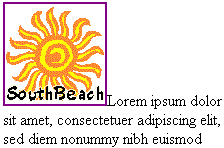
For the nth time, the piece of HTML code used for the screen shot above is given below.
Lorem ipsum dolor sit amet, consectetuer adipiscing
elit, sed diem nonummy nibh euismod
Notice that the border attribute is set to one. This means that a line with the thickness of one pixel should surround the perimeter of the image.
For your convenience, we have included a summary of the different attributes of the image tag that we discussed.
- where location is the alignment of the image against the text in a web page.
- where phrase is the characters that will be displayed instead of the image if a browser cannot display images.
- where border_number is the size of the border in pixels drawn around the image.
- where height_number is the height in pixels of the image.
- where horizontal_number is the size of the horizontal space in pixels between the image and surrounding text.
- where file_name is the name or the address (URL) of the image file.
- where vertical_number is the size of the vertical space in pixels between the image and surrounding text.
- where width_number is the width in pixels of the image.
Congratulations! You have successfully completed the tutorial. We hope that this will encourage you to add more images and consequently liven up your GeoCities web pages.
Click on the "next" button to proceed.
![]()
![]()
![]()
Should you have any comments and suggestions, please e-mail the site administrator. Be advised that GeoCities-related questions will not be entertained in the aforementioned e-mail address. Please direct such questions to SouthBeach Community Leaders.
The copyright for this tutorial belongs to Wilson. Tampering, reproduction or reuse of text and screen shots contained herein without Wilson's approval is prohibited.
Site
Administrator is Wilson
Graphics by DJ
Background by JadeRyan
Last updated: September 19, 1999