
Creating
a Tube From An Image
We all have our own way of
tubing an image, Mine is just
a guideline for those who need it.
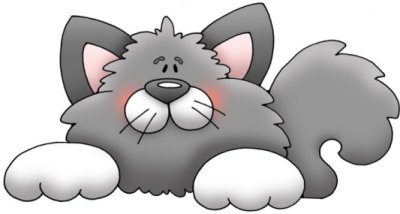
We first need an image, Right click on the
the image below or use an image of your own.
 Duplicate the layer, you should
now have a background layer and a
duplicate layer. Now we want to
delete the background layer.
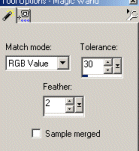
Next using your magic wand, settings below,
Duplicate the layer, you should
now have a background layer and a
duplicate layer. Now we want to
delete the background layer.
Next using your magic wand, settings below,
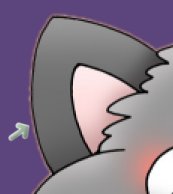
 click on your image, you will
have marching ants around the image.
Alot of this depends also on the
image you use, Sometimes the above tolerance
is not enough and you have to move it
up a bit, to 50, or down to 15 because
it may be selecting more of the image than
you want selected. You have to
play a bit. See image below.
click on your image, you will
have marching ants around the image.
Alot of this depends also on the
image you use, Sometimes the above tolerance
is not enough and you have to move it
up a bit, to 50, or down to 15 because
it may be selecting more of the image than
you want selected. You have to
play a bit. See image below.
 Nexr, hit the delete key, or the
sissors tool. You should
now have something like this.
Nexr, hit the delete key, or the
sissors tool. You should
now have something like this.
 Once you have deleted the backgroud,
deselect. Now you are ready to work on
the tube. Add a new layer, Layers/arrange/send
to bottom, now we want to
flood fill with a darker color,
I'm using #5C447C, this allows you
to see those white pixels better.
Once you have deleted the backgroud,
deselect. Now you are ready to work on
the tube. Add a new layer, Layers/arrange/send
to bottom, now we want to
flood fill with a darker color,
I'm using #5C447C, this allows you
to see those white pixels better.
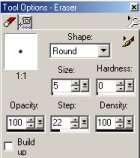
 Grab your eraser tool, using the
settings below.
Grab your eraser tool, using the
settings below.
 draw around the image, an outline,
color black.
draw around the image, an outline,
color black.
 I often use a color
a few shades darker than the
image it self.
That's it.
Hope you enjoyed this tutorial
I often use a color
a few shades darker than the
image it self.
That's it.
Hope you enjoyed this tutorial