


• You've just finished your skins and now you have only one step remaining! You have to turn that lovely piece of art into a VOL file for Tribes. It's actualy quite easy once you understand it. You must first have Pal3 and you can download that right there, and you must have the Bat files to create your skins and you can download those right there. Now once you have these you wan't to create a new folder on your desktop (because it just makes things easier this way) and call it...well whatever you want, as long as you know it's your skins making folder. Put the bat files and the Pal3 in there. Now you'll need to go back into Photoshop. Now go to Image, Image size, and make sure that your Pixel Dimensions are set to 256 x 256. If not your skin will go all wacky and your tribes will close and you don't want that to happen. =) Now go to Image, Mode, then Indexed Color. It will ask to flatten layers so just go ahead and say yes but make sure that you saved it before you proceed. It will then bring up a small box and in there is the Palette options so click the down arrow there and select Custom. In Custom select the Load button then find your folder with Pal3 in it. Select that then hit OK, then OK again and your image should look a little grainy but thats ok it will turn out fine when you wrap them. Now go to File, Save a Copy, then make sure the save file is a BMP format. Name your file and save it to your skin making folder. Another window will pop open. On there just make sure it has 8-bit marked then hit OK. You can close Photoshop if your done with it or just minimize it for now if not. Open your skinmaking folder and find the MakeSkin bat file. Right click it and select Edit. If it asks what to edit with choose notepad. Now it should look like this.
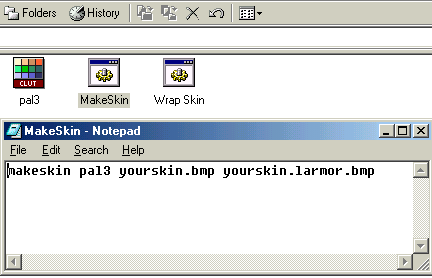
• Yourskin is where you will place the name of the skin you have made. Make sure to keep it the same with the other one also. Yourskin.larmor.bmp will vary in what skin you're making. If you are making a male light armor then the middle should say "larmor". The others are as follows:
Female Light - lfemale
Male Light - larmor
Female Medium - mfemale
Male Medium - marmor
Heavy - harmor
• So depending on what you're wrapping is what the middle will be. If your wrapping more than one armor at the same time to make a complete set (I guess that would be smart =) then place a line for each one like this.
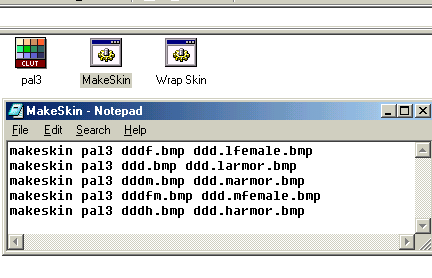
• See how they are each a different armor? Now when you are done editing MakeSkin.bat save it then edit WrapSkin.bat. You will see a window that looks almost like MakeSkin. It looks like this.
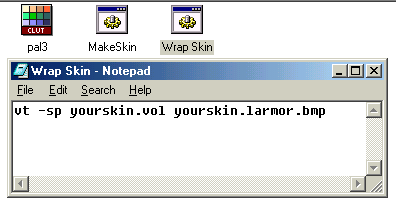
• Now the text at the end is the same as the one from MakeSkin.bat. In the front, the yourskin.vol, is the key part. If you are making an armor and using more than one skin file, the .vol MUST be the SAME on each line. If not you will get different files with one skin on them. The .vol can be called a different name from your .bmp file. Like this:
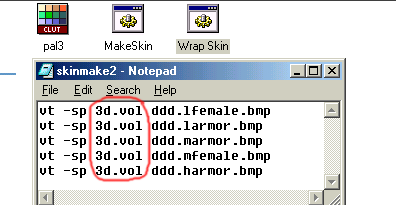
• Again once you are done just save and close it. Now all you need to do is run your batch files, make sure that you run them in order, and sit back at watch the magic! Watch how it makes each file like you told it to do. Guess what? You just did some programing! Simple as that folks! Congrats you just made your first skins! Now take that .VOL file and toss it into you Tribes/Base/Skins folder