 |
|
Step 10: Customizing your suit
Your almost there, but your suit is not quite finished yet! This is the part where you will decide what different options you want on your suit, and to try the suit on yourself. This part is mainly for the BDU suit that you can crawl with (since the Flight suit has Velcro wrist closer and keep it in place just fine), but if you want to put some of these on the other suit, that's fine by me.
We will first start with the thumb loops. These are great when you need to crawl, because they will keep the arms flat and not catch on anything. All right, remember that long piece of double stitched canvas that I told you to put aside? Well, this is the time to take it out and cut it in half. After that, seal the ends with a flame. Then the first thing you want to do is put on your jacket and get on your elbow and knees. Look at where you think the most appropriate place to put the thumb loops based on the placement of the canvas and the way you are crawling, and mark the topside of the sleeve with a little dot (on both arms). Take off the jacket and pick an arm to start with. Lets say the right sleeve for sake of argument. Go to that little dot that you marked off and place one of the pieces on the dot's area only on the inside of the sleeve and make it perpendicular to the end of the sleeve. Put the strip down about an inch from the end of the sleeve and put two pins through the strip and sleeve to keep it in place. Important! You want to make sure you have the smooth side of the strip facing inward! It is better to have the smooth side against your tender hand muscles then the rough seams. I unconsciously made this mistake and had to re-sew the whole strip again. After making sure, you then want pull some dental floss out to about an arm and a half's worth of length (about 38 inches) and thread it into a needle. Start sewing from the inside of the sleeve and keep sewing up and down the strip until you've made about 4 lines or until you run out.
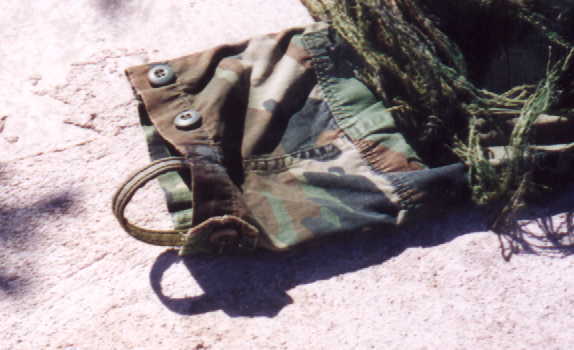 |
Now, put the jacket and look at your right sleeve. Take the loose piece of the strip and pull it into the other inside part of the sleeve (to see where you need to sew it in). Depending on your arm length and what size of the BDU's you have, your finished product may or may not look like the one in the picture, but you are generally trying to get it to look like that. Once you know how far and where the strip should be pulled to, mark the strip and the place where it was held, then take off the jacket. Pin down the strip and cut off any of the extra and unnecessary strip. You want to have it about an inch down the sleeve like in the first one. Unpin it and seal the ends with a flame. Again, thread and sew the strip into place just like before, with about 4 lines, or until you run out. Then, repeat this process with the left sleeve (or the right one, depending on which one you started with). Important! You want to make sure you have the smooth side of the strip facing inward again! You may forget about this part after all that sewing.
The next special modification you may want to consider doing to your suit is to replace some of the chest buttons on your jacket (or button fly on your pants) with Velcro strips. You would want to do this so that the buttons don't jam into the soft parts of your body on a hard ground. I am going to show you how to replace the second and third button down from the top button on your jacket with Velcro. Notice I did not say the first button around your neck. It's not necessary to do that since it won't be in any contact with the ground. You may want to do all of the buttons except for the top one, or just the ones I show you. Its you decision and how you come in contact with the ground. First, lay your BDU jacket on the ground facing inside up. Remove the second button down from the top with a small pair of sharp scissors, or a seam ripper if you have one. Mark the spot where the button was. This is your center point. Now, depending on what Velcro you get (preferably black, with 2 inches of width, none of that stick-on stuff if you can), you may have to do this next part differently. Cut the Velcro in a 2-inch by 2-inch piece, both the hard Velcro part and the soft Velcro part. You want to start with the hard Velcro part on the place where you removed the button. Take out some of that left over Shoe Goo or Goop and put a bead all around the edged of the 2x2 inch piece, and a dab in the middle. Then line up the middle of the piece with the center point that you marked earlier and press it down. Put something heavy on it and come back in about an hour or two (you may want to do both of the Velcro pieces since it takes so long to dry).
 |
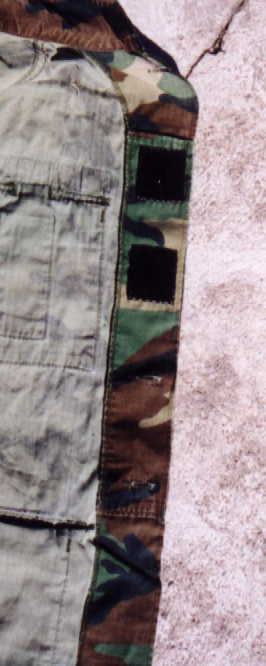 |
After everything is dry, pull out about two arms length of dental floss (about 50 inches) and thread and needle. You now want to sew one line around the entire edge of the piece. Only one is necessary. Important! Be very careful sewing the dental floss into the hard Velcro! If you do it too fast and are careless, the hook will eat up the wax and chew up the floss! If this happens you'll need to cut the thread off and do it all over again. Go slowly with the needle, making sure the floss doesn't come in contact with any of the hooks when your pulling it through. If it starts catching a hook, pull it out in the other direction a little, then try pulling it through again. After one line all around the Velcro piece is finished, tie off the knot as you would with a knot on the netting. Repeat the same procedure with the soft piece of Velcro on the other side of the suit, using the buttonhole as the center point (be sure to only go through one piece of the fabric and not through to the canvas). Repeat these processes to any of the buttons you wish to replace with Velcro.
| Back: Step 9: Blending and spray painting the suit |