DEVELOPMENT OF THE PRACTICAL LOWRACER
Dan Duchaine, owner of Pharobike
What is a lowracer recumbent? It
usually means that the seat is very low to the ground, and most of these
designs are short wheelbased ones, with above-the-seat steering. Rather have a
hard and fast seat height cutoff, us lowracer aficionados will call any design
that has a seat base height below the wheel axle height (the biggest of the two
wheels) to be a recumbent lowracer.
So what’s the difference between a lowracer and a “practical” lowracer? Again, no ideal definition. But in my mind,
a practical lowracer has complete front wheel clearance so there is no
interference either between the crankarms and (more importantly) the drivechain
with the front wheel. In the real world, you should be able to pedal the
lowracer at a low speed and still have enough turning radius of the front wheel
to execute a U-turn. The majority of lowracers, since they are considered
offroad (for the track) machines, allow chain interference, sacrificing
maneuverability (and safety) for less friction losses from the extra of pulleys
needed to hike the drivechain over the front wheel.
Why would
anybody want to ride a lowracer over a more conventional recumbent design? Anyone who has ridden a lowracer they’ll
tell you: they feel....more fun. Being
close to the ground imparts a sensation of great speed, even at low
speeds. Also, there is a great sense of
security being so close to the ground. The reality, all bike riders eventually
fall down. On a lowracer you don’t fall
far. Additionally, because your center
of gravity is so low, and you have so much bike ahead of your body, on panic
stops, you never have the sensation of launching off the front of the bike. And
don’t disregard the “coolness” factor.
When I used to ride my Presto and V-Rex on the bike path, most of the
people looking at me thought I had just won some drunk circus clown’s trick
bike in a poker game. I started getting get respect with my Rotator Pursuit (18
inch seat height), but my Lowfat, my practical lowracer, would stop auto traffic, with drivers who
had never been on a bike for years, would inquire: where can they get one. Why? Because they thought that it would be
fun and cool. Not the kind of bike that only a trained bear would ride. The
ultimate “lowrider”.
I couldn’t find a lowracer that was in
commercial production that I liked. So I decided to build my own design. Since I had just built a Caterham 7 sports
car, and a complex labyrinthine Lowther loudspeaker system, a bike project
wasn’t scary. But building them in quantity was a nightmare. What’s the old saying: “How do you make a
small fortune in the recumbent business? Start with a large fortune.”
Everything started with me buying a set of Peter Ross’s Festina lowracer full
scale drawings. I pinned it up on my
bedroom wall. And over the next few
weeks, I would scrutinize the drawing and ask myself “What’s wrong with this picture?” I’m sure Peter would reply,
“Nothing you bloody ingrate!”, but remember these were the early version of the
Festina (drawn in 2/96).
In a practical sense, the first thing I
wanted to fix was the drivechain issue.
As routed, the rider would only have a few degrees in each direction to
turn the front wheel before the
drivechain hits the front tire. Granted, on a track, and/or
enough speed, one can steer passably by leaning. But there is no such thing as low speed maneuvering unless the
drivechain is routed up and over the front wheel. I had seen a photograph of the Lightning M5 lowracer, and saw how
Tim Brummer had just doubled up his Lightning P-38 pulleys to route the chain
over the front wheel. So I borrowed
(okay, stole) that idea and pencilled it in.
Next, I was not terribly happy with using a 20 inch front wheel. I do like the practicality of having similar
wheels front and back, but it was obvious that any lowracer with a 20” front
wheel was going to fit only riders at about 5’9” and above. If I ever wanted to sell this lowracer, it
had to fit more people, hence, the use of a 16 inch front wheel. At this point I had to make a decision on
which 16 incher: the more common juvenile 305mm one, or the recumbent-friendly
349mm size that had the better tire selection.
My gamble was to use the 305mm size for two reasons. I had found a
fairly okay semi-slick tire made by LHR, with a corresponding size in the rear
20 inch size (I like things to match).
And I was thinking that Bike E was doing so well in their sales, that
they would probably find a way of getting better tires made in their
305mm/406mm sizes, which they have done. We now have LHR, Primo V-Monsters, and
Primo Comets, all in both 305mm and 406mm sizes. If only we had a Conti Gran Prix in 305mm...
Some other recumbent designs got their best features “borrowed”. I loved my
Kingcycle seat more than any recumbent seat.
So I duplicated the dimensions.
I liked how Rans had closed their mesh backs with stainless steel rod
and plastic zip ties, so I grafted that feature onto the Kingcycle seat. I thought the way that the Presto and
Haluzak put their seat frames through the frame, with the mesh holding the two
seat halves together, was pretty trick, so I rigged the seat the same way. I
liked how Rotator used round forkblades for his rear chainstays, but I liked
the elegance of Haluzak doing the same thing, but using a tapered wishbone seat
stay for both his front for and rear chainstays.
With all these neat modifications to the basic Ross Festina in my head, I
bought a drafting table and lots of graph paper. And I started drawing my
lowracer. The only other major
departure from most other lowracers I did, was tightening up the bottom
bracket-to-seat bottom distance. Most
lowracers like to see at least a 10 inch difference (or more) between the seat
bottom and the centerline of the bottom bracket, where the cranks are. But from
the discussions on the HPV e-mail discussion group, most riders complained with
such a high bottom bracket height. My
compromise was allowing no more than 6 inches between the two. This was
approximately the distance that Mr. Brummer used on his P-38, and not too many
people complained.
Bill Haluzak welded up the first prototype. He
did a great job. And he was infinitely
patient with me. How did it ride? Great.
Almost perfect. What was wrong?
Only two things structurally: because the pulleys were doubled, side by side,
the drivechain would graze the upper inner right thigh. The first solution was to increase the width
of the pedals away from the crankarms (called the “Q” factor) with a little
spacer set called Kneesavers. And on
the redrawing of the second prototype, I placed the seat further away from the
front of the bike, so that the upper inner right thigh was away from the
drivechain. This modification would usually mean that the shorter rider
wouldn’t fit on the bike, but a bit of blind luck bailed me out of this
problem; more on that later. The other flaw from the first prototype was having
to raise the seat height by one inch.
Otherwise, the drivechain would cause a buzzcut through the seat mesh
bottom when the chain got on the 28 tooth cassette
sprocket.
The next step was to outfit the bike with components.
I knew that I couldn’t compete with the big recumbent companies if I was going
to get the usual bike dealer wholesale prices. So I attended Interbike, and I
walked around with a gram scale and a calculator, and kept telling the
component companies “I’m an OEM”. I got some great prices. Of course I had to
buy 50 or 100 of every piece. My goal
was to find the best components for the job, but they had to be light (lighter
than Shimano) and inexpensive. Since I was always a bike lightweight weenie (I
had a Teledyne Titan in the 70s), I think most recumbents are too damn heavy
for the price you pay. My goal was a 25
pound lowracer, at under $2000 retail. Lots of components came out of Taiwan,
directly imported by me via DHL. Rims were from the Czech Republic (the only
company would make 24 hole, 20 inch rims). Brakes were from Portugal. I’d pick
a really inexpensive Dotek crank, which was the lightest I could find, but pair
it with a TUV-approved and rebuildable bottle bracket and Vuelto laser cut
chainrings. I made sure that all the
bolts on the bike were either anodized aluminum or stainless
steel.
And one day I stumbled onto this odd gizmo called the Power
Saver, a little extension that dropped your pedal down below the pedal hole.
Shimano did the same thing years ago with some road pedals. I wanted them
simply because they spaced the pedals out about the same distance as the
Kneesavers and were (at the time) about one-fifth the price. The biomechanics
involved is this: in reality, a bicycle rider doesn’t pull “up” on the passive
leg when the other leg is pushing down on the opposite pedal. In reality, your
so-called “pulling leg” is actually pushing as a counterbalancing force from
two things: simple gravity, and the plyometric muscle rebound stretch from the
passive leg hamstring. So if you are exerting 200 pounds of force on your power
leg, and your passive leg has a counterbalance of 40 pounds, the actual force
the crank is 160 pounds. In the case of
the Power Savers, I use very short cranks (either 140mm or 150mm), because at
full extension, the Power saver adds 20mm extra length. Your “power” leg feels it’s pushing on a
regular-length crank. Except on the passive leg gives you an effective passive
crank length of about 120mm. So these
Power Savers do four very important things for a lowracer: 1) It increases the
Q-factor to clear the drivechain from the inner thigh. 2) It causes more power
because it lessens the passive leg plyometric hamstring rebound. 3) Since the
passive leg is not drawn as far back (remember, the crank length has 20mm less
millimeters)your handlbars can be adjusted very low, below your face. 4) Using shorter cranks allows a very short
boom extension with no crank/front wheel interference. Most lowracers use a
boom extension of 18 inches or more.
The Lowfat, because of the short cranks and PowerSavers, the boom
distance can be as short as 13 inches (it is an adjustable boom). This allows
riders down to 5’6” to ride this lowracer.
Bill Haluzak welded up the second prototype.
Since I was using very thinwall tubing (.035” wall), some of the key
stress points are reinforced with sheet metal gussets. The aluminum inner adjustable boom and the
seat frames were both heat treated to T-6 hardness. The pulleys were injected molded, rather the heavy and expensive
lathe-turned ones that Lightning uses.
The pulley bolts are hidden inside frame with custom stainless steel
inserts. All cables were now routed inside the frame.
I’m very particular about things matching on
a bike: same rim extrusions, and tires front and rear. Seat mesh, its piping, cable housing,
brakes, handlebars, chainring, and even the zip ties, are all color matched.
Most of the aluminum parts are hand-polished. Little details like this show the
potential purchaser that they recumbent is from a real bike company, and not
some mongrel experiment out of
garage.
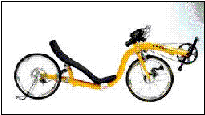
Specifications:
Wheelbase: 41.25”
Seat height: 10”
Bottom bracket height
(adjusted for a 5’10” rider) 15”
Weight (without pedals): 25 pounds.
Rear wheel: 20” (406mm) rim with 24 spokes
Front wheel: 16” (305mm) rim with 16 spokes
Gearing: 21 speed
Rear Hub: Sachs 3X7 with 11-28 cassette
Rear derailleur:
ESP 9
Cranks: Dotek 150mm/140mm with 48 tooth chainring
Handlebars: adjustable, detachable, with 18”width
Brakes: Vuelto all composite (plastic) levers and cantilevers
Tires: LHR semi-slick, blackwall
Chain: Taya, with
2 breakable links
Misc.: Handlebar mirror, safety flag (3-section)
Sizing: One frame size. For riders 5’10”, the standard setup is the 15” boom,
150mm cranks, with Power Savers. Under 5’10” uses the 10” boom, 140mm cranks,
and either Power Savers, or (for the shortest riders)
Kneesavers.
Options: Primo Comet tires and tubes will save one pound over LHR
tires
Tektro Mini-V brakes will
save 8 ounces over the Vuelto cantilevers.
(Note: Mini-Vs will not
clear LHR tires)
Pedal recommendations: Bebop or Speedplay. We also have dual sided (flat on
side/SPD other) blue-annodized Welgos always in stock for around-town
riding.
Custom options: Special Lowfat using a Zipp rear hub, Real aluminum cassette
and titanium spokes, with Mountain drive bottom bracket (saves 3 pounds). It is possible to build Lowfat that weighs
21 pounds.