
The Fake Patek comes with a metal deployant clasp and black leather band. The band is screwed into the lugs with a thick pin with a screw on one side.
Pic 3: Patek band and clasp
There are two quick correctors on the 9 o'clock side of the case, and two more on the crown side of the case.

Pic 4: Side view showing two of the quick corrector buttons, the crown and screw-in lugs
The dial is painted silver and has a month and year at 12 o'clock, day at 9 o'clock, date at 3 o'clock and a 24-hour sub-dial with day/night display at 6 o'clock. I originally thought this was a moonphase display, but it didn't seem to change when I set the date. Only later after disassembly did I find that it is in fact a day/night indicator and is directly fixed to the 24-hour dial. I have no idea why you need both 24-hour and day/night indicator but there you go. You'll see more of this when we get the dial off. The other functions mostly seem to work, including the 24-hour subdial, with the exception of the month and year indicators which do not change at the end of the month. You need to hit the quick correctors to set these. The watch is definitely not a perpetual calendar though, and you'd also need to correct the date every month.
The numerals are actually applied to the dial and polished along with small pyramid shaped markers and 3,6 and 9. All hands are simply polished steel without a trace of paint (luminous or otherwise). The crown is undecorated, but has a hacking function so that the sweep seconds hand is stopped when the time is adjusted. However after the crown is pushed back in, the seconds hand shoots round the dial to a random position, so the hacking mechanism doesn't actually achieve anything.

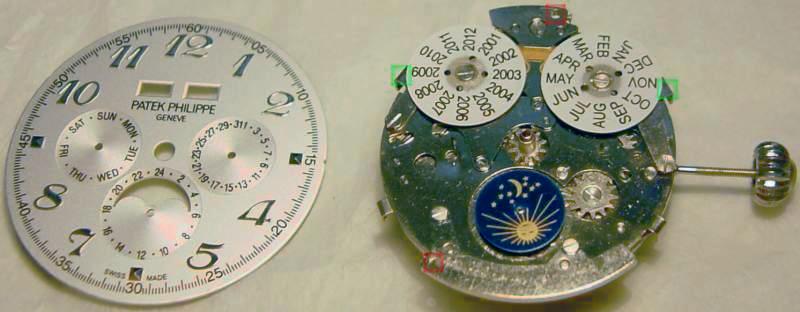
Pic 5: Close-up of Patek face (note that the month and year don't line up - not even close!)
The Patek comes with a transparent case-back that is screwed onto the case with 4 screws (part of the reason that I picked this particular model was that the screw-back looked easy to get into). The movement is completely unfinished, and the only marking visible to the naked eye is the phrase "PATEK PHILIPPE SWISS MADE" stamped across the back of the rotor. Or so it appeared...

Pic 6: Close-up of the back of the fake watch. Note the complete absence of any finishing or decoration, except for the words stamped across the rotor and case back.
Since the aim of this exercise is to strip the whole thing down, the obvious first step is the removal of the leather band and case back. The bands come unscrewed easily enough, but there is enough Vaseline around the pin and screws to equip the entire Dutch adult movie industry. The case-back was also easily removed by simply unscrewing the four screws. With the back off, we can finally see the lovely white spacer ring in all its cheap plastic glory.

Pic 7: Fake with the case-back removed
After pressing down the stem release catch on the back of the movement, the crown and winding stem was released and pulled out. The spacer was also removed, but before the movement and dial could be taken from the case, the four quick corrector pegs would have to be removed.
![]()
Pic 8: Watch with crown and plastic spacer removed. The movement is now held in place solely by the quick corrector pins on the inside of the case (red).
The removal of the four quick corrector pins proved to be slightly tricky, as they were held in place on the inside with C-clips. I eventually managed to get these off by pushing down simultaneously with two screwdrivers, one on either side of the C-clip. Luckily none of the C-clips escaped into the watchmakers triangle, and I carefully set aside all the clips, pegs and other case parts.
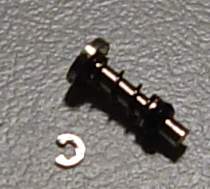
Pic 9: Close-up of the quick corrector pin and C-clip. The c-clip sits in a notch on the quick corrector pin and holds the quick corrector in place on the inside of the case. As a secondary function, it also keeps the dial in place.
The case was then flipped over onto a piece of lintless paper, and the movement dropped out of the case. As a byproduct of the movement's removal from the case, the year and month indicators now line up. I assume then that the misalignment problem was caused by the movement turning slightly within the case (its not held in place by anything but the spacer and winding stem), and the quick corrector pin jamming against the lever on the side of the movement.

Pic 10: Uncased movement, dial-side up.
Next up was removal of the hands and dial. All the hands were removed, and the dial was removed from its fittings on two plates which were screwed to the top of the main plate. With the dial removed, the construction of all the subdials becomes easier to view. The year and month rings are identical in construction - one has 12 months, and the other has 12 years (2001-2012). These are operated solely by the corrector buttons on the side of the case. The day/night dial is attached directly to the 24-hour hand in the 9 oclock position, and as the 24-hour dial reaches midnight a small spoke moves the day and date forward.
Pic 11: Dial and movement with dial removed. Note the two "flying dial plates" attached to 12 oclock and 6 oclock which serve only to house a screwhole (red box) for the dial pins. Normally the dial will attach directly to the main plate of the movement. The year and date appear to be set only by the corrector pins (green box).
The year, month and day/night plate were then removed to reveal the mechanism underneath. As you can see, the year/month indicators have an identical construction, with a 12-spoke wheel underneath the subdial that is advanced by pushing the corrector lever.
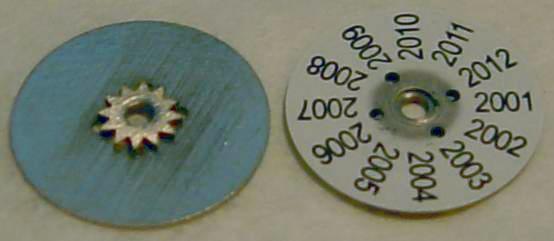
Pic 12: Construction of the month and year subdials. Note the 12 spoke wheel which is pushed along by the corrector.
Under the subdials you can see that the corrector pins are the only mechanisms that can advance the month and year display.
Pic 13:Month and year mechanism. Operation of the corrector lever (blue) pushes the plate (green) against the spokes on the bottom of the subdial. The spring (red) clicks the subdial into position.
The 24 hour hand has a slightly different construction though and also drives the date ring. A spring underneath the day/night dial advances the date once per day as the dial turns. Due to the spring construction, if the time is then set back again the date is not set back.

Pic 14: 24 Hour dial and date driving mechanism. A spring under the dial rotates with the day/night display (green arrow) and drives the date wheel. If the day/night display is moved anticlockwise (when the time on the watch is set back), the spring is pulled over the date wheel without setting it.
After removal of the subdials and associated springs and wheels I turned over the movement and removed the Rotor. This operation revealed the true nature of cheap copy watch production values as I discovered that amazingly the "engraving" on the back of the rotor turned out to be simply on a thin peice of metal that was stuck to the rotor with (I kid you not) double-sided sticky tape ! I never knew the chinese watched Blue Peter. Actually I prefer the raw industrial look of the rotor without the stick-on cover, but there you go.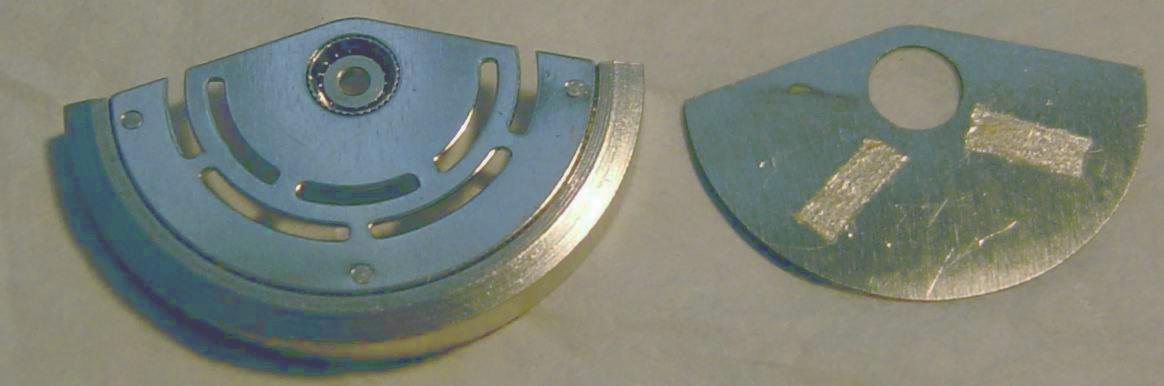
Pic 15: Rotor with stamped cover removed.
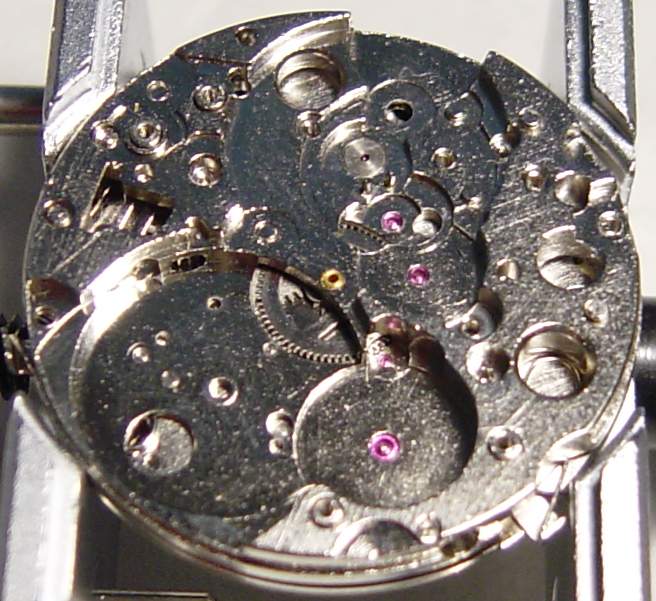
With the rotor removed, we can get a good look at the business end of the movement and it's not pretty. All of the plates (like the other components) are unfinished (or only very roughly smoothed). I'm assuming that you know the main parts of a watch movement and there is nothing particularly surprising about this one. The rotor moves the winding train which winds the watch. A monometallic balance again is fairly typical, and is held in place by a Chinese incabloc lookalike (Chincabloc?).
Pic 16: Movement with rotor removed. Showing winding train and balance.
With the bridge removed, the mechanism that the watch uses to wind the mainspring from the rotor can be viewed.
Pic 17: Close-up of winding train. The rotor (green) drives the click wheels (red), which then drives the winding train (yellow, purple) and drives the crown wheel (blue).
Next to come out is the balance wheel, spring and cock. The balance wheel construction is fairly standard for a cheap watch and doesnt appear radically different from an ETA.
Pic 18: Balance from underside. Note the nasty black colour of the jewel (green box) underneath the balance. Also the usual laser mark (purple box) on the balance wheel.
Unfortunately I broke the shock spring when trying to open it to remove the cap jewel. Maybe this is just my amateur clumsiness, but then I've removed the incabloc springs from my ETA movement 4 or 5 times without breaking any. I think I'll blame it on the cheap movement instead. Looking at the watch through a loupe reveals that the construction of the balance spring is again fairly standard, with the end held in place by a screw and a separate adjuster for the dog-leg on the spring.
Pic 19: Close-up of the balance assembly. Note the bottom of the broken off shock spring is still stuck there (green box).
Underneath the wheel train bridge, the wheel train itself holds no surprises. However, the wheels don't appear to be as well constructed as an ETA movement as the pinions aren't held as securely as they are in the swiss design.
Pic 20: Close-up of the drive train. The mainspring barrel (green) drives the wheels (red to purple to yellow) which in turn drive the escape wheel (orange).
The escape wheel is a vital component of every watch, and is a piece that regulates the timing. As such, I wanted to have a close look at this critical piece and see how it compared with the ETA. Unfortunately a close inspection with a 10x loupe revealed the worst. The escape wheel was not only badly polished, but slightly misshapen and had a large lump of dirt on one spoke which could not easily be removed.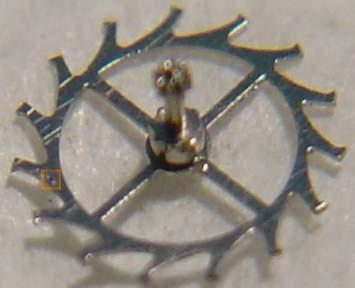
Pic 21: Close-up of the escape wheel. Note the poor finish, and the dirt (orange).

Pic 22: Close-up of the keyless works. This is a very primitive construction compared to an ETA movement.
Pic 23: Plate with all the wheels removed.
Now that all the wheels have been removed, the only remaining task is to strip down the remaining parts of the movement on the dial side of the plate. For this I turned the plate over and removed the remaining month/year components and a couple of covers that held some of the wheels in place. The top plate was then removed, revealing the construction of the day and date mechanisms. These are identical to the month/year mechanism, with the quick corrector pusing a lever up against a spoke on the wheel and a catch to click the wheel into place.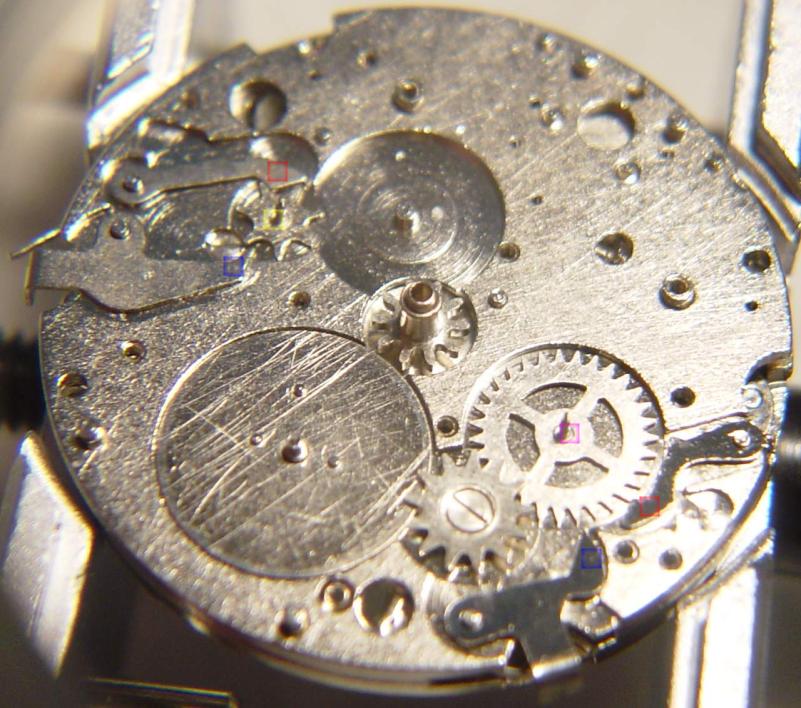
Pic 24: Dial-side under the top plate. Note the construction of the day (yellow) and date (purple) wheels, with the quick correctors (blue) and the catches (red).
These wheels, levers and springs were then removed and the second plate was then unscrewed to reveal the final components of the watch. This final layer of components includes two pretty hefty springs which hold back the quick corrector levers for the day and date. I'm not sure why these springs are so big, especially since the month/year correctors didnt use springs at all (just the sprininess of the levers).
Pic 25: Dial-side view of the main plate.
Finally, I stripped all the remaining components from the main plate. Except for the bottom shock spring - since I'd broken the top one I decided not to push my luck with the bottom one.
Pic 26: Main plate, with all components stripped.
Well thats it. A fully deconstructed fake. I hope my (rather average) photographs have given you an insight into the wonderful world of the copy-watch. Even from my minimal knowledge there appears to be a big difference in quality between this movement and a base ETA. All the bridges and plates are scratched to some degree, mechanisms are clunky or don't work at all, and critical components such as the escape wheel are given little attention. Anyway now I have to put the thing back together, but to be honest I'm not in any rush to put this back on my wrist.
Pic 27: All the components (neatly stored in compartment trays of course!).
Coming soon.. anatomy of a fake Rolex... Back to part 1