
Click on image below to view animation.

 This tutorial will show how to animate circular ripples of water. Start with a new scene file in Bryce. Goto the File menu to open the Animation Setup window. Create an animation that is 10 frames long at 15 frames per second.
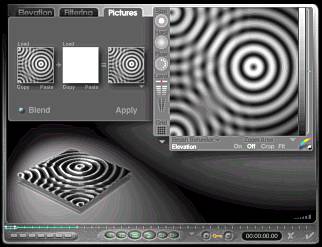
Create a terrain object and click on the [E] icon to get into the Terrain Editor. Bryce does not allow you to load AVI video files into the Terrain Editor to animate terrains. However, we can import a series of sequential bitmap images (or TIF files) to achieve the same result. Click on one of the thumbnails below to download the sequential image files that I have prepared for you. The images are in JPG format to save space, so you'll need to convert them to BMP or TIF format. You can create your own images using the Texture Fill feature in Corel PhotoPaint. Click Here to find out how.
 Single Ripple. |
 Three Ripples. |
 Single Ripple.(offset) |
With the timeline set to the first frame, load the Frame01 image into the Terrain Editor. Click Apply and the preview terrain will look like the ripples. You can adjust the height of the preview terrain by holding the Ctrl key while click-dragging the mouse.
Click the + sign next to the Key to set a keyframe for the Terrain:Geometry.

Advance the timeline to the next frame.
Load the Frame02 image into the Terrain Editor.
Click Apply.
Click the + sign to set the Keyframe.
Repeat these steps until all ten frame images have been loaded. The ten images represent one wave "cycle." You can create multiple "cycles" in the Advanced Motion Lab (I'll show you how in a moment.)
You can use the  keys at the bottom of the terrain editor to playback the animated terrain. Note: It may play back slower than real time. Leave the Terrain Editor and return to the main window. You can render a quick wireframe animation to see how it looks in real time. Go to File menu and select the Render Animation dialog box. After selecting your settings, hold the Shift key as you click the 'check mark' at the bottom right corner. Bryce will qickly render a wireframe version of your ripples. Neat, huh?
Now it's time to apply a texture to your terrain. Instead of using one from the Waters & Liquids presets, select the Glass library and choose the texture called Water.
In order to get this wave cycle to repeat itself, we'll need to get into the Advanced Motion Lab. Click on the  icon to get into the lab. Click on the word Terrain 1 to expand the hierarchy. To the right of the word Geometry, select all ten of the keyframes (the little vertical lines.) Do this by holding the Shift key as you select each one. As you select them, they will change to white.
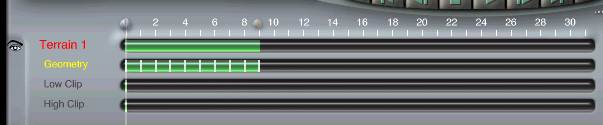
Once they are all selected hold the Ctrl key and then click on one of the keyframes and drag them to the right of the timeline. This will copy the keyframes.

You can keep copying keyframes in this manner until you have the number of cycles that you want. Once you're done, render the animation and enjoy!
Return to