
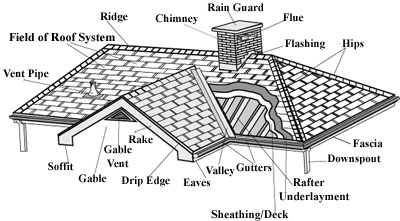
INSTALLING COMPOSITION SHINGLES
TAKING OFF THE OLD SHINGLES
     If it is necessary to take off the old shingles, it will save you a lot of time
to buy a roofing shovel like the one below.  It has a keel on the back to pry
up the old roofing, and has a v-cut edge which lodges itself under the nails
and pulls them out at the same time.


ROOFING SHOVEL
PREPARATION

DETERMINE THE MATERIALS NEEDED
* Roofing shingles are sold in "squares." Most asphalt shingles are baled together
with three or four bundles per square.
* First, measure the length and width of each area of the roof. For each area of the
roof, multiply the length times the width. Then add the results for the total square
feet of shingles needed. Measure all dormers and extensions.
* Divide the total square footage by 100 and purchase that many squares of shingles.
* Purchase an additional 10 percent of the number of shingles for cutting, waste and
starter courses and to save one bundle for future repairs.
* You'll also need about 2-1/2 lbs. of roofing nails for each square of shingles. Use
hot-dipped galvanized roofing nails, either 11- or 12-gauge with a 3/8" diameter
head, or follow the shingle manufacturer's recommendation for the type of nails to
be used.
* Use 1-1/4" nails for new roofs, or 1-3/4" nails for re-roofing or repairs.
* If you are starting a new roofing job, or a complete re-roofing project, you'll also
need enough 15-lb. roofing felt to cover the entire roof area underneath the
shingles.
* You'll need roofing cement for edges, flashings and ridges.
DRIP EDGES
     The first item to be put on a new roof is the drip edge along the eaves.  Drip
edges are L-shaped strips of aluminum or galvanized steel that are nailed along the
eaves and rakes of your house to prevent wood rot in the roof-deck edge.  Always place
the wider side of the drip edge on the roof and let the other end hang over the exposed
edge of the roof deck.
     Aluminum drip edging should be nailed with aluminum nails. Galvanized roofing nails
will cause a chemical reaction that will result in disintegration of both metals.
     After  drip edges are applied to the eaves (only the eaves, not the rakes), lay the
underlayment over the first section of the roof.
     Drip edges for the rakes may be applied in two different fashions.  One style is to
put them over the underlayment.  An increasingly popular method is to put them over the
shingles.  This method prevents rain from blowing under the shingle edges.

FELT UNDERLAYMENT
     Felt underlayment is a black tar paper consisting of organic felt saturated
with asphalt, and comes in 15 or 30 pound felt.  Asphalt shingles require a 15 pound felt
(use 30 pound for cedar shingles).  The underlayments provide extra protection to a roof
system, and acts as a vapor barrier and reflects moisture that might have been able to
leak under the roofing shingles.
     Underlayment must be applied flat and unwrinkled.  Shingles should be applied as
soon as possible after the application, to avoid wetting and wrinkling of the
underlayment.
     Lay felt over entire deck parallel to eaves, overhanging 1/4" to 3/8" (I prefer 1")
with fasteners placed every 2 feet across the lower edge and with 2" overlap parallel
to eaves and with 4" end lap parallel to rake.  End laps shall be staggered 6 feet apart.
Corrosion-resistant drip edge should be placed over the underlayment at the rake and
beneath the underlayment at the eaves.


SHINGLE APPLICATION

ASPHALT SHINGLES - ESSENTIAL KNOWLEDGE
     Asphalt shingles were introduced into the roofing market in the late-1800s as a by-
product of making tar and asphalt-impregnated felts for flat roofs. Early shingles
contained up to 33 percent cotton or wool fibers derived from rags.   From the early
1940s to the late 1970s asphalt shingle mat was comprised of organic cellulose fibers
derived from recycled waste paper and/or wood fiber. Although organic mat is still
available, the dominant base material since the late 1970s has been inorganic
(fiberglass) mat.
     The fiberglass mat typically used in the asphalt shingle industry is lighter than
organic mat. Fiberglass mat doesn't necessarily perform better but does allow shingles
to meet Class A fire resistance ratings, while organic mat only meets Class C. Organic
mat is presaturated with asphalt and then coated with a mineral-stabilized material
(limestone, slate, flyash, or traprock). Inorganic (fiberglass) mat is coated with
mineral-stabilized material but not presaturated. The mineral-stabilized coating fills
the voids between individual mats while at the same time providing increased resistance
to fire and weather.
     The typical asphalt shingle had been for many years a 36 by 12-inch three-tab strip
shingle, but now the THREE TAB COMPOSITION SHINGLE SIZE IS
39 3/8" X 13 1/4".  The cut-outs between the tabs create the illusion of
individual shingles.  Within the last five or ten years,  "Architectural" or laminated
shingles that simulate wood and slate shingles or shakes have become increasingly
popular for higher end housing.  These shingles are made of two or even three layers
laminated into a single unit.


SHINGLE PATTERN
     Apply shingles over properly prepared rood deck, starting at bootom of roof and
working across and up.  Our shingles are applied with a 5 5/8" offset.  The supplier
recommends a 6 9/16" offset, and will accept a 4 9/16" and 5 5/8" offset.  The term
"offset" refers to the distance each shingle is offset from the one below it to
prevent leaks from working through the cutouts.  All patterns will protect the roof
equally well.  The 5 5/8" offset has a re-occurring pattern every 7 layers, and the
6 9/16" offset patern every 6 layers.

SHINGLE OFFSET:
Cut out left edge
1. 5 5/8" 5. 28 1/8
2. 11 2/8 6. 33 6/8
3. 16 7/8 7. 39 3/8
4. 22 4/8
At the start of each course of shingles, you cut off part of the first shingle,
working in 5 5/8" increments. The remaining shingles in each course are whole ones.
The resulting pattern aligns each cutout diagonally across the roof.
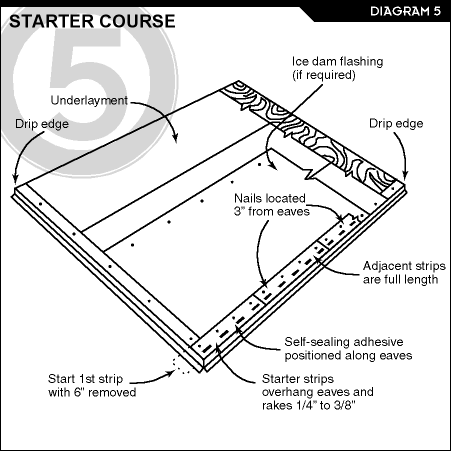
STARTER COURSE
In all types of shingling, an extra layer is always applied along the eaves. This is
because shingles in subsequent courses overlap at least once for double coverage, and the
first row needs a similar overlap. This layer is applied after the drip edges,
underlayment, and valley flashing are in place.
The easiest method of providing the extra layer is to apply a starter roll. This is
a 7-inch or 8-inch wide roll of mineral surface roll roofing that is nailed along the eaves.
It should overhang the edge of the roof by 3/4" to 1 inch.
If you neglected to buy the starter roll, you can use shingles as a starter course.
Starter shingles are made by cutting the 5 inch tabs off of a standard shingle, leaving a
long piece with the tar strip. The starter course should be "straight" for a good
beginning. Turn the shingle upside down, so that the tar strip is near the eave edge.
In order to offset seams, cut 6" off the left end of the first shingle. Begin
application at lower left rake of roof, then continue across with full length shingle,
nailed with up to 2-4 nails equally spaced across the shingle and nailed 3" up from the
eave.
The starter course can help straighten irregularities in the gutter board and drip
edge. Use a chalk line or simply align the starter course with the drip edge if it is
straight.
SHINGLE OVERHANG
     Establishing the shingle overhang -- Before shingling a roof, it is essential to know
how far the shingles will overhang the bottom (or eaves) and sides (or rakes) of the roof
deck. Ideally, all trim has been installed along the roof edges, and if used, metal drip
edge is also in place. In these cases I leave a 1-in. overhang along the eaves and the
rakes of the roof . Most shingle manufacturers recommend a 1/4-in. to 3/8-in., or 3/4-in
inch overhang, presumably to reduce the chance of the wind snagging the edge of the roof.

INSTALLING THE SHINGLES
     Begin first full shingle at lower left rake of roof.
     After the first course of shingles has been laid on top of the starter strip, snap
down a chalk line at the manufacturer's specified exposure, usually 5", to aid in
applying shingles.
     An optional band of asphalt plastic cement  may be applied to the rake of the roof
with each shingle course to enhance wind resistance and to resist wind driven rain.
     Start the second course of shingles on top of the first course. Place the cut-out
over the center of the middle tab on the center shingle. Continue placing shingles in
the second course to the end of the roof in each direction. Start at the center of the
roof for the third course of shingles. Again, place the cut-out over the center tab on
the preceding row, and continue to the end of the roof. Remember, a shingle cut-out
must never fall directly over another cut-out in the row immediately below it.
     The joints between the tabs must continue to be staggered. This means the joints
(cutouts) must not be aligned in adjacent courses. To do this, cut 6 inches off the first
shingle of the second course at the rake (side) of the slope. Cut 12 inches (one full tab)
off the third course, 18 inches off the fourth course, 24 inches (2 full tabs) off the
fifth course, and begin the sixth course with just a 6 inch length of shingle. Repeat
this sequence beginning with a full length shingle on the 7th course.
     Follow this procedure until you reach the ridge of the roof. Then start on the other
side of the roof in the same way you started the first side.

SHINGLE EXPOSURE
     Shingle exposure is the height of the shingle that will be exposed to the weather.
In most cases, the exposure of three-tab asphalt shingles is 5 in. Shingles are 1 ft.
high, so each successive shingle will overlap the one below it by 7 in.  I prefer an
exposure of of 5 5/8" .

5 5/8 INCH EXPOSED PER SHINGLE
(5.625") x2 = 11.25" or 11 2/8"
Chalk lines for top edge of every other shingle:
18 7/8"    63 7/8     108 7/8     153 7/8    198 7/8
30 1/8     75 1/8     120 1/8     165 1/8    210 1/8
41 3/8     86 3/8     131 3/8     176 3/8    232 3/8
52 5/8     97 5/8     142 5/8     187 5/8    243 5/8

NAILING
    Four nails are required per shingle (6 nails are required for high wind areas or
shear strength on steep pitches).
     Each three-tab shingle is fastened with four roofing nails-one nail an inch in from
each end and one nail above each cutout.  If the shingle has a self sealing strip, place
nails just below it, not in it or above it.  All nails must be driven straight, with the
heads flush to the shingle surface, never cutting into the shingle. Nails must not be
exposed (visible) on the finished roof. If the fastener does not penetrate properly,
remove it, patch the deck, and drive another fastener nearby.
    Nails must be 12 gauge, corrosion-resistant roofing nails with 3/8" minimum heads and
must be a minimum of 1-1/4" long.  Nails or staples shall be of sufficient length to
penetrate through roofing material and at least _ inch into roof sheathing or through the
thickness of the sheathing, whichever is less. use zinc-coated nails to prevent corrosion.
     New roofs require at 1-1/4" long nail, whereas, putting a new layer over an older one
requires at least 1-1/2" long nail.
     NAILS PER POUND:  For 1 1/4"", about 192 to 210 nails.

CHALK LINES
     Check for straightness every three or four courses (I prefer every second one) by
measuring up from the butts off the shingles at each end of the roof and snapping a new
chalk line on which to place the butts for the next course.
     After the first course of shingles has been laid on top of the starter strip, snap
down a chalk line at the manufacturer's specified exposure, usually 5" (I prefer 5 7/8"
[1/7 of a shingle width]), to aid in applying shingles. To chalk a line, place a nail or
have someone hold one end, and stretch the chalk line tightly, pick up the line and snap
it. This should leave a visible line. Continue snapping down chalk lines until you reach
the ridge of the roof. This simplifies the job of laying each succeeding course of
shingles in a straight line.
     It is not necessary to strike lines every 5 in (or 6");  I always strike lines in
increments of 11 6/8". When marking horizontal lines, place the end of the rule at the
starter-course line, and then make marks every 11 6/8 in. If working alone, strike lines
in increments of 22 in. or 44 in. The most important thing to remember is that all lines
are measured off the starter-course line rather than off the drip edge.

RIDGE SHINGLES
     As you near the peak of the roof, form both sides. You will need to possibly trim
the very top course of shingles in order to expose the 2 inch gap in the decking,
required for the roof vent. Nail shingles until you determine that the ridge vent
material will cover the remaining deck. Prior to installing the first piece of ridge
vent, you must calculate where to start. There must not be ridge vent over a rake
overhang and the start and end of the vent system must be equally spaced from the ends
of the roof.


     Generally, ridge shingles should be applied with the exposed ends facing away from
the prevailing  winds.  Put a shingle in place at each end and snap a chalk line along
one edge to keep the shingles straight.  Use a 5 5/8" exposure and put nails 1 inch
from the edges and just below the self-adhesive strip.
     When shingles meet in the center, trim the final shingle to fit, then cap the joint
with a shingle that has had the top portion trimmed off.  Nail at each corner and cover
the nail heads with roofing cement.
     When shingling a ridge from one end to the other, the last shingle should be
trimmed and capped in the same way.
      CUTTING RIDGE SHINGLES.  You can make 3 hip/ridge shingle from one
composition shingle, but cutting the three tabs.  Cut full shingles into three 13 1/4 x
13 1/8" hip and ridge shingles.

SHINGLING VENT PIPES
     The easiest way to finish around vent pipes is to purchase a vent pipe boot that
slides down over the vent pipe. It consists of a rubber gasket and metal flashing. If
you do not have a vent pipe boot, follow these directions.
     Place mineral-surfaced roofing material or metal flashing around the vent pipe
before laying any shingles. Cut a square of flashing material with at least 6" of edge
around the vent pipe (Fig. 7).
     Cut a hole in the center of the flashing that's large enough to fit over the vent
pipe.  Coat the bottom side with roofing cement, slip it over the vent pipe and nail it
into position.
     Lay shingles up to the vent pipe, completely covering the edge of the flashing
material. Set the ends of the shingles in roofing cement.
     Cut a hole in the shingle that goes over the vent pipe, apply roofing cement to
the bottom and nail it into position.


SHINGLING AROUND CHIMNEYS
     Place mineral-surfaced roofing material or aluminum flashing around the edge of a
chimney before shingles are positioned.
     On older roofs, you can use the old flashings for a pattern.
     Fit the new flashing around the base of the chimney, then cement and nail it into
place.
     Cut flashing strips into pieces measuring 7" x 10", then bend them in half to
7" x 5".
     Place these flashing strips against the chimney, seal the edge with roofing cement
and nail into place.
     Apply shingles up to the edge of the chimney, seal the edge with roofing cement and
nail the shingles near the edge of the flashings.

CONVERSION:
1/8 = .125" 5/8 = .625 2/8 = .250 6/8 = .750 3/8 = .375 7/8 = .875 OUR HOUSE: SHINGLES PER SIDE: 39 layers bottom to top (front and back). RIDGE SHINGLES: 51 tabs 12 1/2" x 12 1/2" Garage has 26 pieces. 6 1/4" overlay. ROOF DIMENSIONS: 42' 7 " North to South; 18' 8" per slope. GARAGE: Front 16' N-S; 16'6" Front Slope 16' 7" back slope; 34 layers shingles Back Garage Roof: 14'0" N-S SHINGLE EXPOSURE: 5 5/8"; LEFT EDGE OFFSET 5 5/8", repeats every 7 rows. OVERHANG: 1" bottom eaves; 7/8" sides NUMBER OF SHINGLES: 504 Front House, 669 back house, 165 Garage Front. COST: 20 YR - $8.86 25 YR $10.26 30 YR $12.00 Each bundle 21 tiles. Garage east took 8 bundles.